We digitally simulate a landscape similar to the paradise: very bright and full of moving clouds. Thanks to Kdenlive we can insert an actor into the scene and make him move as if he were really in such an environment, surrounded by a bright glow.
One of the best sides of computer graphics is the ability to create worlds by freeing up one’s creativity. Of course, you can also create fantasy scenes directly in the room, but it is obvious that this can be quite expensive: creating scenography requires materials and manual skills that not everyone has. In computer graphics, however, it is enough to have a computer and a lot of imagination. Of course, if we have a complete landscape in mind, in which to move the actors, the only practical option is represented by 3D modeling software. We must therefore create three-dimensional models, for example with Blender, and then insert the actors using the camera tracking tools (present in Blender). But if what you have in mind is a simpler scene, perhaps it is not necessary to complicate life so much. For example, if you want to represent an actor’s death and his arrival in paradise, all you need is a bright place with clouds. Making a shot of the scene is not possible, because heaven does not exist (or, at least, so far no one has managed to photograph it). And simulating it in a studio is not easy, because you need an extremely bright environment and the lamps cost a lot especially for large rooms. Furthermore, it is true that with fog machines or dry ice it is possible to simulate a fog, but clouds are a different and more difficult thing to replicate. Simulating such an environment with Kdenlive, however, is not particularly difficult. We have to work on 4 different levels: the first is a white base, which is used to give a diffused brightness to the whole image. Then we will insert a first layer of clouds, quite flat, because they serve to give a sense of the landscape in the distance. Then it will be the actor’s turn, which obviously must have been filmed in front of a green sheet. Finally, it’s up to a second layer of clouds, which represent the first floor and must therefore be more detailed (perhaps with some particular shape, so that you immediately understand that they are clouds). The green background on which the actor was filmed can be made transparent with the effects Chromatic key is rotoscope . Then you can also add a slight blur to the actor’s outline, adding a special operation on his alpha channel (in an image the channels are RGB for colors and Alpha for transparency). In this way it will have a less human aspect, to give an idea of the fact that it is a sort of spirit. The clouds in the foreground must be superimposed with the hard light mode, so they will seem to illuminate everything underneath them, and this contributes to the idea of ambient brightness. To give a touch of realism, we can use the transitions to move the two banks of clouds, since nobody expects to see them perfectly still. Among other things, there is another option: instead of resorting to photographs of clouds, as we have done, you can find videos (typically made from airplanes, balloons, or hikers who climb particularly high mountains). The films can then be inserted into Kdenlive and their background can be removed using the effect Chromatic key . In fact, these videos will basically be clouds and sky: to remove the blue sky and leave only the white clouds visible, just use the chroma key. As always, you can see the example video at the following address: https://www.youtube.com/watch?v=mOQDAJC99VU
 The actor is immersed in the clouds
  The clouds are on the move
 How to illuminate the actor
When creating a shot to be used in chroma key, it is necessary to think about how the environment we will build digitally will be made. Only in this way can the subject be properly illuminated. So how do we light up a paradise? In principle, a very bright place is expected to have diffused light. If we have a strong lamp we can point it to the white ceiling of the room, so as to obtain a fill light that does not produce particular shadows on the actor. Otherwise, two lights can be used from opposite directions so that one cancels the shadows produced by the other. But that’s not enough: to get a better result, it’s a good idea to use a rear light, which illuminates the actor from behind in order to produce a slight glow around his body, especially for the head. Usually, in fact, the spectators focus on the actors’ faces.
Let’s prepare the clouds
We are looking for cloud images on the web
 1 PHOTOS OF THE CLOUDS – The first thing to do is to find images of clouds: you can use a query like this above the clouds . In fact, the photo must have been taken above the clouds, because this is how the public tends to imagine a paradise.
  2 EDIT WITH GIMP – At least two images are needed, one for the clouds to be kept in the background, and one for the foreground ones. The images must be cleaned up, then they must be opened with GIMP and for each of them one must add the alpha channel .
 The actor on a white background
We superimpose the actor on the white clip
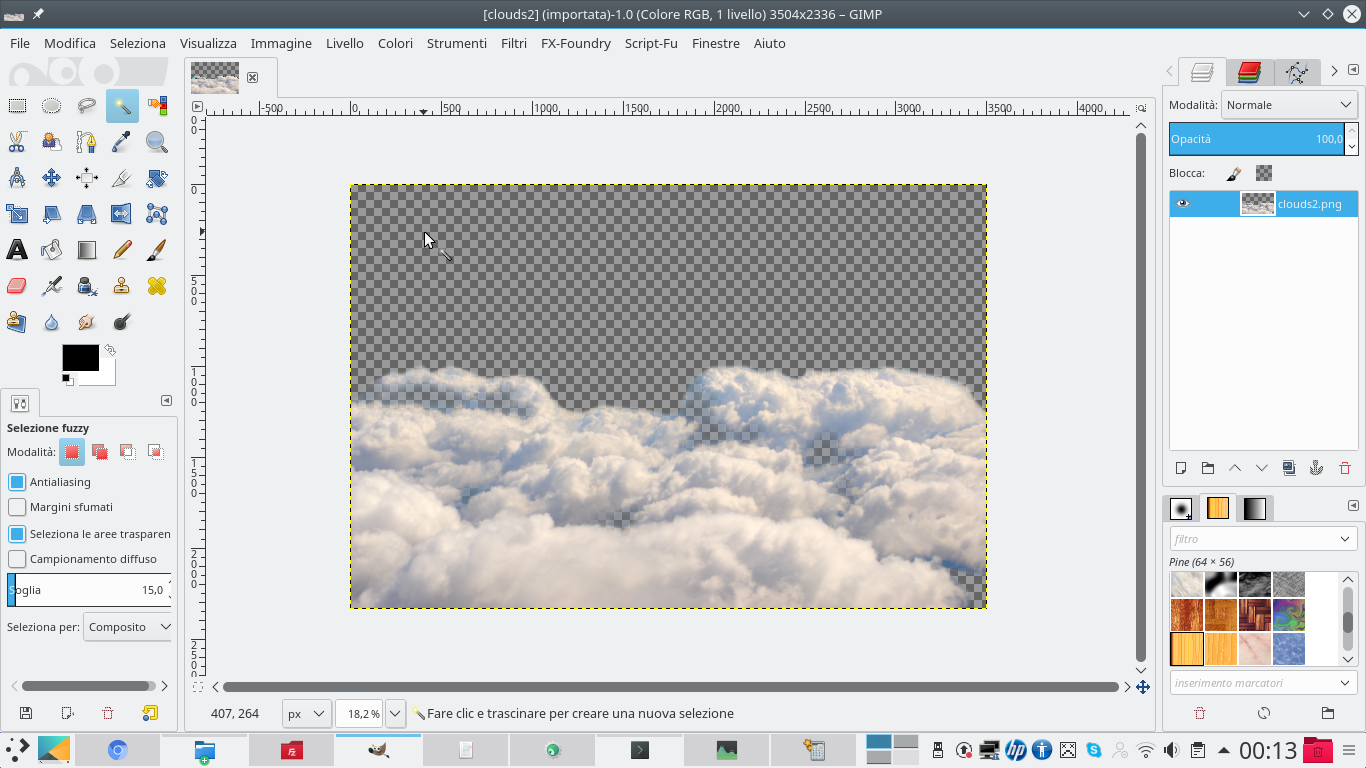 1 WITHOUT THE SKY – Using the lasso selection we can cut out the sky, thus separating it from the clouds. Pressing Delete we eliminate it, thus making the background of the image transparent. You can also use the fuzzy selection , for spaces between one cloud and another.
 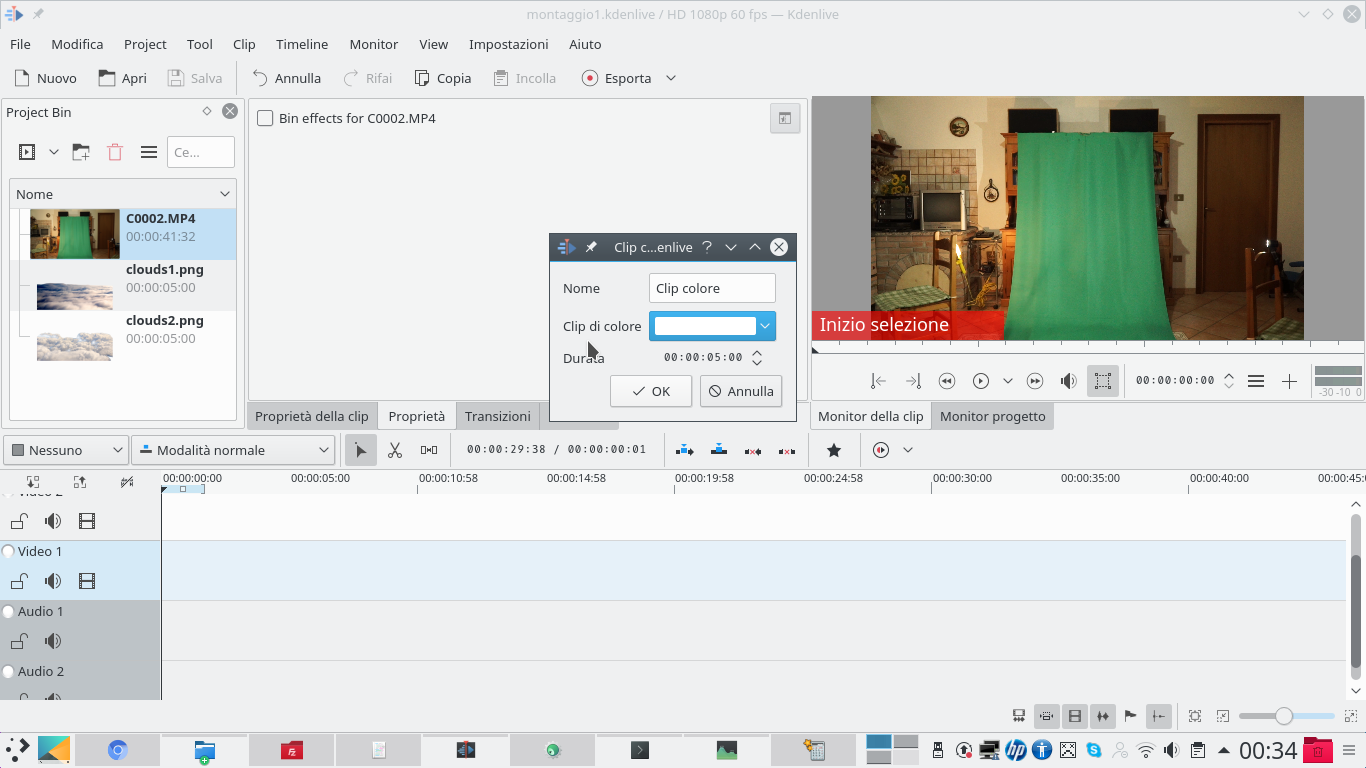 2 A WHITE CLIP– Created a new Kdenlive project, we insert the images of the clouds and the video clip with the actor on the green background. We also add a color clip with the menu Project / Add color clips by selecting the white color.
  3 THE ACTOR IS HERE – The color clip must be positioned in the lowest track, the Video1 . The video clip, on the other hand, goes to the highest Thrace, the Movie3 . Obviously, the movie must be cut where necessary with the tool Scissors and the color clip must have the same duration.
  4 THE COMPOSITION – The clip with the actor needs a type transition Composite . The transition must be extended to the entire duration of the clip, and must be referred to the track Video1 . In this way we can correctly overlay the actor on the white background.
 A blur in the outline
We make the actor’s outline blurred to mix it with the background
 1 CHROMATIC KEY – To delete the green sheet from the movie we resort to the effect chromatic key . We can insert more than one, adjusting the color tone and the variance of each of the effects we add, so as to cancel all the shades of the cloth.
 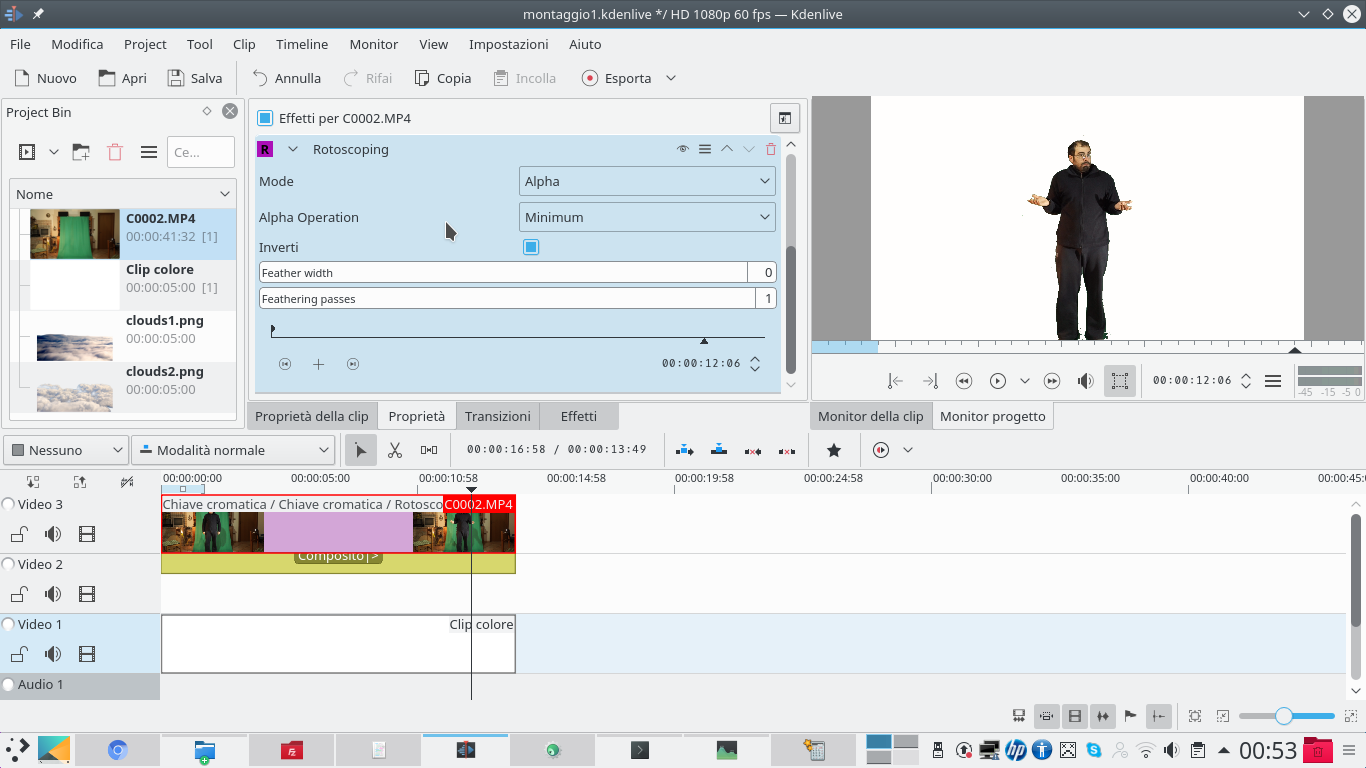 2 THE ROTOSCOPING – To remove the rest of the background in the actor’s movie, i.e. those parts that have not been covered by the green sheet, we draw the outline with the effect rotoscoping . There Alpha Operation must be set to minimum .
  3 SLIGHT BLURRING – We also add an effect to the clip Operation on the alpha channel . In this we set the operation to Blur and we bring the value of blurs quantity at such a level as to obtain soft edges but not too much.
  4 BACKGROUND CLOUDS – It’s time to insert the clip of the “background” clouds, the ones that will be most distant, in the track Video2 . This clip must have a type transition Composite , and the image should be stretched so that it is much wider than the frame.
 Make science as bright as possible
We can use special effects to add brightness to images
 1 AN ANIMATION – Moving to the end of the transition between Video2 is Video1 , create a new key frame and drag the image so that it scrolls more or less horizontally. Clouds must appear to move from left to right or vice versa.
  2 NEW TRACK – To insert the clip of the clouds in the foreground we need another track. By right clicking on the track Movie3 we can choose the option to create a new one above ( above ). It should be called Movie4 .
 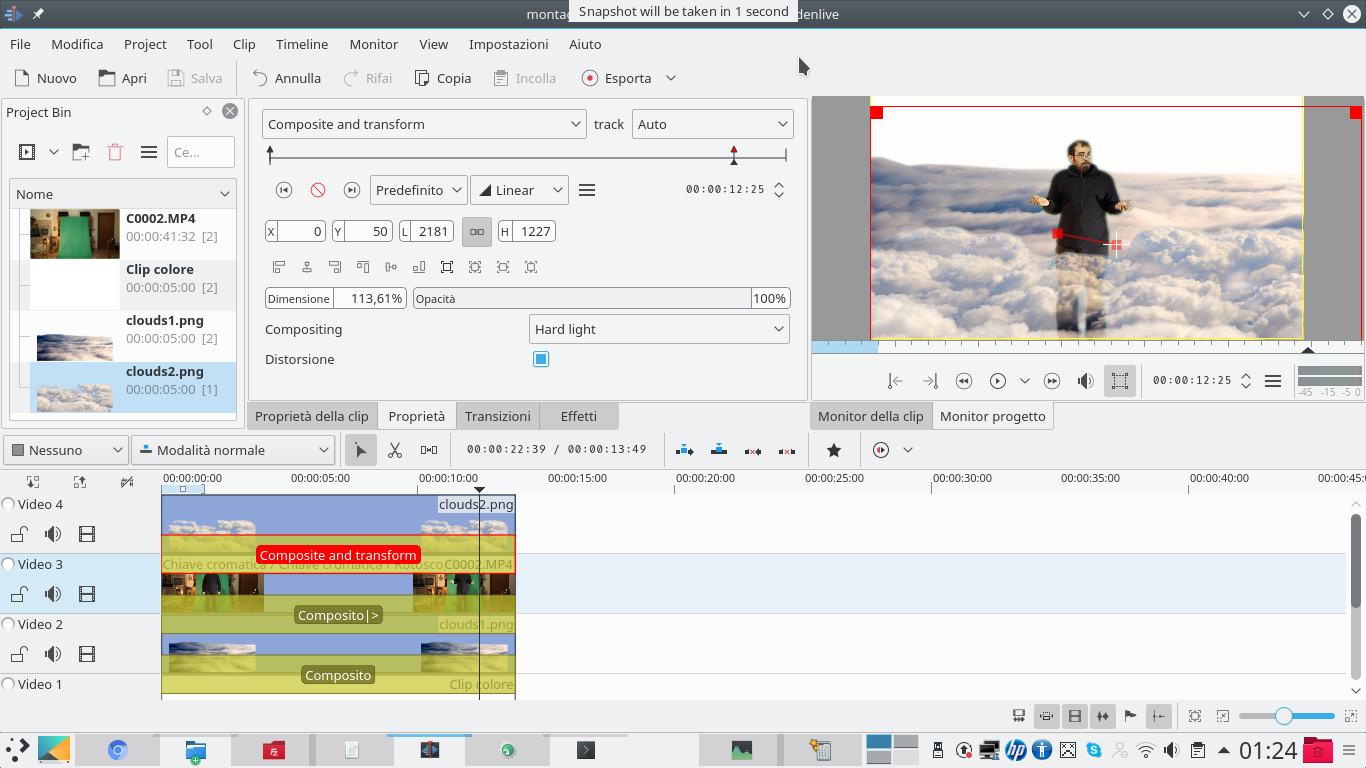 3 THE HARD LIGHT – In this new track you can insert the clip of the foreground clouds, with a transition of type Composite and transform referred to the track Movie3 or Video2 , depending on what is best, and with compositing Hard light .
  4 LEVELS OF LIGHT – The clip of foreground clouds can also be translated using the transition, but must be moved in the opposite direction to that of the other clouds. About the clip in Video2 , you can adjust the brightness with the effect Levels (raising black output).
 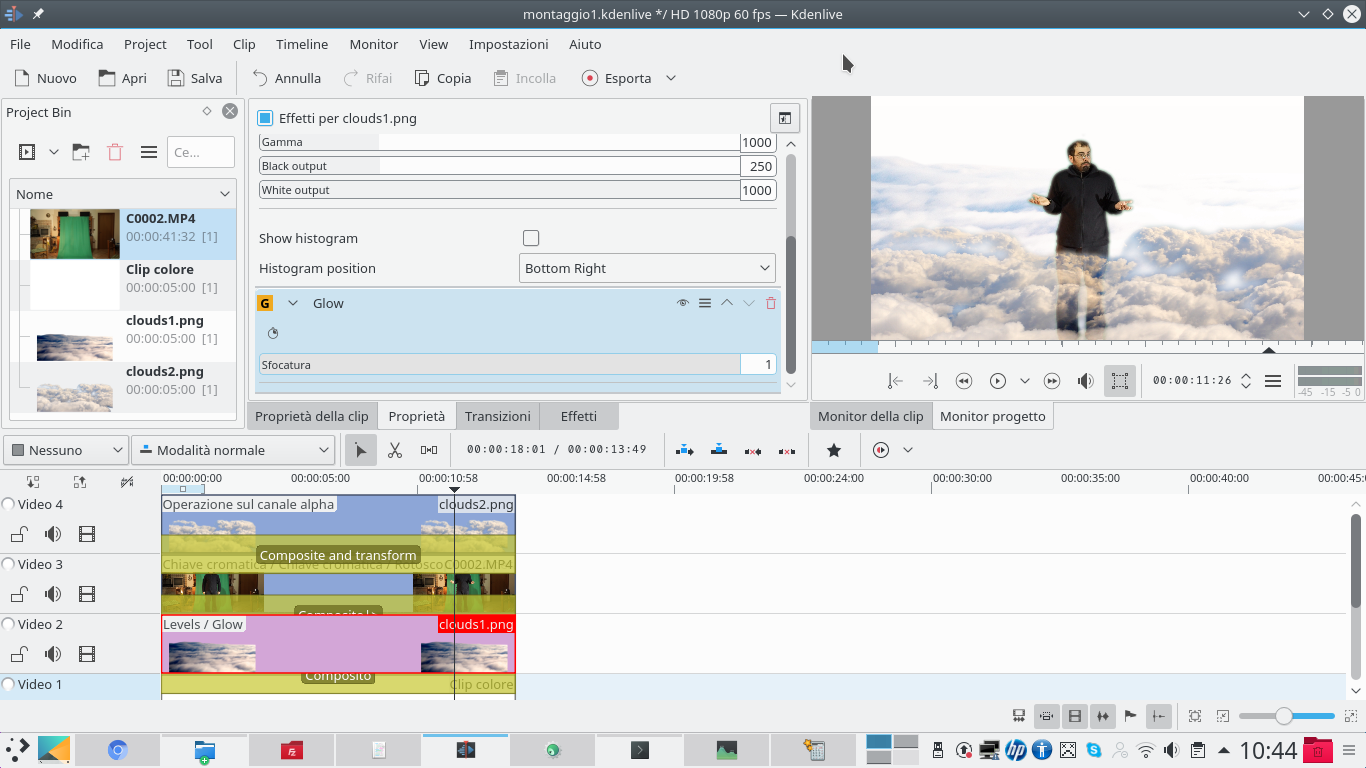 5 HERE’S A BAGLIORE – In the levels it is better to raise black output and lower input white , to have less contrast. A luminous glow effect can then be obtained from the background clouds by applying the effect Glow . Blurring should be kept to a minimum, that is 1 .
  6 LIFT THE LIGHTS– Finally, an effect can be set edge glow to the actor’s clip. What we want to achieve is a slight glow effect of the actor’s brightest points: the face, the hands, but also the shiny points of the clothes.

