To change the eye color of an actor you can use contact lenses, but with Kdenlive we can color the eyes with different shades in the same shot directly in post production
Among the many things that you may want to represent in an amateur or semi-professional movie there are effects dedicated to the eyes of an actor. The eyes are in fact a very important part, not only for questions of tradition and culture of the society in which we live, but precisely for a “biological” reason. As human beings, in fact, we have evolved to pay close attention to the eyes of another person: this is the reason why in a photograph or video they must always be perfect. In fact, we are able to recognize a face even if it is blurred or dimly lit. The important thing is that the eyes are clearly visible. It was precisely the close-ups of Clint Eastwood’s eyes that made Sergio Leone famous. Precisely for this importance many directors decide to devote a lot of attention to different eyes in different situations, possibly modifying them to make it clear that something is changing. Applies to the horror world, where you can decide to make an actor’s eyes bleed with a special fake blood eye drops (which obviously must only be purchased from reliable sellers). And it applies to fantasy settings, where you can decide to give a luminescence effect to the eyes, perhaps changing their color. This second effect is more complicated to achieve in the room: colored contact lenses can be used, but those do not change color during shooting. If you want an effect in which the actor’s eye color changes in front of the camera, perhaps to demonstrate a change in mood, you have to resort to visual effects. Computer graphics have always been used to change the colors of part of the image without touching the rest of the scene, and today as today everyone can do it thanks to software such as Kdenlive. The starting point is, of course, a shot in which the actor’s eyes are clearly seen. Thanks Kdenlive, after the necessary cuts, we will be able to duplicate the video clip and position the two clones one on top of the other, perfectly synchronized and superimposed. This will allow us to use the lower track for anything other than the eyes, instead dedicating the upper track to the eyes. We will therefore have to cut them from this clip: the solution is provided by the Chroma Key effect, which makes a certain color transparent. By using at least three or four Chroma Keys in sequence we can “cancel” all the shades of color on the skin of the face. To simplify things, Rotoscoping allows you to cut out your eyes in broad lines, basically by drawing a mask, so you don’t have to worry about the rest of the face. At that point it is possible to color what is left, practically only iris and pupil of each eye. Some adjustments will be needed, because until the eye color is done it is not clear if they have been correctly cropped by the Chroma Keys. But it’s not a problem, just go back to the effects and correct the necessary. As always, you can see the example video at the following address: https://www.youtube.com/watch?v=yKwR8uv_U80
 The eyes have a green glow
  The eyes have taken on a blue color
 At least two lights
The eyes are something a little complicated to illuminate. First of all, if the actor wears glasses it becomes difficult, because the lenses deform the light. The solution could consist in making the actor wear fake glasses, in which the lenses are of simple plastic without a deforming effect. The light sources must be at least two, or one very strong but with a good reflective panel. To give a dramatic effect, creating an atmosphere of mystery, we can illuminate with a strong but diffused light from above, not too far from the actor’s forehead. Of course, you need a light in the opposite direction to eliminate the inevitable shadows that fall on your eyes, projected from the forehead and nasal septum. The two lights may also come from the right and left, but it is always advisable that one is moved a little upwards and the other downwards.
The right cuts to the clip
Let’s divide the movie based on when the eye color should change
 1 ONE CLIP ONLY – As in any project, you have to start with the video clip, cutting it where necessary. To achieve this effect, a single film is sufficient, possibly contiguous (i.e. without cuts in the middle).
 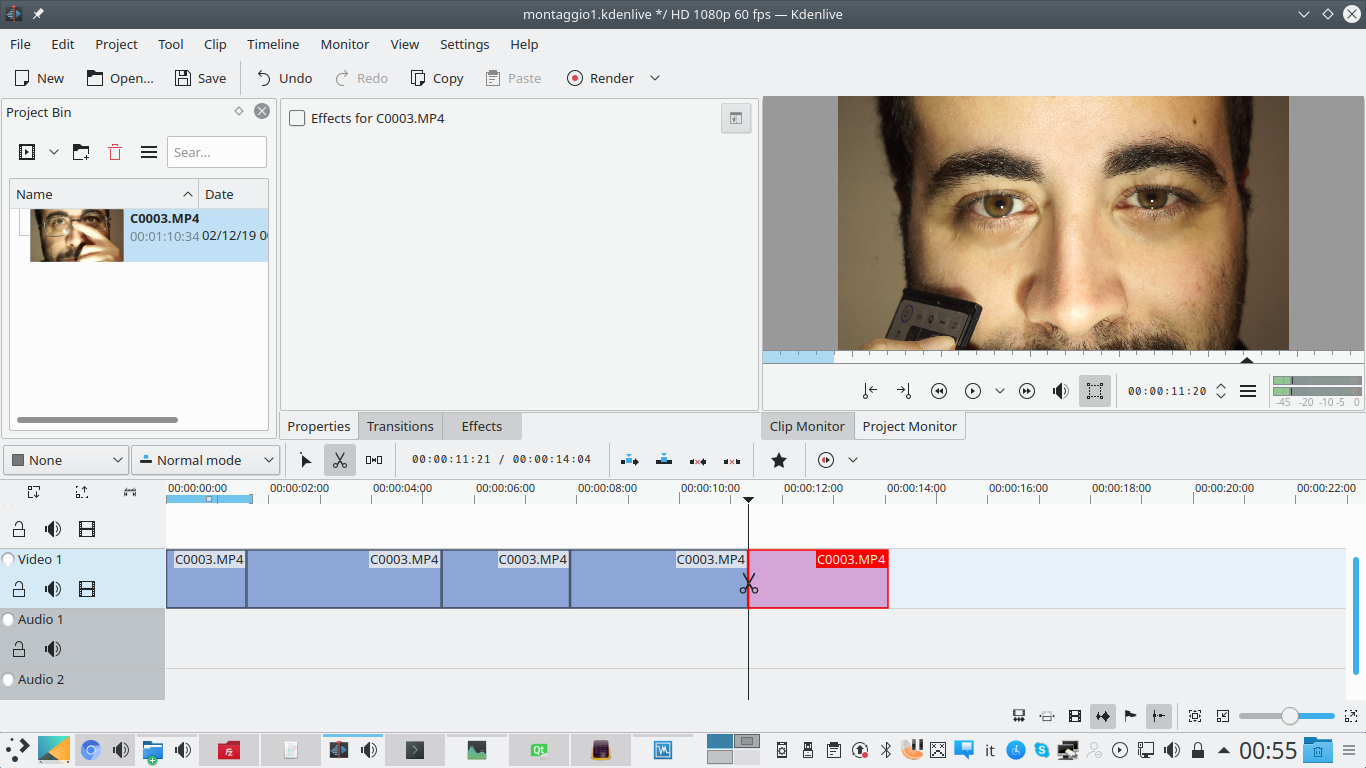 2 MANY STICKS – Now we can cut the clip in the various places where the eye color change must take place. In this way we will have a different clip for each color, but always in the same original sequence without interruption.
 Two identical clips
We need two perfectly overlapping clips
 1 CUT IN TWO – Let’s start by duplicating the first clip where the eye color needs to be changed. To do this we have to cut it into two parts, it doesn’t matter exactly where. We will therefore have a left and a right part.
  2 THE SAME CLIP– Let’s move the right part of the clip to the top track, the Video2 . Then we can drag the left edge of this clip to the left, until we get the length of the original clip. We do the same with the right edge of the track clip Video1 .
  3 THE TRANSITION – Now we have two identical clips one above the other. We can merge them together using a transition Composite and transform , which must be extended to the duration of the clip. Normal compositing is Alpha blend .
  4 ONE MASK – It must be added to the track clip Video2 an effect rotoscoping . The effect is used to draw an approximate outline of the actor’s eyes, with a very thin strip on the nasal septum.
 Let’s color the image
We can finally color the eye with the shade we want
 1 A CHROMA KEY – We only have to keep the iris and pupil of the eyes, so let’s insert an effect Chroma key to make the face disappear. Just select the skin color and set a minimum variance for now.
  2 SECOND AND THIRD – Similarly, you need to add more effects Chroma key selecting the color of the lashes and any other shades. For now let’s keep the variance of each effect to a minimum, so as not to make them really work.
 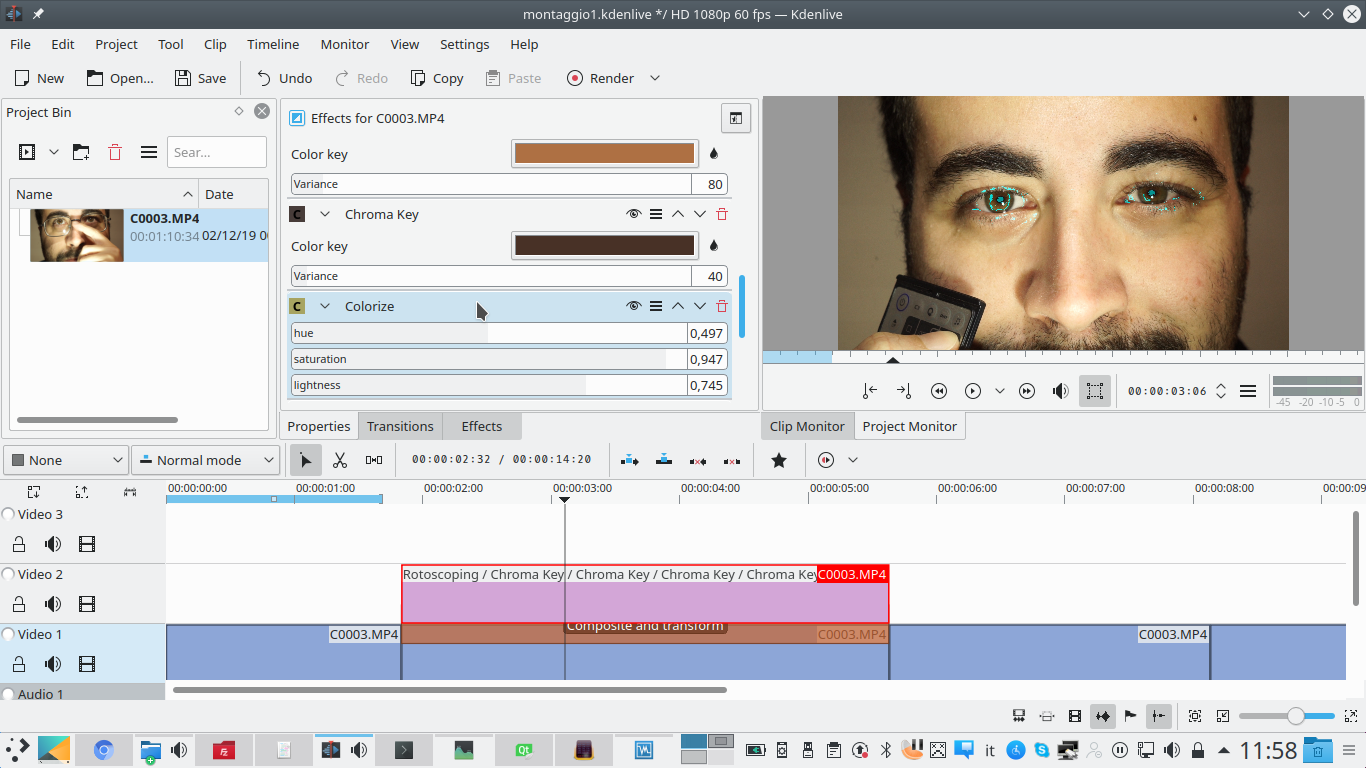 3 THE COLORING – Let’s add a type effect Colorize , selecting the color we want to give to the eyes ( hue ), and also saturation and brightness. The spectrum ranges from red to yellow, green, blue, and purple.
  4 FEW CORRECTIONS – Now we can go back to the effects Chroma key previously created and change the variance. The goal is that only the inside of the eye appears colored, and not the rest. You can also change the colors of the chroma keys.
 From one color to another
We change the color of the eye in subsequent clips
 1 ON THE ALPHA LEVEL – In the end, having found the correct eye color and the right chromatic keys to hide the superfluous, we can blend the colored halo with the effect Alpha operations using the operation Blur .
 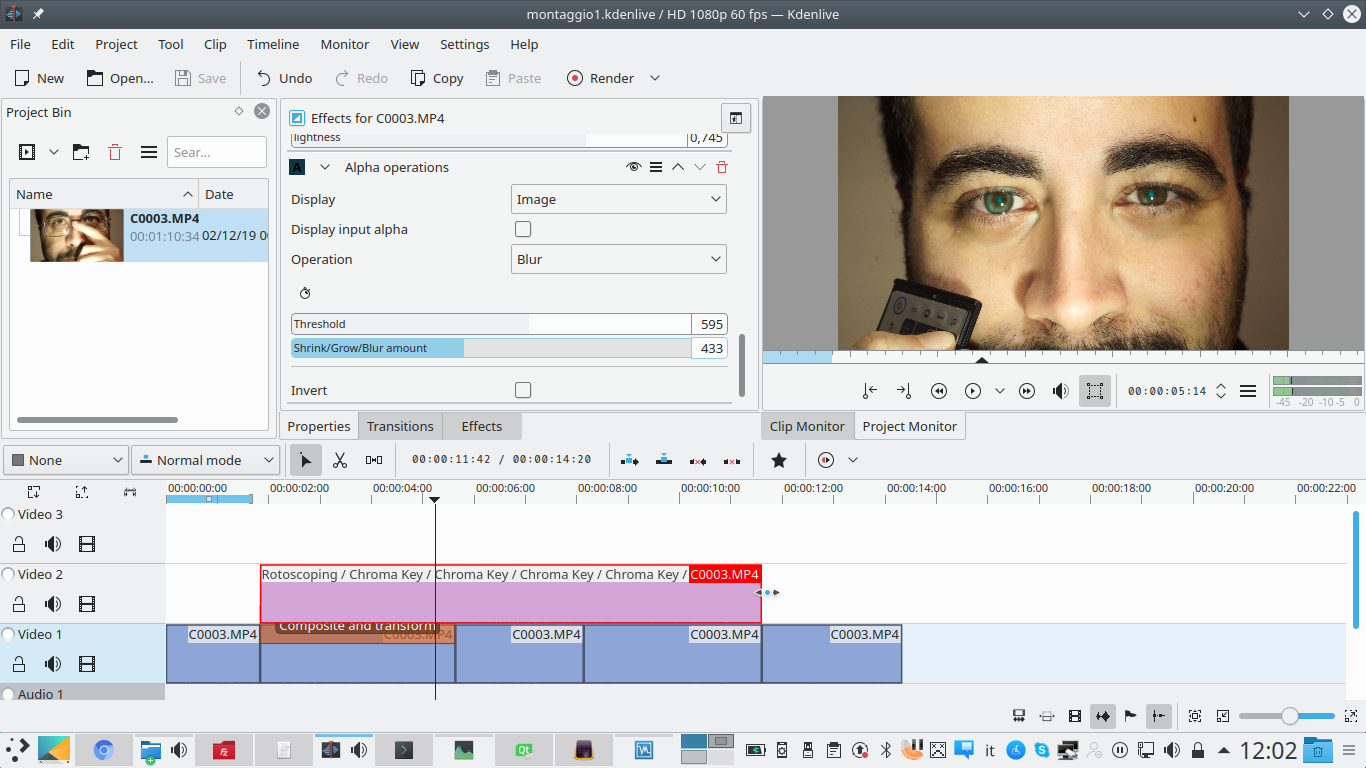 2 LONGER CLIPS – The clip with all effects can then be to reach the total length of the various clips in which the eyes have to change color. Just pull the handle on the right edge of the clip.
 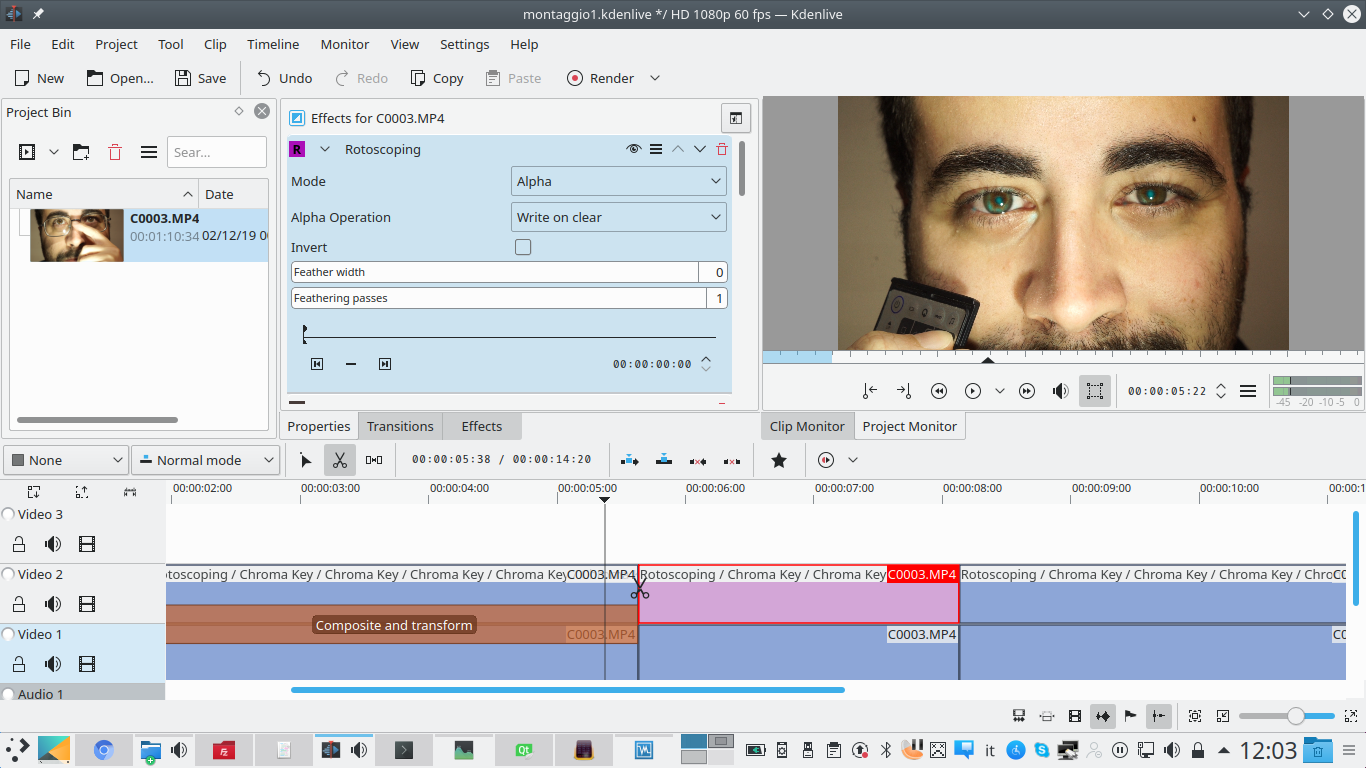 3 MANY STRIPS – Now we need to cut this clip so that the clips of the track Video2 match with those of the Video1 . The transition must also be extended to all clips: its mode can remain Alpha blend , or be changed to Screen .
 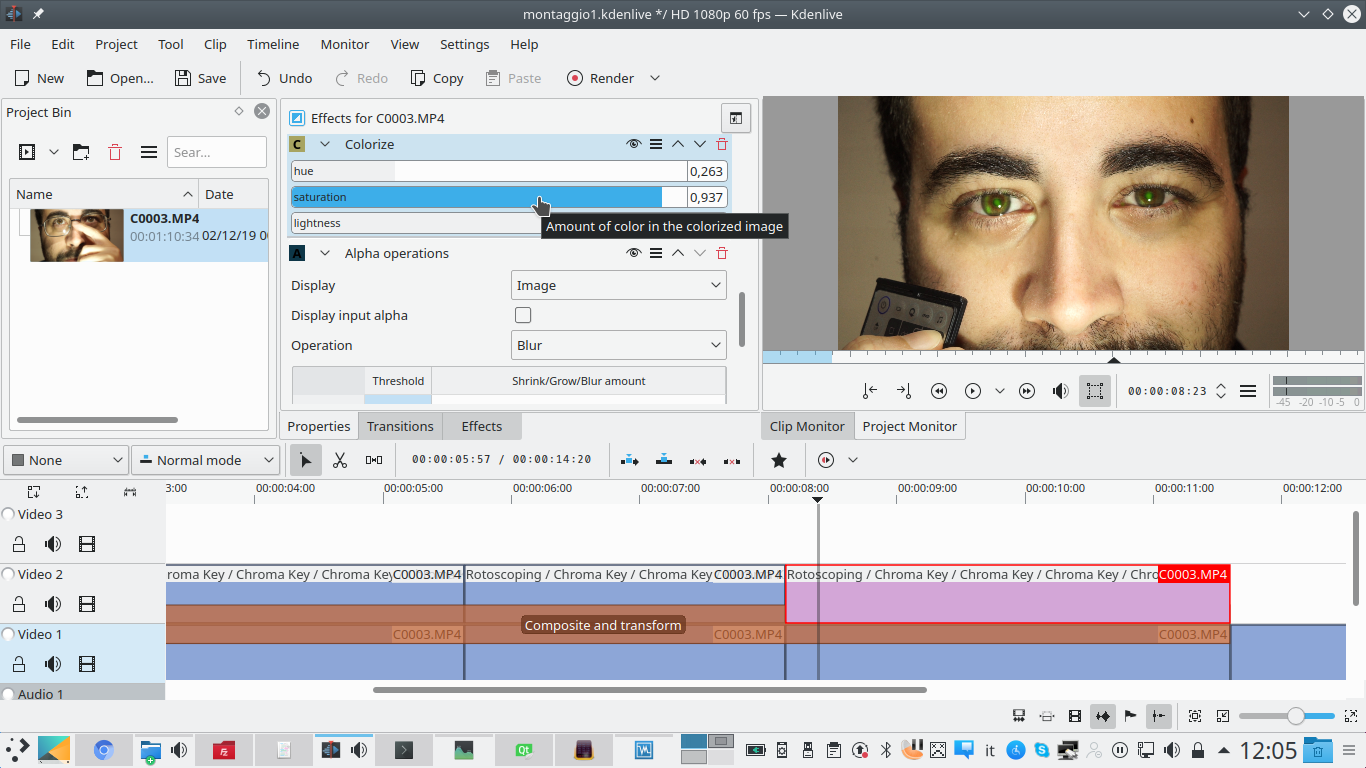 4 AND MANY COLORS – Now you can edit the parameters of the effect Colorize in each piece, thus allowing the actor’s eyes to change color from one clip to another. Changing the hue should also adjust brightness and saturation.
  5 RIGHT CONTOUR – The other effect that should be changed between the various clips is the rotoscoping . The actor may indeed have moved, so you must eventually follow the movement of the eyes with the outline of the rotoscope.
 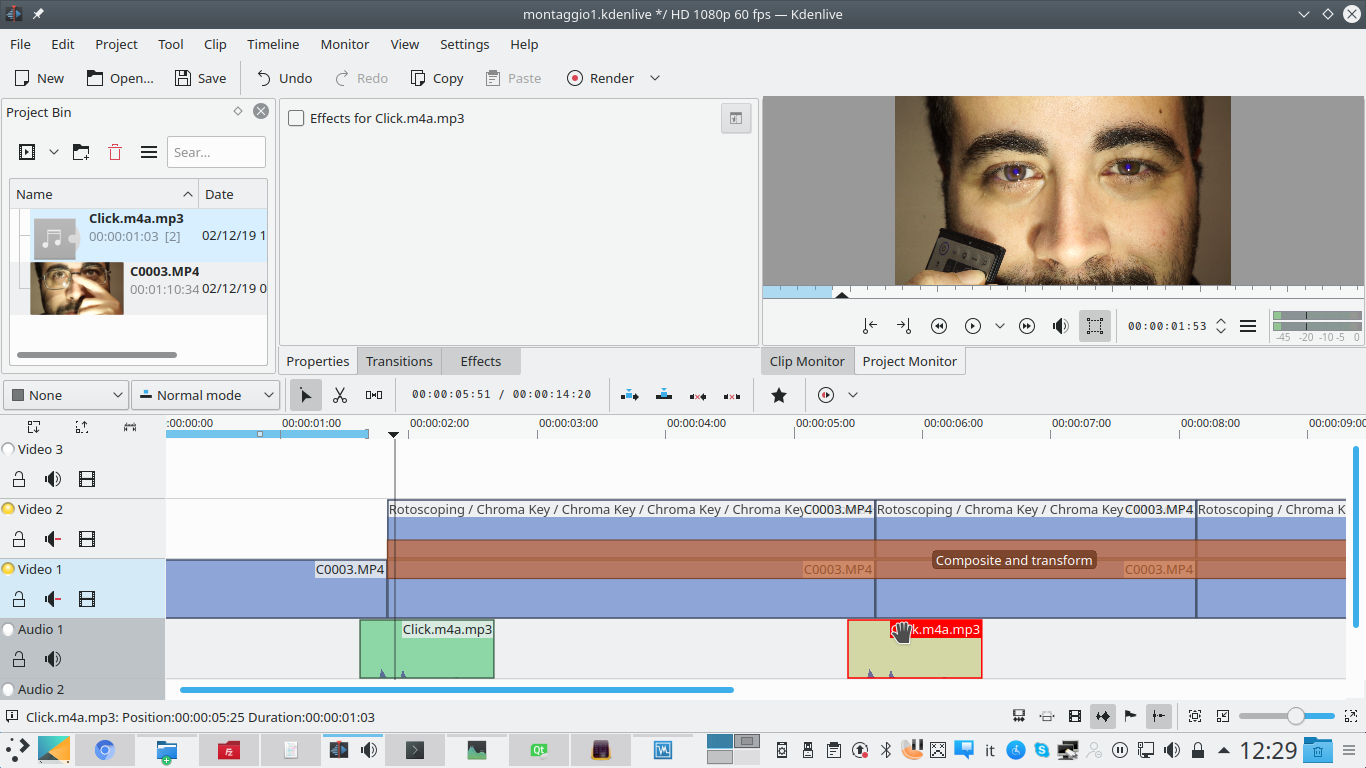 6 SOUND EFFECT – To give greater emphasis to the effect, we can add a sound at the exact moment when you switch from one clip to another, and therefore from one color to another. To download a sound just use the menu Project / Internet resources .


Pingback: Nueva página web con tutoriales para Kdenlive - KDE Blog