Using Kdenlive’s color manipulation effects, it is possible to transform a real movie into a cartoon, giving the illusion that the actors are drawn by hand instead of shot with a video camera.
The two most common forms of amateur production are live action (film with actors) and cartoon. Sometimes, however, it happens that you want to do a combination of two things: insert cartoons into real footage, or insert actors into cartoons. The advantage is that drawing human characters by hand is rather uncomfortable, unless you want to stylize them. Instead, if you take a shot, you just need to put the actor in front of a green screen. If you are Dick Van Dyke, you had the opportunity to dance with penguins in a world designed within the film Mary Poppins. If you are not, you have not had this opportunity. So far, of course, because with Kdenlive you can insert yourself into a cartoon, also changing the picture appearance to look like cartoons. In fact, we are not satisfied with entering the cartoon, but we also want to transform the actor into a drawing in order to blend him with the background (hand drawn). The operation is less complicated than it seems: starting from the shot on a green sheet, we remove the background of the shot to have only the actor, with a clean edge, which obviously appears against the background of the cartoon. At this point we can reduce the number of colors of the actor, with some precautions to prevent the image from appearing grainy: we want the actor to appear hand-painted, so it is obvious that we cannot have so many shades of color. In addition, we correct the colors to be brighter, except in the shadows. In fact, shadows in cartoons are always represented in gray regardless of the light that forms them, and it is the same thing we will do. An important trick concerns the use of a Gaussian blur to spread the colors and avoid that there may be too sharp edges between one color and another. This will make the result more credible, because otherwise, due to the posterization of the colors, there is a risk of having a “striped” image where there was a gradient in the film. Of course, the nuance must be minimal, because if you exaggerate then you can no longer distinguish anything about the shape of the actor. In the end we can take advantage of the Charcoal effect to draw the outline of the actor, thus giving the illusion that it was drawn in pencil and then painted. But the charcoal effect offers a black and white image: we will then create a copy of the video clip, to apply the charcoal only on this. We will then get two identical clips, one in color and one (above the previous one) in black and white. Using a transition with color multiplication mode we can merge the two images obtaining the colored image but with black edges. In fact, in the multiplication of the color white becomes transparent and black remains black. Obviously, some tests may be needed to find the right dose of charcoal to apply: the contours must be seen, but the black strokes must not cover the actor’s features, especially those of the face. All various aspects, both that of color and that of black edges, can be adjusted using the effects of brightness and contrast. As always, you can see the example video at the following address: https://www.youtube.com/watch?v=FdgGR4vSDEI
 The video clip we started from
  The fake drawing we got
 A valid shooting method
A cartoon usually has very generic shadows, the scenes always seem lit in the same way. The best way to achieve this is, as Duccio suggested in Boris, to dismantle everything. You can use a diffused light throughout the room, perhaps using reflective panels or a very strong lighthouse pointed on the white ceiling in order to reflect the light uniformly on the whole green screen simulating the Sun. Or, you can film outdoors, better if around noon to not have too many shadows. To help you with perspective, you can print the background design on a transparent sheet (with laser or inkjet printer) and you can position it over the display of your video camera in order to correctly align the actors.
Two clips and a transition
We place a transition between the actor and the background
 1 ONE ABOVE THE OTHER – The two fundamental clips are the actor’s movie on the green screen and the hand-drawn background image. The background should be placed in the lowest track, the Video1 , while the actor must be in the immediately higher track, the Video2 .
  2 THE TRANSITION – Using the Scissors tool you can adapt the clips by cutting unnecessary pieces. A transition of type must be inserted between the two clips Composite and transform . The transition must obviously cover the length of the clips.
 Simplify the image
We begin to remove details, so the video will look like a drawing
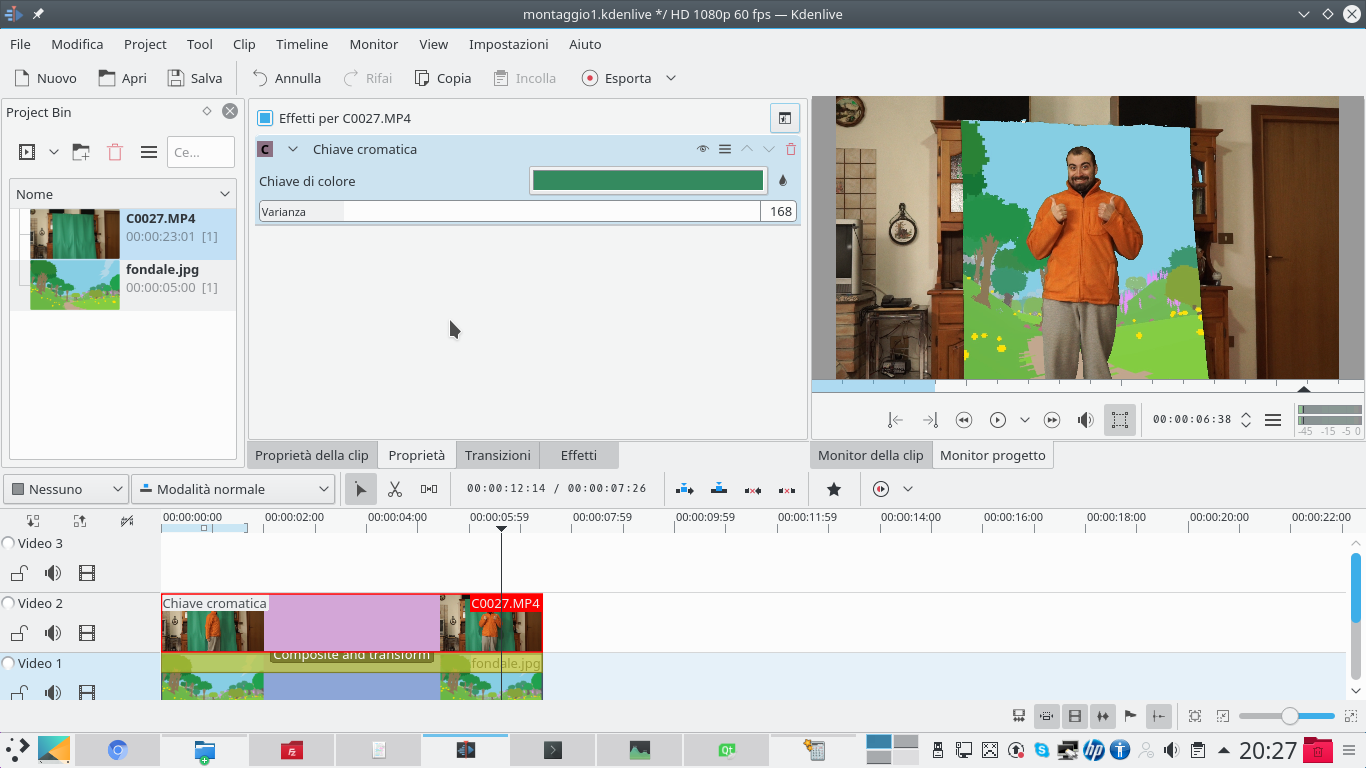 1 WITHOUT THE BACKGROUND – Obviously you need to delete the background on which the actor is located: just apply the effect to his clip Chromatic key . By selecting the background color (usually green) and an adequate variance, the whole background can be deleted.
  2 THE ROTOSCOPING– It is good to be generous with the variance, so as not to leave a green halo around the actor. You can then add the effect rotoscoping to eliminate all the superfluous parts, those that in the movie had not even been covered by the green sheet.
  3 REDUCE THE EDGE – To be sure that the edge of the actor is cut cleanly, as in the drawings, we apply the effect to the clip Operation on the alpha channel . The operation must be Shave and you need to set the quantity in order to cut the outline a little.
 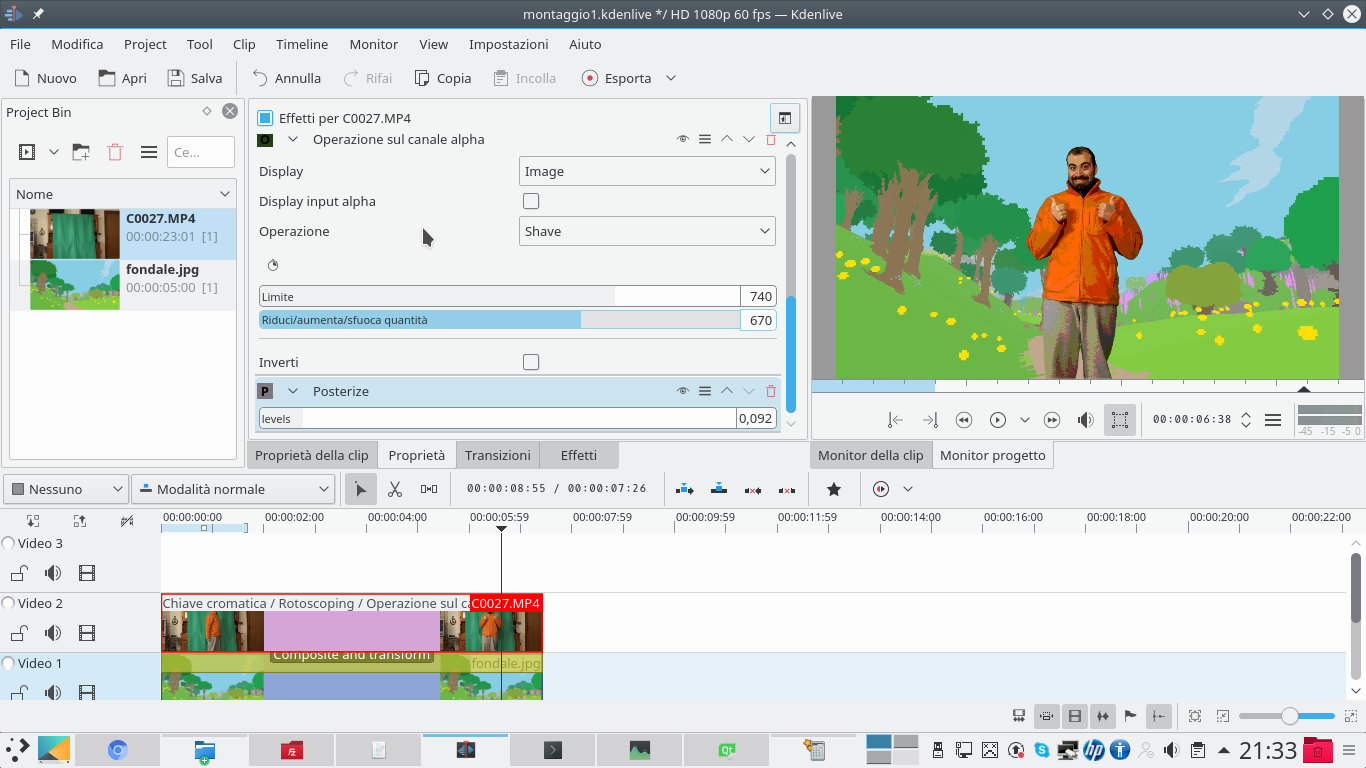 4 WITH LESS COLORS – The effect is then applied posterize , in order to reduce the colors (a design does not have the same color depth as a photograph). It is important not to reduce the colors too much, otherwise the image is no longer realistic.
 Less colors in the shadows
We bring the shadows to gray, and the rest to more vivid colors
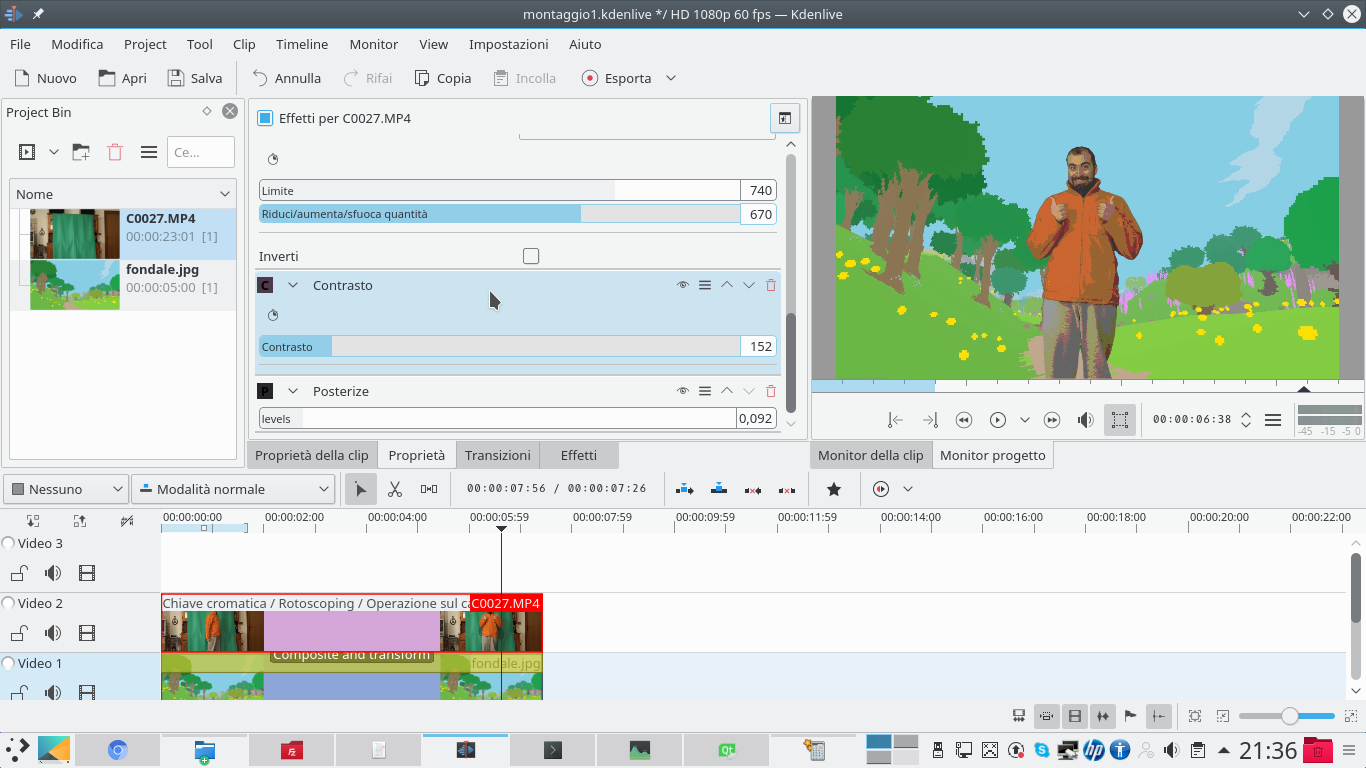 1 MORE CONTRAST – To further reduce the shades of color, without however obtaining only the primary colors, shadows can be reduced by inserting the effect contrast and bringing its value around 150 . This effect is dragged over to Posterize .
  2 SATURATION – You can then add a type effect Curve by setting the channel to Saturation . We can draw a curve by increasing the saturation for the lights and decreasing it for the shadows. Thus the lights will be well colored, and the shadows tending to gray.
  3 THE DUPLICATION – Now we need to duplicate the actor’s clip: the easiest way to do this is to cut the clip in half using the tool Scissors . Then you have to take one of the two halves and drag it to the track above, or the Movie3 .
  4 TWO EQUAL CLIPS – Obviously, it is essential not to lose alignment. However, the two halves must coincide at the junction point. Then you can use the special handles to stretch each of the clips in the necessary direction until you get two identical clips.
 Add the pencil edges
By correctly exploiting the Carbon effect, the edges are drawn on the video
 1 NEW TRANSITION – Now we can set up a new transition, like Composite and transform , between the clips on the track Movie3 is Video2 . The transition can remain relative to the track Video2 , so they will be hooked.
  2 WITH CHARCOAL – We add to the track clip Movie3 the effect Charcoal . It is important to keep the parameters to a minimum, to avoid that the black strokes are too visible and cover the actor’s features.
 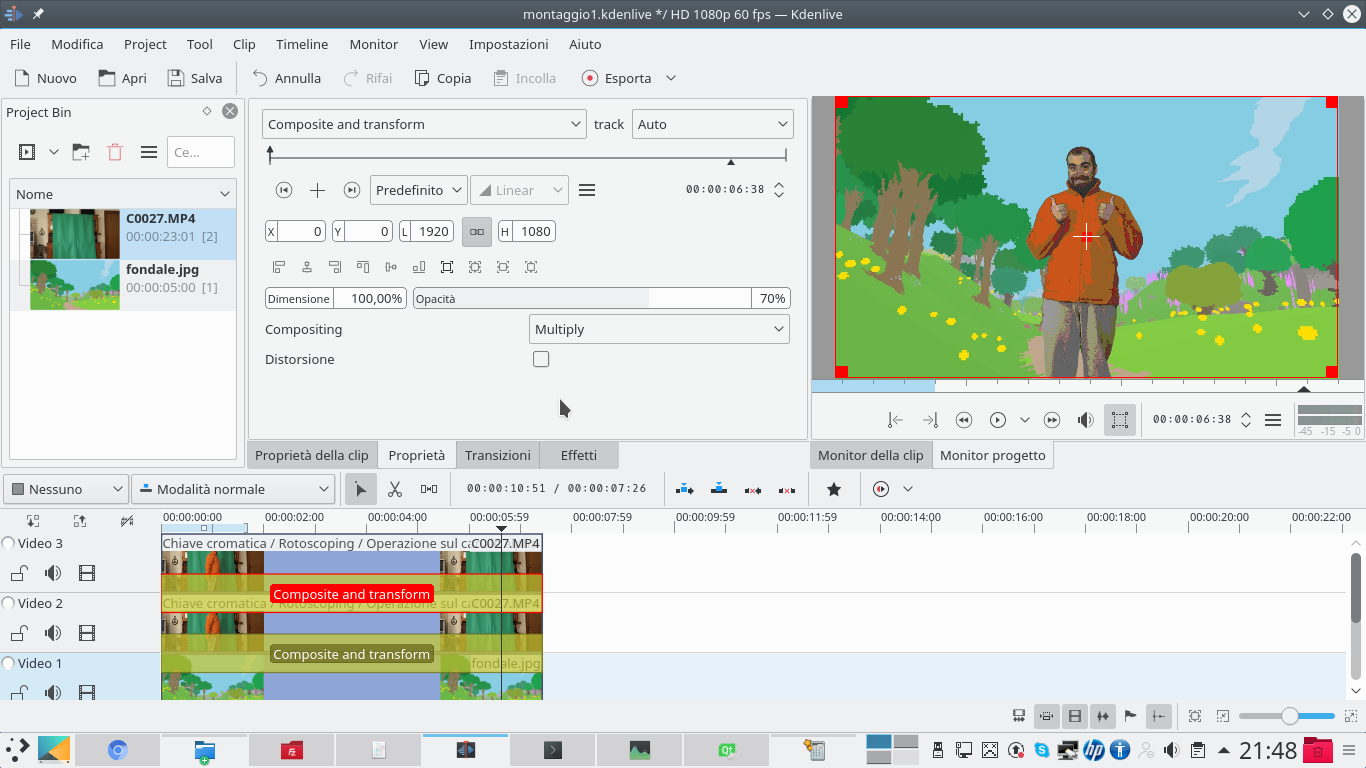 3 MULTIPLICATION – We can therefore go back to the transition between the tracks Movie3 is Video2 to set its mode a Multiply . You can lower the opacity to make the charcoal section barely visible, just enough to not compromise the appearance of the image.
 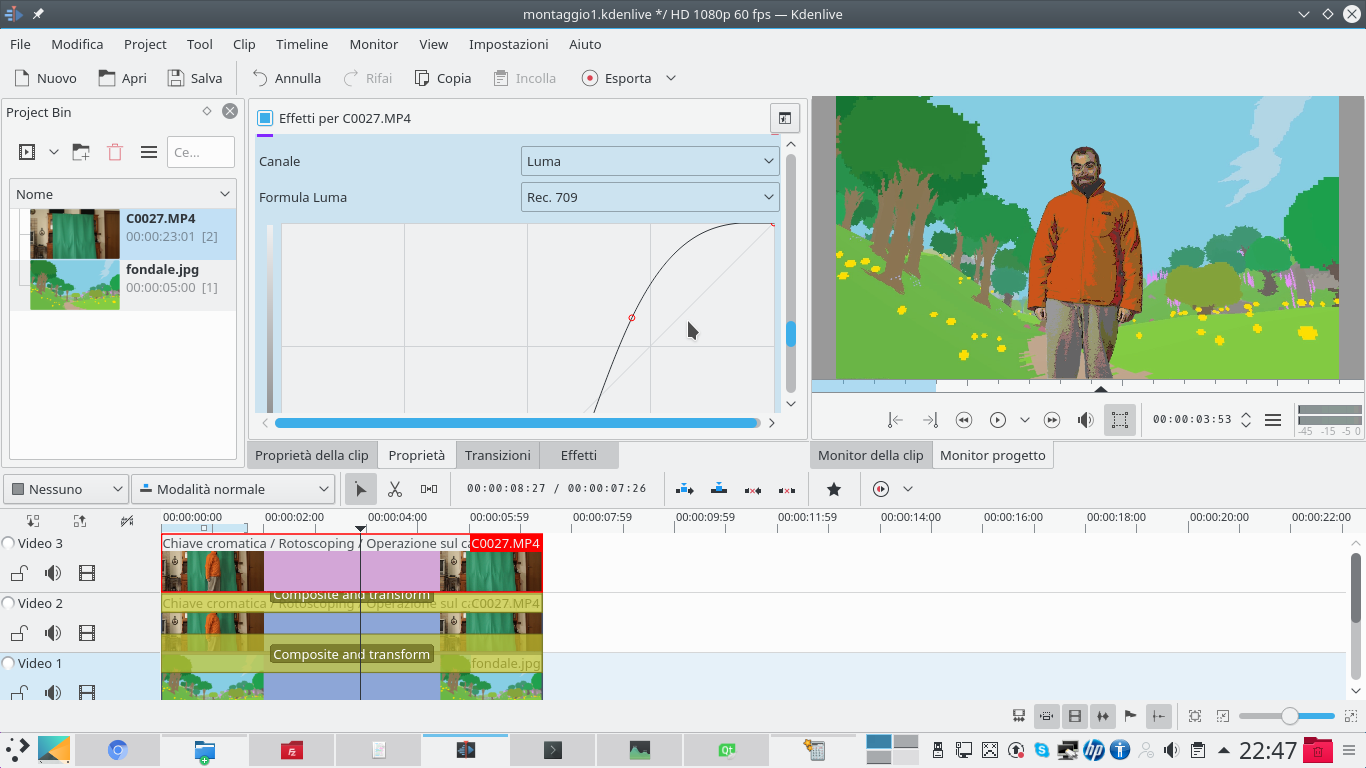 4 WITH MORE CONTRAST – You can give a greater yield to the charcoal effect by adding to the clip of the track Movie3 a type effect Curve . The effect must be set on the channel Luma and you can raise the lights and lower the shadows, to increase the contrast.
  5 A slight blur – Due to the posterization of the colors, it is possible that the image is a bit grainy, in some places the pixels can be distinguished. To solve the problem it is added to the track clip Video2 the effect Blur , of type Gaussian .
  6 PERSPECTIVE – At the end of the transformation into cartoon, you can manipulate the transition between the track Video2 is Video1 in order to position and resize the actor in perspective with respect to the drawn background.

