With Kdenlive you can emulate the classic cinematic look of Hollywood films in post production: all you need is a slightly overexposed shot and the effects for the light manipulation of the famous open source video editor
People who make amateur short films usually try to achieve the quality of the great Hollywood cinema in their images. Today DSLR cameras allow, without spending too high figures, to obtain however very good images in terms of dynamic range. The rendering of colors and brightness is however complicated: often the colors obtained by the cameras seem flat, but it is only because the image should be taken care of. There is in fact color grading, which allows you to correctly balance colors in post production. However, it must be remembered that the first step should be lighting: using correct lighting while filming a scene allows you to obtain the desired result directly in the room. Of course, with amateur vehicles it is not always easy to obtain the classic “cinematic look”, that lighting with high contrast and well-kept lights typical of large productions. However, there is the possibility of adjusting not only the colors but also the lights in post production. And you can do it with Kdenlive, taking advantage of its overlapping modes. The most typical problem is the direction of the light: when filming a scene in a room, you often don’t have many lights, especially easily adjustable lights, so you end up using a simple chandelier that evenly illuminates the whole room. ‘environment. The problem with this is that it distracts the viewer a lot: it is good that you see the whole scene a little, but attention must be directed towards the actor and what he is doing. In short, a sort of reflector would be needed, even if not as marked as those of the theaters. The solution consists in filming the actor not too far from the light source, and allowing the lights to be homogeneous throughout the room in the shot. Then, with Kdenlive, we can create a black curtain with which to cover all parts of the image where we don’t want there to be a lot of light. Obviously the light source and the actor must be well lit, but otherwise we can “hide” what we want. Overlaying this black block with mode Weak light the brightness of the affected area will simply be lowered. This actually allows us to remodel the light, because we can choose the area to be shaded with great care thanks to the effect Rototscoping . The trick, in fact, consists in creating a black rectangle that covers the whole clip, and then cut out only the part that needs to be well lit. By taking advantage of the nuance of the rotoscope it is possible to have an excellent, very realistic gradient. Clearly, for the success of the effect it is important to follow a certain logic while drawing the area to be cut out: you must follow the outline of the objects, to give a sense of three-dimensionality. For example, if there is a table in the foreground, this must be completely inside or completely outside the clipping, but it cannot be halfway. With a couple of other corrections it is then possible to adjust all the small overexposed or underexposed details. As always, you can see the example video at the following address: https://www.youtube.com/watch?v=p359lBE9ouo.
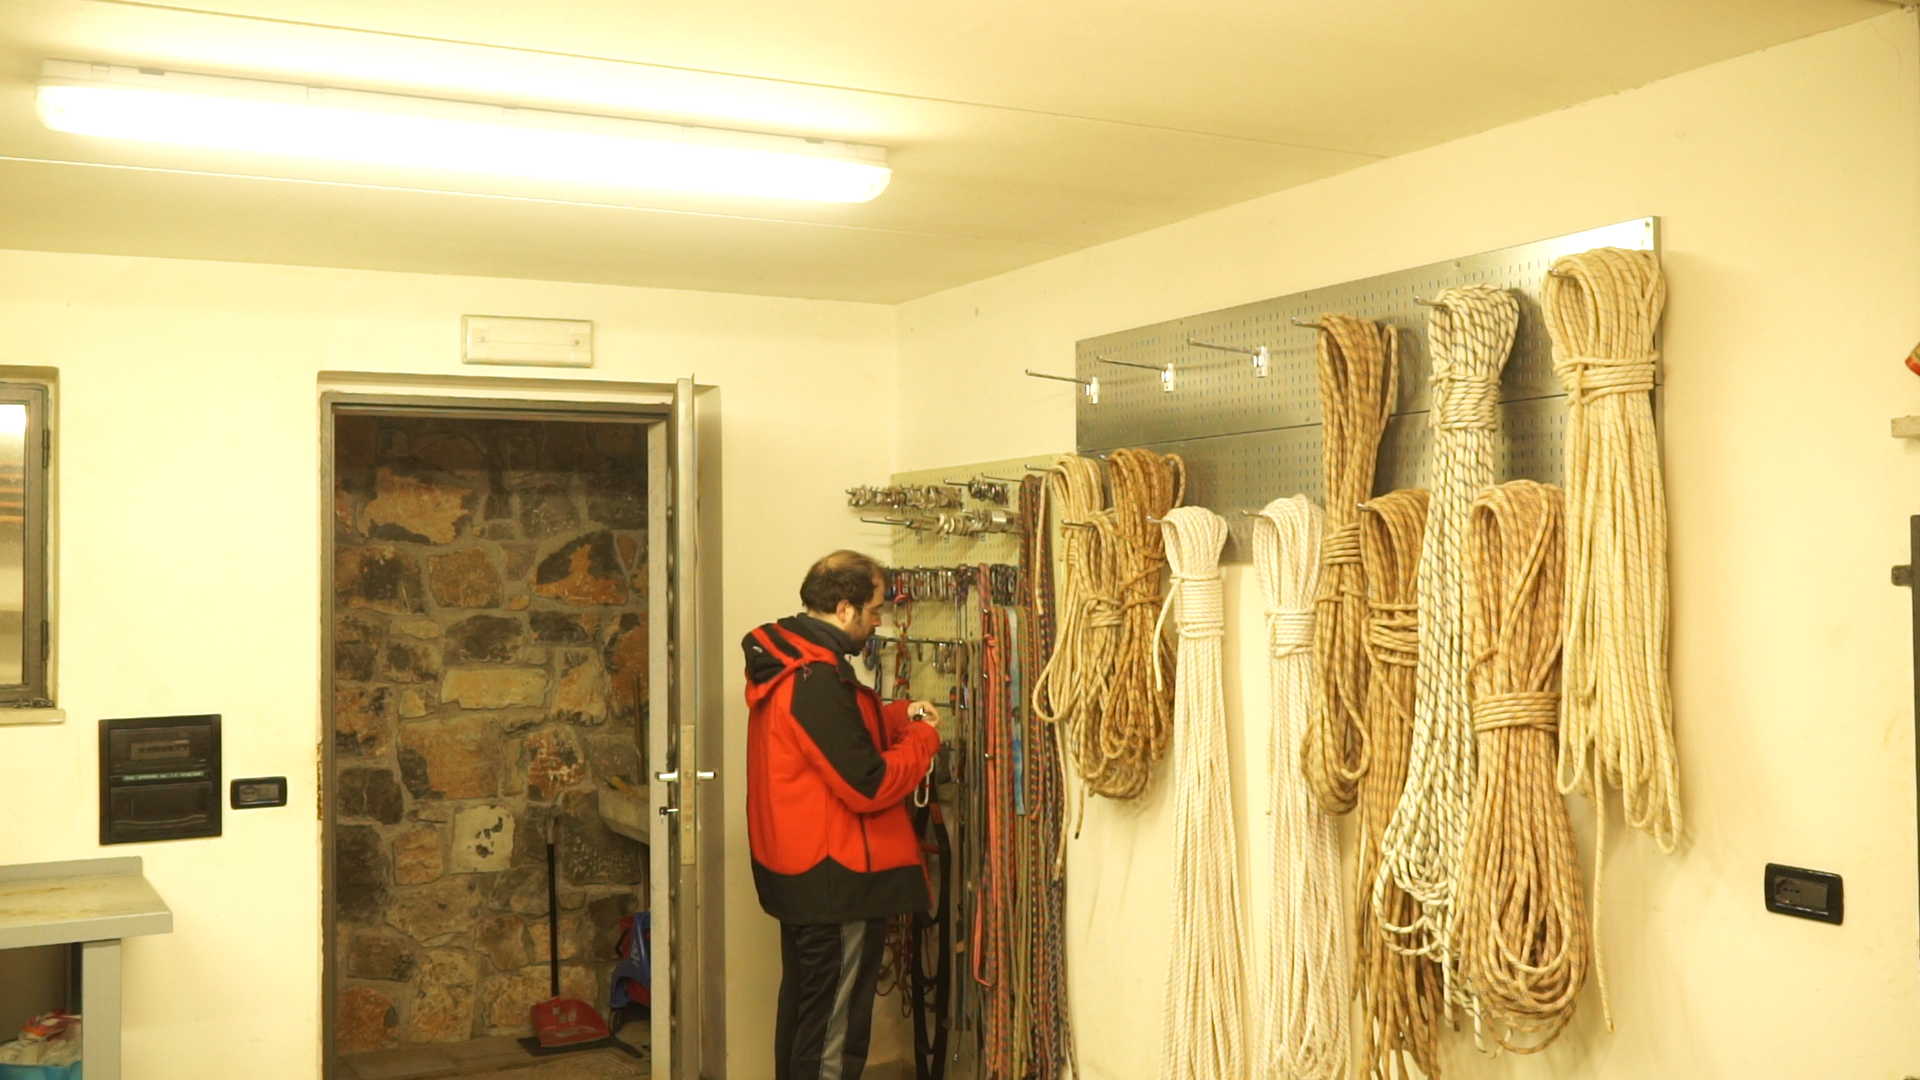 The image from which we started
  The same image after the effect
 An overexposed scene
To work on the colors and brightness of a scene it is first of all important to try to shoot it with a camera capable of recording a considerable range. Secondly, it is also good to be able to manually adjust the exposure. This is because for the effect we want to achieve it is good to have a slightly overexposed image. The overexposure should be slight, otherwise the highlights will be burnt out. Having a lot of light is important, however, to prevent the increase in the shadows that we create in post-production from making a good part of the scene completely black. For the rest, it is important to try to keep the actors always in the same part of the scene, so as to avoid entering the area that will be made darker.
Two clips are enough
For the effect we only need the movie and a completely black clip
 1 A VIDEO CLIP – The first thing to do is to start from the video clip that we filmed: you have to upload it to Kdenlive and eventually cut it if necessary. The clip can be loaded into the lowest video track, usually the Video1 .
  2 SOLID COLOR CLIPS – In the next higher video track, then the Video2 , we can upload a completely black color clip. To create one, just go to the menu Project / Color clip , selecting the black color.
 The path of light
We draw the outline of the area that must be illuminated
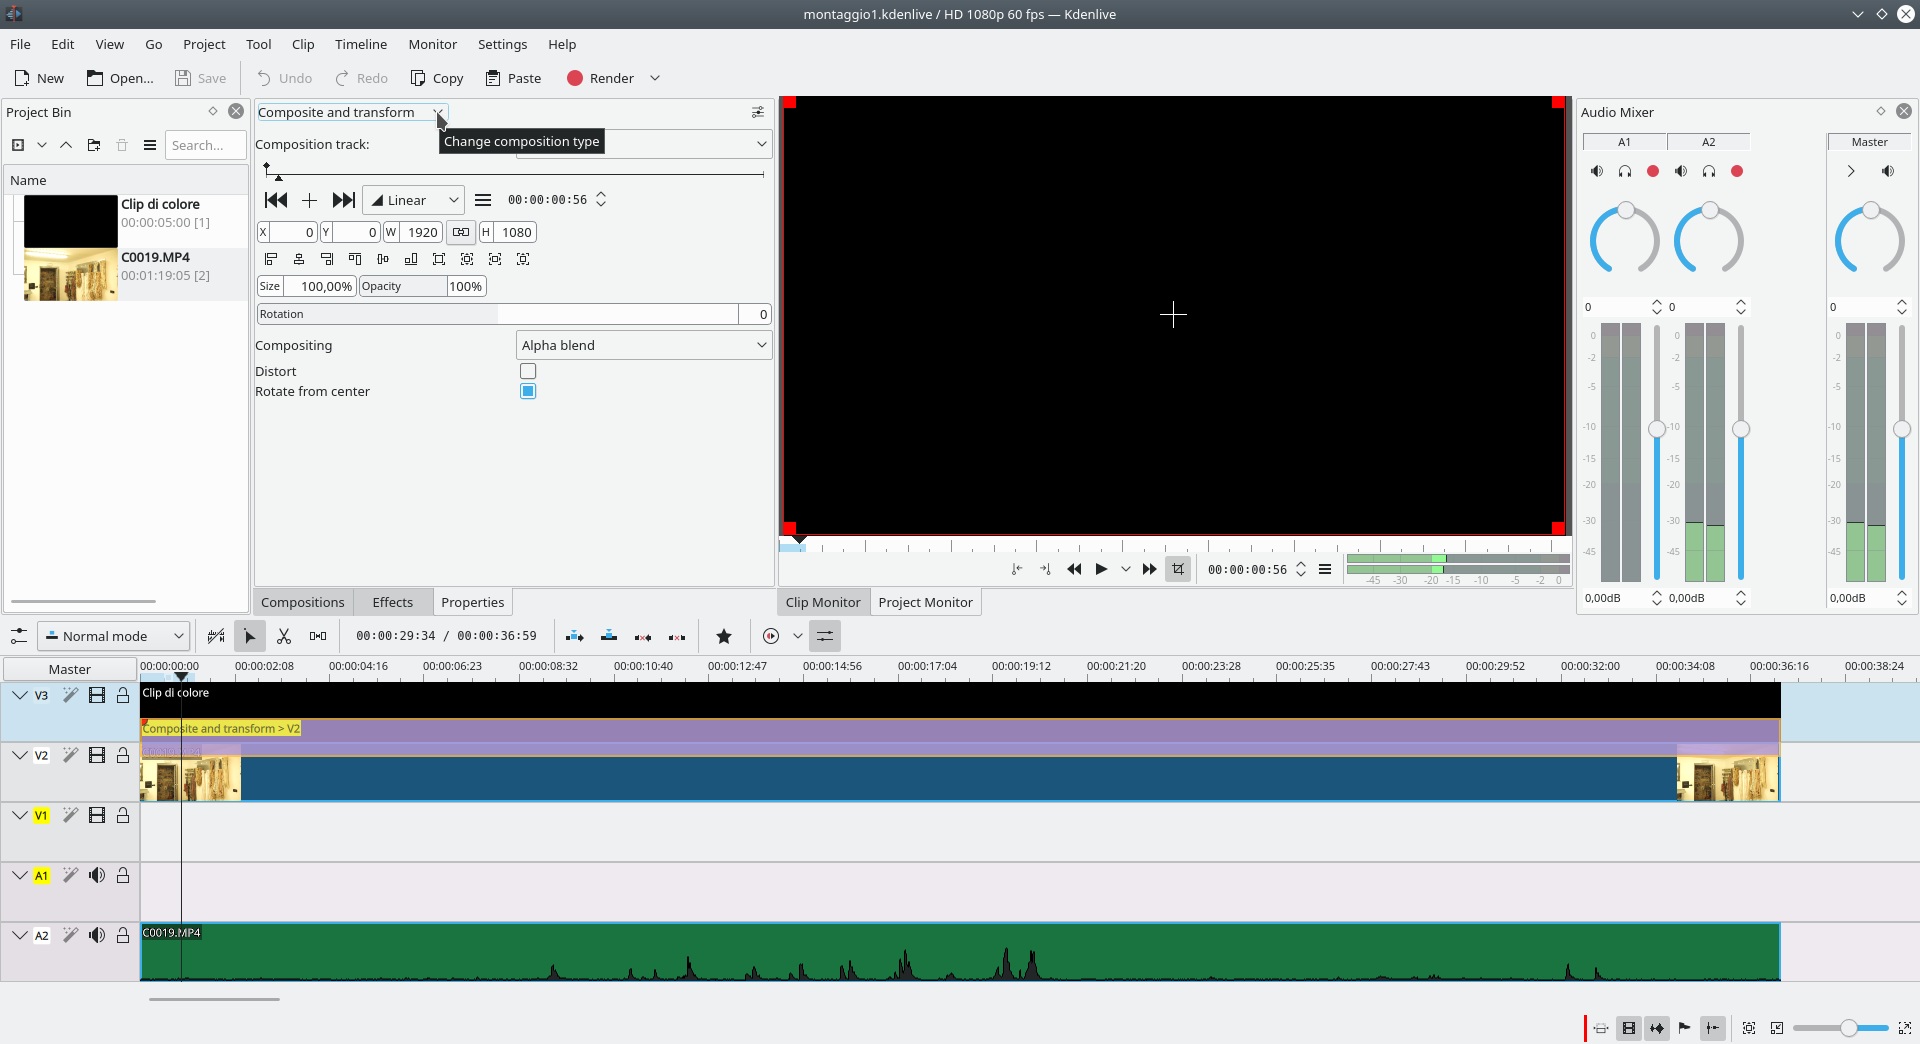 1 THE TRANSITION – The black clip should be stretched, until it overlaps (as duration) perfectly with the video. A transition of type must be added between the two clips Composite and transform . The transition must span the duration of both clips.
  2 THE ALPHA BLEND– This transition may, for now, have the composition method Alpha blend . L’ opacity however, it must be reduced to at least 70% , so you can watch the original movie. It obviously depends on how bright your starting image is.
  3 WITH ROTOSCOPING – Now let’s add an effect rotoscoping to the black clip. By clicking with the left button on the image, we must draw the path of the light source, but on the contrary: everything that is not directly affected by the light must be selected.
  4 SHADED EDGE – It is not very intuitive, but the goal is to obscure the parts of the movie that are not the center of attention. Once the path is finished, you can close the drawing with the right mouse button. Let’s set one feather of at least 60 points e 4 feather passes , to have a soft shade.
 Correct the color
We adjust the colors between shadows and halftones
 1 MAXIMUM OPACITY – Going back to working on the transition, we can set the overlap mode to Soft light . The opacity must then be raised: ideally it should go to 100%, but it can also be kept a little lower if the shadow halo is too marked.
 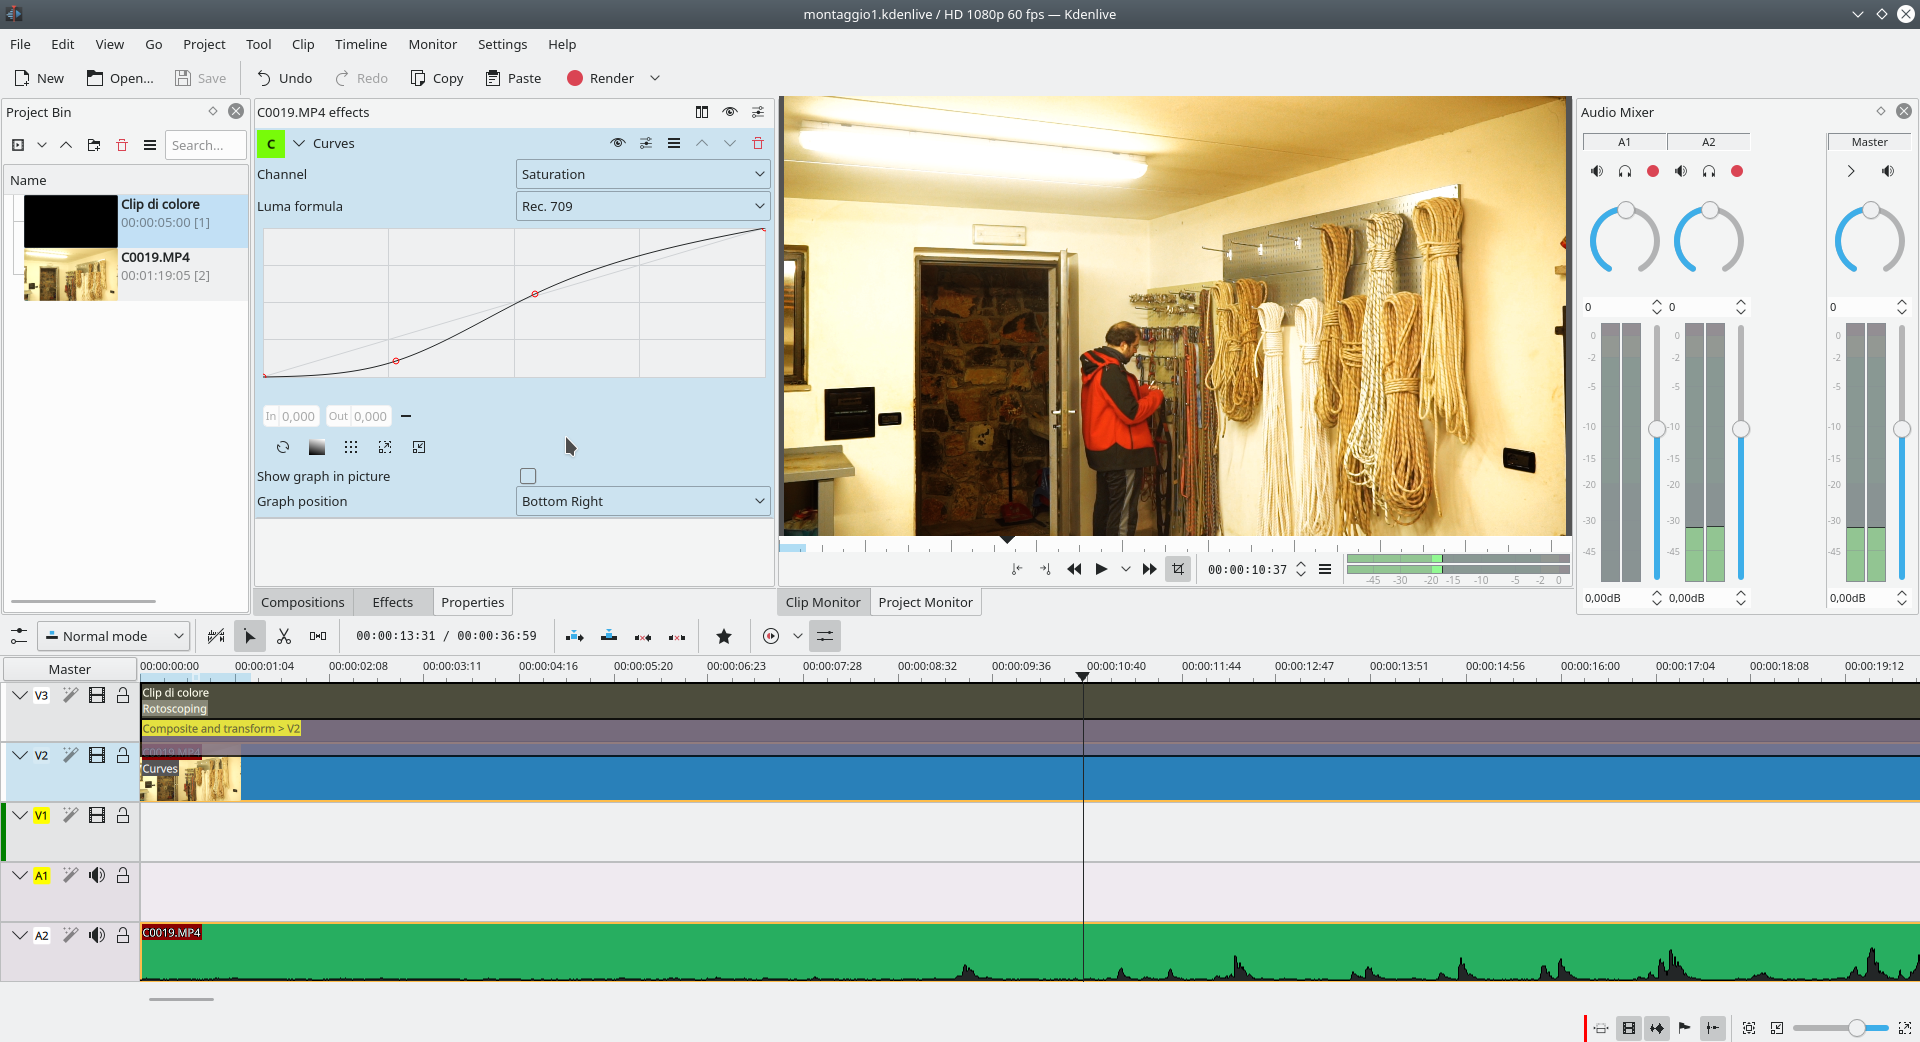 2 LESS SATURATION – Now let’s add a type effect to the original movie clip Curves , On the canal Saturation . The idea is to maintain normal saturation (on the diagonal) for highlights and halftones, lowering it for shadows, which will therefore be less colored.
 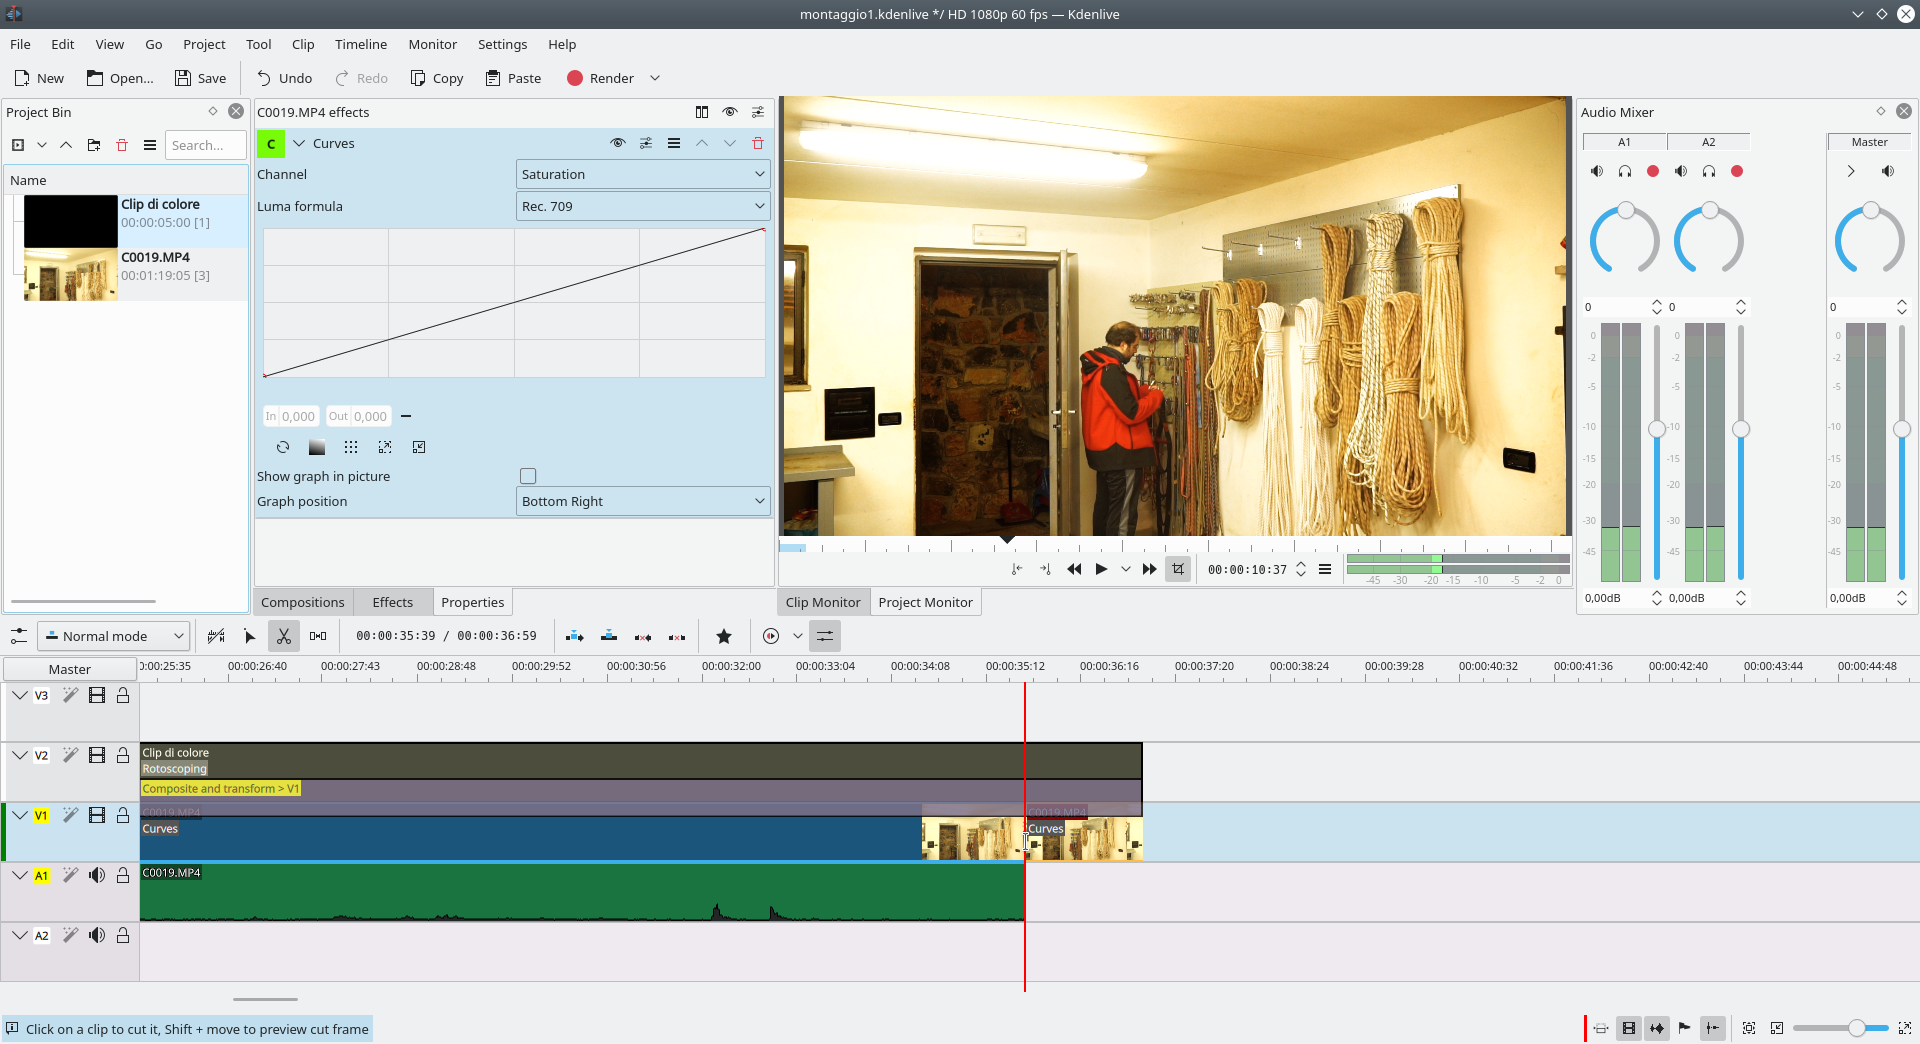 3 THE DUPLICATION – Now we can duplicate the original clip: the first step is to cut a piece of the video clip. Then you have to move this piece in the free track above the others, the Movie3 , keeping the alignment.
  4 EXTEND THE CLIPS – At the end just extend the two clips: the original one, in the track Video1 , will return to have the same duration as before, and the other (track Movie3 ) must be stretched in the opposite direction so as to be identical to the original one.
 The right light to detail
With the rotoscope we can make adjustments to the details “out of place”
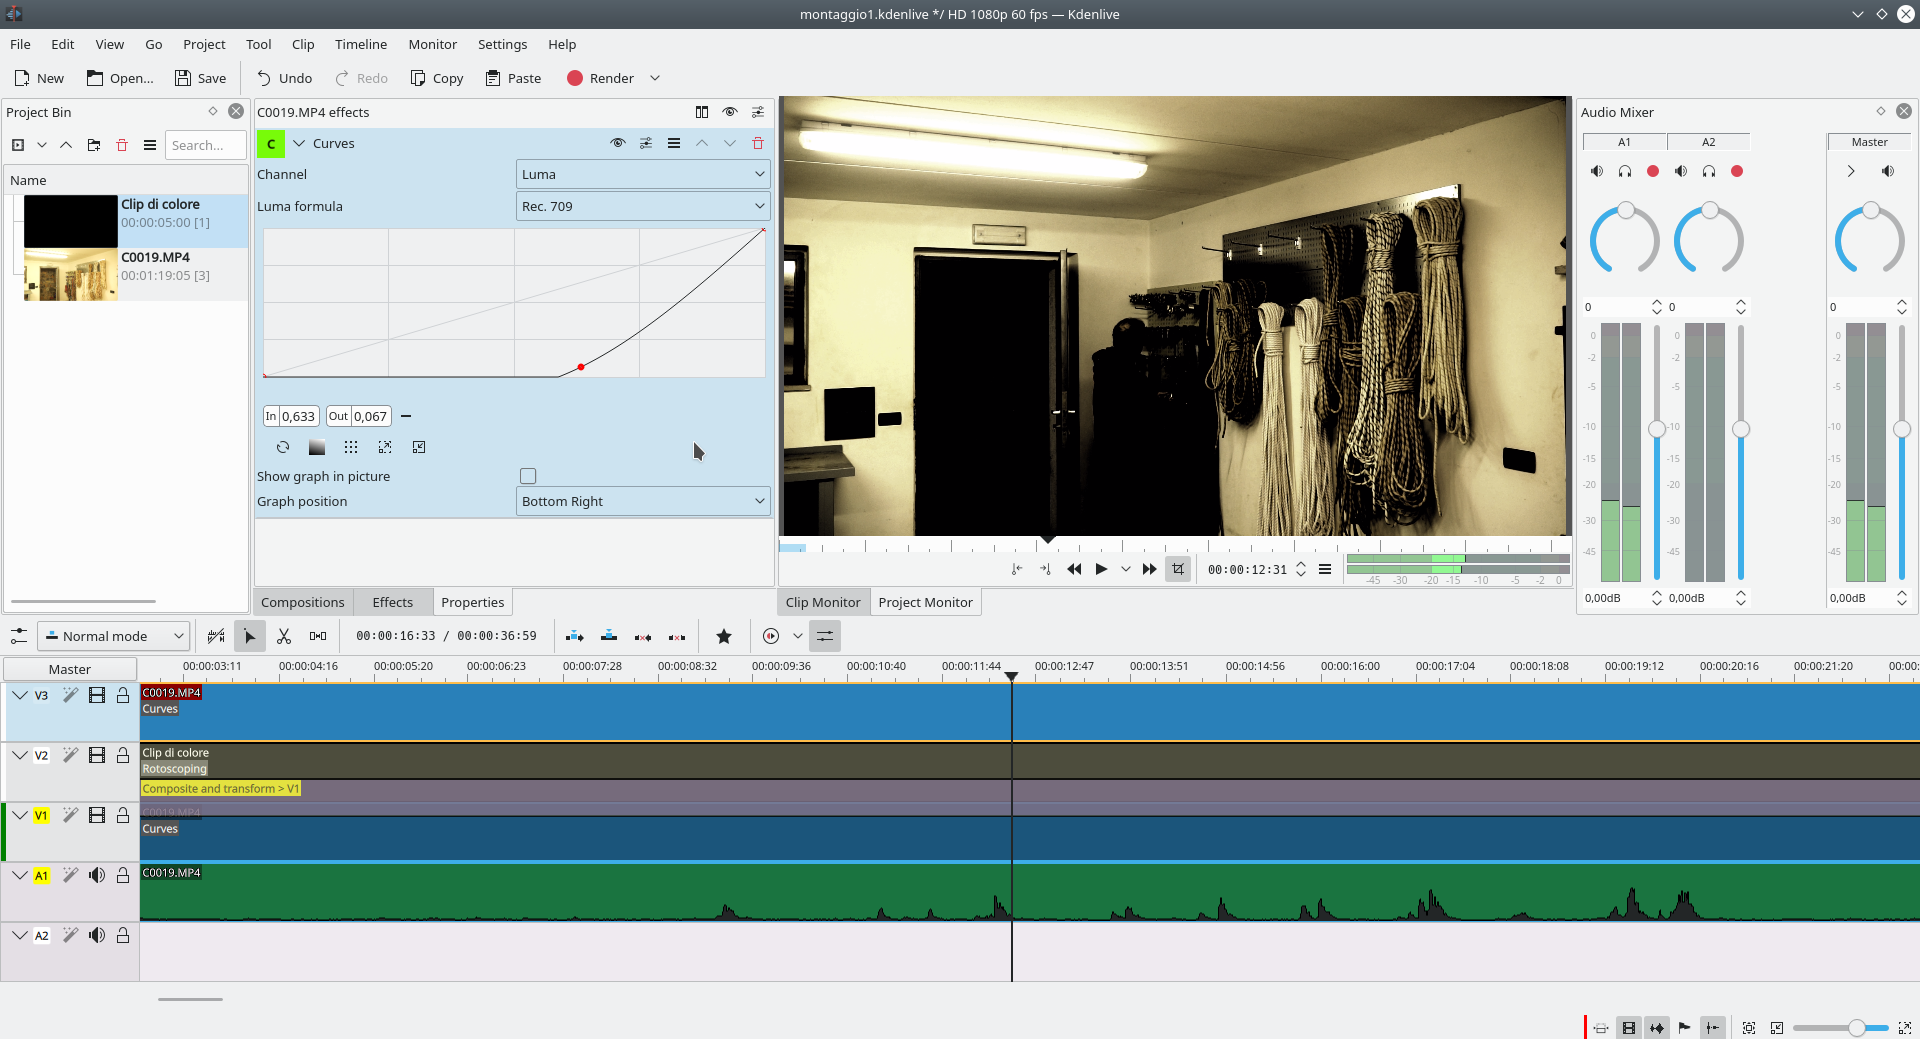 1 CURVES OF LIGHT – The new track clip Movie3 , being a clone of the clip present in Video1 , it also has all its effects: let’s remove them and insert only one type effect Curves On the canal Luma . We need to turn down the brightness to see well the overexposed objects.
 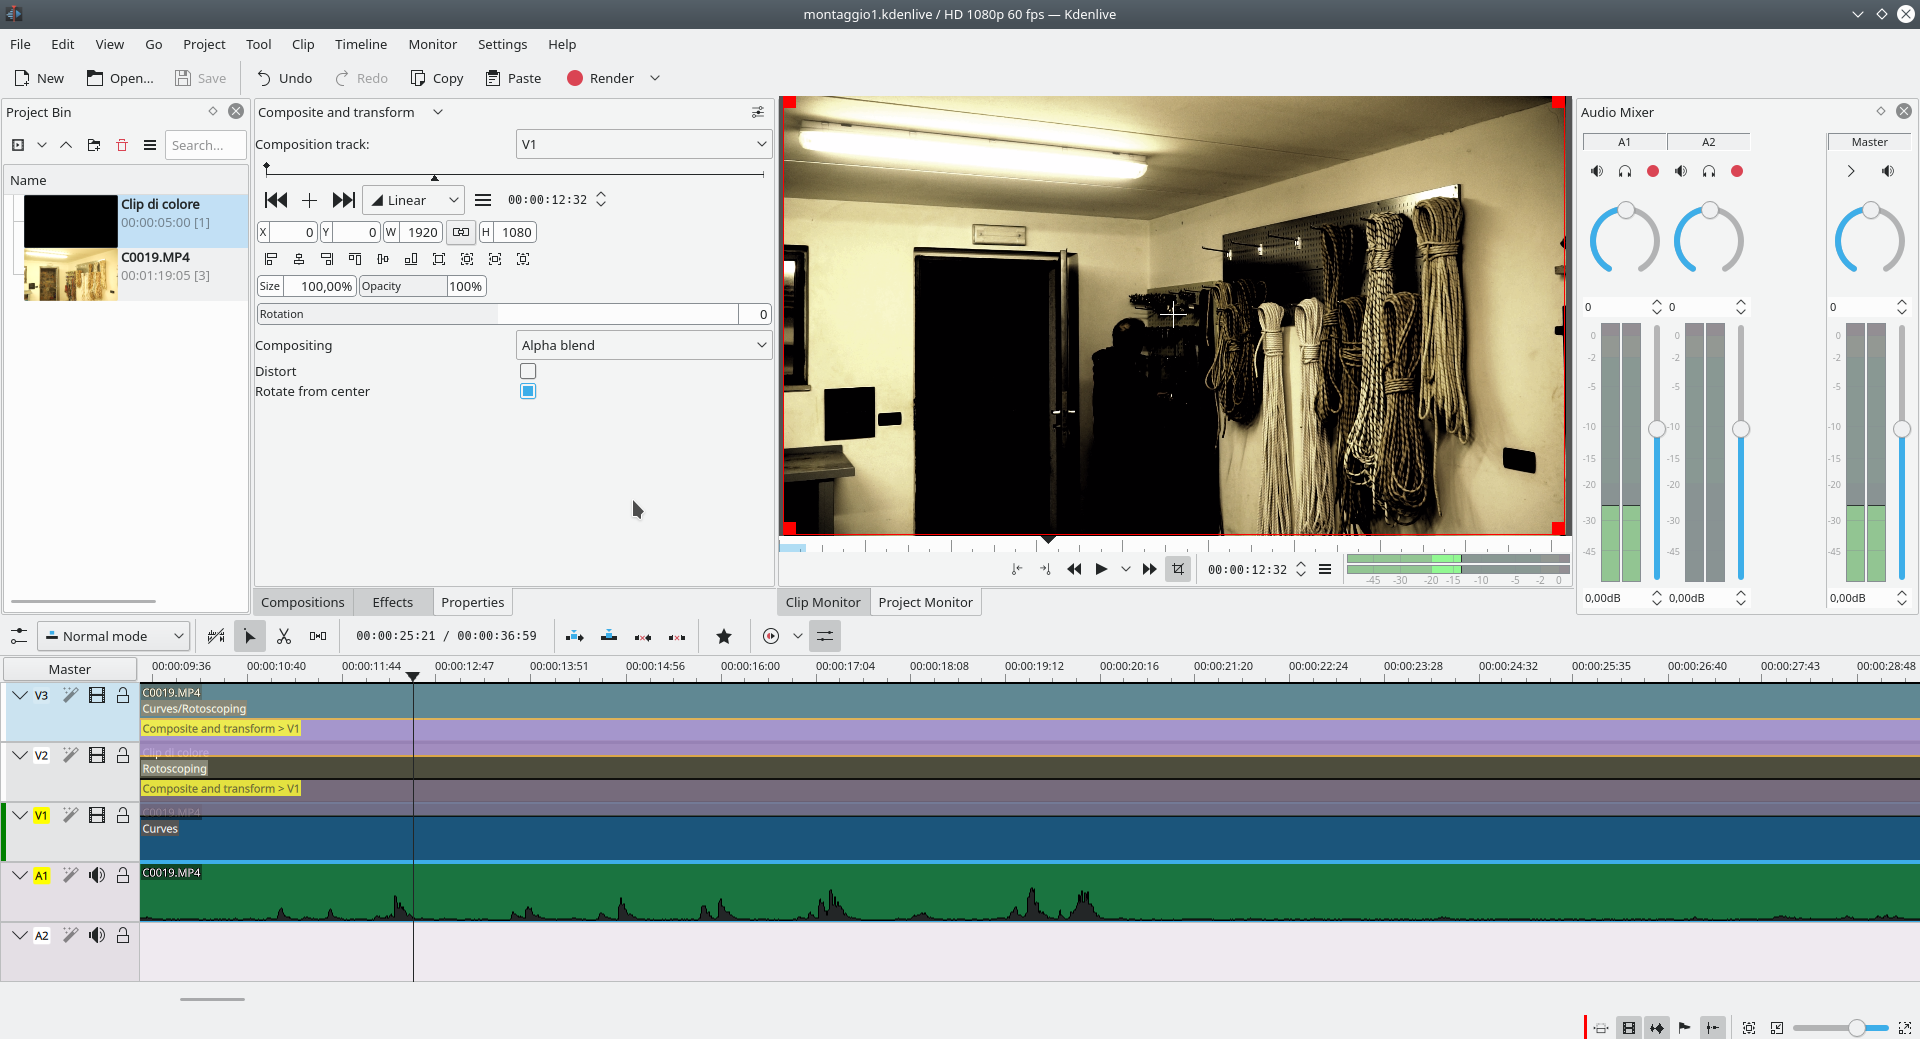 2 A TRANSITION – We add a transition for the duration of this clip: the transition must be of type Composite and transform , and referred to the track Video1 . For the rest, the mode is fine Alpha blend with opacity to 100% .
 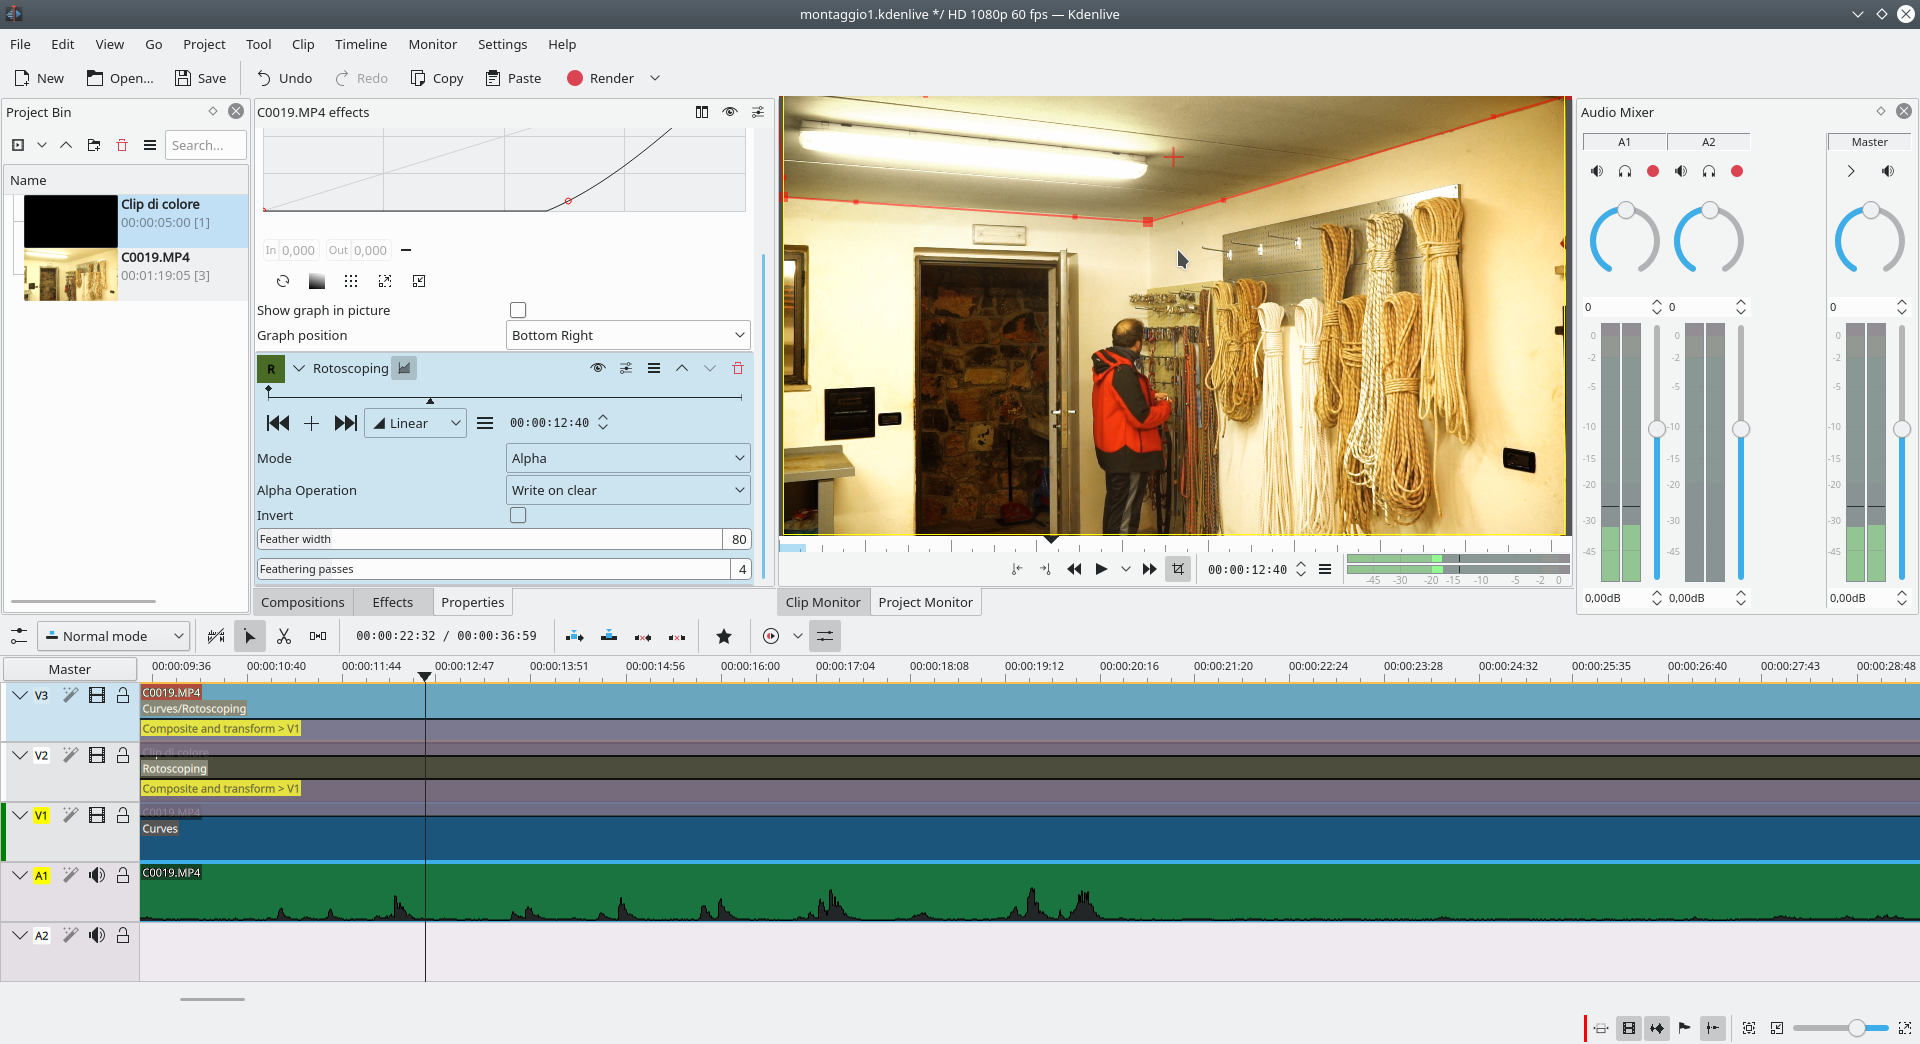 3 THE ROTOSCOPING – We always add a type effect to this clip rotoscoping , by selecting the outline of the object that in the original shot is overexposed, for example the ceiling. We use a feather of at least 80 , so as to blend the edges well.
  4 ALPHA CHANNEL – We probably still have too strong shadows. To get a better fusion, we add the effect Curves On the canal Alpha , lowering the shadows a lot, and gradually the rest (without diminishing the highlights too much).
  5 OTHER OBJECTS – Of course, it is likely that there are other overexposed objects: we can also add these creating a new effect rotoscoping with Alpha operation set to Maximum and cutting out the outline of an overexposed object.
  6 LESS CONTRAST – At the end of the processing it is possible to adjust the original image as a whole, by inserting an effect Curves in the track clip Video1 . The effect must work on the channel Luma and raise the midtones slightly, lowering the shadows a little.

