With Kdenlive we can insert real or simulated lightning clips into our videos, both as a thunderstorm effect or as a result of some magic. And to do it you only need a few steps, still having the chance to customize the result.
What is so fascinating about an electrostatic discharge? It will be the idea of the energy that manifests itself, or the irregular shape (while we usually associate the light beams with a much more similar appearance to a straight line). The fact is that lightning is always a way to surprise the public, whether huge or tiny, vertical or horizontal. We can give the idea of the fury of atmospheric events, or of the superpowers of some character, in addition to the functioning of some laboratory machinery of the villains of a comic (or a Gothic novel). The question, for the director, is therefore how to insert lightning in his own films. Of course, in some cases you can do everything “in the room” by buying or renting a Van der Graaf generator or a Tesla coil. But they are impractical and uncontrollable methods. The best option is to work completely in post production, adding lightning to the superimposed movie. Placing them in a background is quite easy, just take a photo of lightning, bring the contrast of the image to the maximum so that the background appears black, and then insert the image over the night sky that we filmed (presumably black too ), changing the brightness of the movie for a couple of frames so that it looks as if it is lit by lightning. Inserting them into a scene, perhaps letting them come out of an actor’s hands, requires more work. It is a starting point that is filmed. Fortunately, getting lightning videos is not too complicated: sites like YouTube are full of videos produced as an example of special effects simulation software, but we don’t need these programs: we just need the sample movies, from which to extrapolate lightning and edit them with Kdenlive. It is also possible to create the starting video using a tesla reel: just position yourself in a completely dark room, adequately adjust the camera exposure, aim the lens on the reel so as to shoot from the center to the edge and turn on the reel, holding a finger on the glass to let the lightning discharge in the same point. What we are going to do is take the movie, which must necessarily represent a lightning bolt on a black background, and place it on top of the clip with our actor. The clip must have a transition that uses the compositing method Screen , which treats the image as if it were a screen. The result is that that is that it is black will be considered part of the background and therefore canceled, while the white of the lightning will be considered as light, and therefore it will produce a glow on the underlying image (i.e. that of the actor). Using the rotation effect and the possibility for the transition to move the image, the lightning can be positioned in any position and in any orientation we want. Since both characteristics (position and rotation) can be changed with key frames, we will be able to move the lightning during the movie to follow the movement of the actor or camera. In addition, we can duplicate the clip containing the actor to hide parts of the lightning that should not be seen in logic: if, for example, in the foreground there is an object and the lightning should pass behind it, we can use the effect rotoscoping to cut out objects in front of the lightning. As always, you can see the example video at the following address: https://www.youtube.com/watch?v=xXL7_dcC9S0
 Two lightning bolts appear on our movie
  The Tint effect allows us to change lightning color
 Add some color
The example we make involves the use of a white lightning bolt, but of course it is possible to change its color: simply apply the effect to the lightning clip Tint . With this effect you can change the brightness scale of a movie, mapping it to colors other than black and white. In our case it is advisable to choose black for black, while for white the color you want to have lightning, then setting the amount of color by increasing the value Tint amount . In this way the background of the clip will remain black (and therefore transparent thanks to the transition we used), while the lightning will change from white to the color we have chosen. If desired, the effect can even be modified with keyframes, by clicking on the usual stopwatch-shaped button, so as to give a different Tint amount and switch the lightning from white to colored intermittently.
A web search
If we don’t want to resume real downloads, we can find simulations on YouTube
 1 FIND LIGHTNING – The first thing to do, of course, is to get a movie that contains lightning on a black background. You can find many, real or simulated, on Youtube by looking lightning blackscreen .
 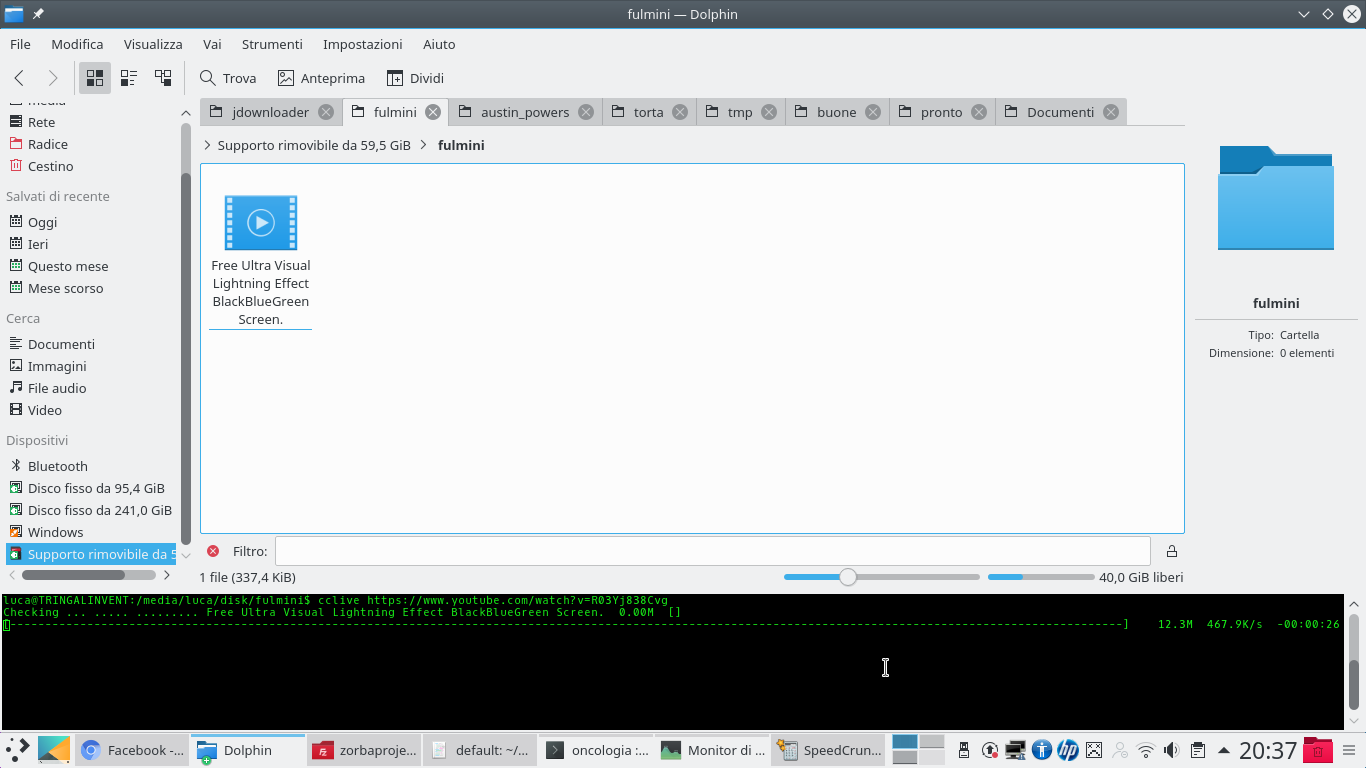 2 VIDEO DOWNLOAD – To download a movie from YouTube you can use the convenient command cclive , which provides the MP4 file corresponding to the video. The command can be installed on Debian with sudo apt-get install cclive .
 Trim the clips
We prepare the video clips by placing them in the tracks and cutting them
 1 ACTOR CLIP – We create a Kdenlive project by inserting the clip with the actor we shot, and the lightning one downloaded from YouTube. The actor’s clip should be positioned in the lowest track, the Video1 , cutting off any unnecessary parts.
  2 ALL THE LIGHTNING – We then need the lightning clip: let’s insert it in the track Video2 , using the scissors tool to cut anything other than lightning on a black background (such as opening credits or images on a green or blue background).
  3 CUT THE CLIPS – Always using the scissors It is possible to cut various segments of the clip for the different situations in which we want to insert lightning in the movie. And we can also insert two: just cut two pieces of the lightning clip and place them on top of each other.
 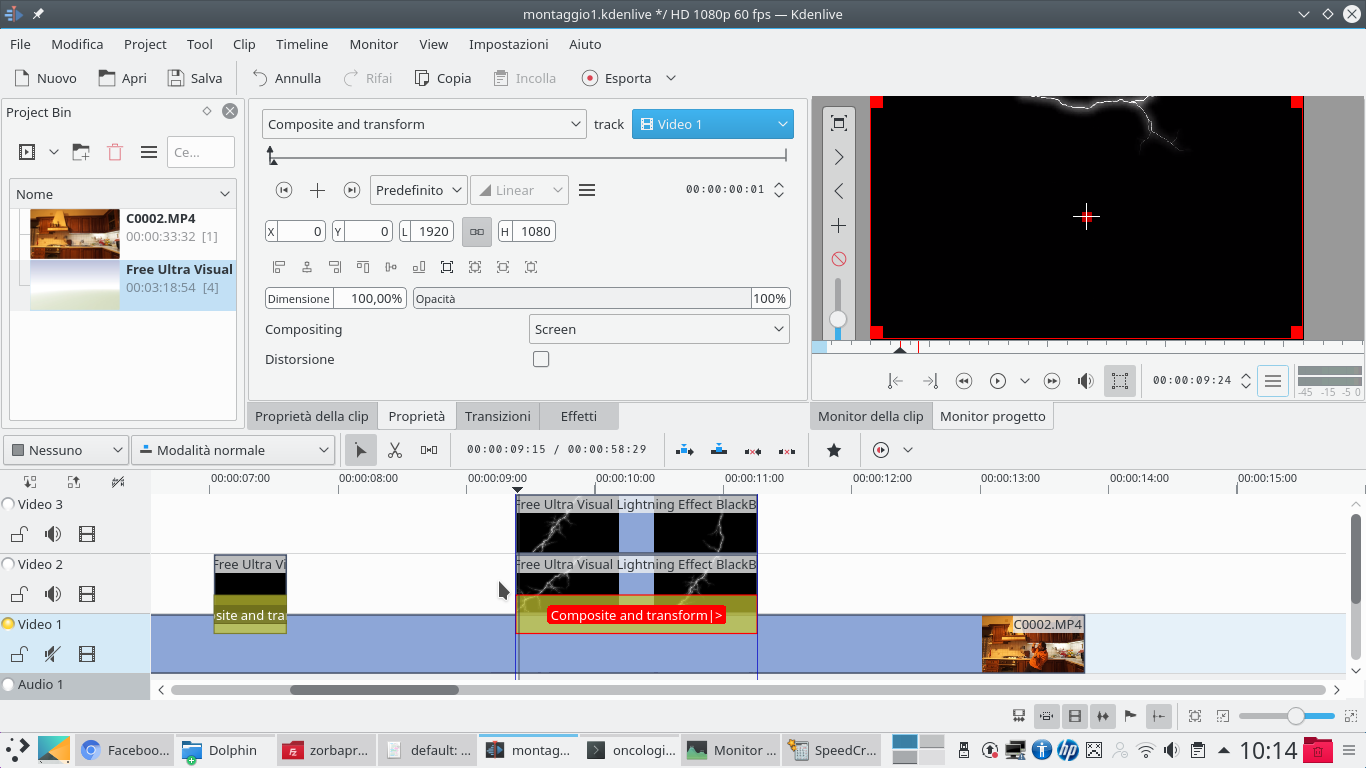 4 A TRANSITION – For example, we can insert a first lightning clip in the track Video2 , and a second clip of the film in the Movie3 . At the first clip, the one on the track Video2 , you can assign a type transition Composite and transform .
 Perfect overlay
With the right transition, the lightning seems bright
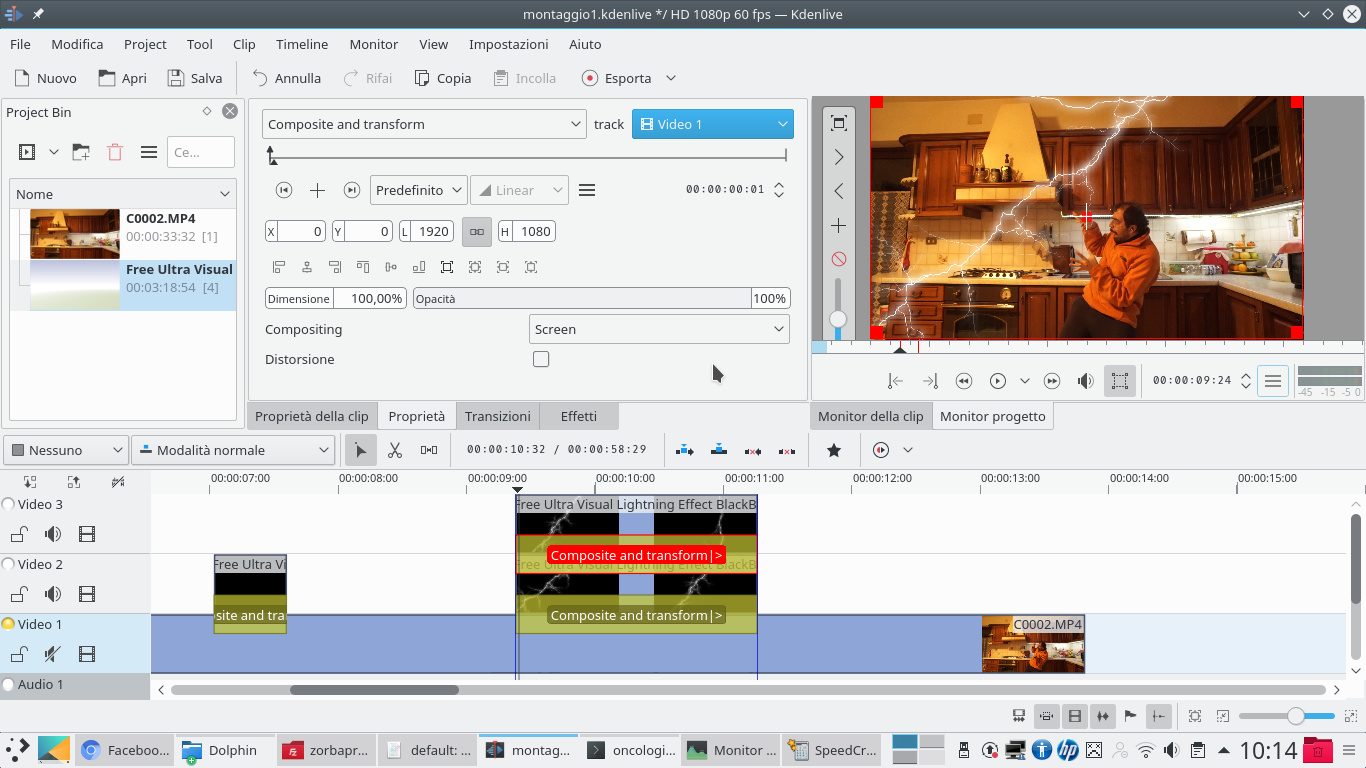 1 COMPOSITING – The transition must have compositing Screen , and be referred to the track Video1 . The same transition, with identical properties, must be applied to the track clip Movie3 . Lightning will appear superimposed on the movie.
  2 ONE ROTATION – We add to the track clip Video2 a type effect Rotate , changing the rotation on the X axis . We must choose the rotation that seems appropriate to give the lightning the direction we would like it to have. If desired, keyframes can be added.
  3 THE ALIGNMENT – Now we can go back to work on the transition of the track clip Video2 to place the image of the lightning where it is needed. For example, we can place one end of it in the center of the actor’s hand.
  4 REPEAT AGAIN – The same procedure can be repeated for the track clip Movie3 , rotating it with the effect Rotate and positioning it using the transition, so that the second lightning bolt is also where it should be.
 Adapt to the scene to be more credible
We modify the lightning to follow the actor and hide it behind objects in the foreground
 1 THE KEY FRAME – Obviously, it is possible that the actor will move during the shooting, so lightning must also be moved. You can do this by working on transitions, simply by adding new keyframes and moving the lightning where necessary.
 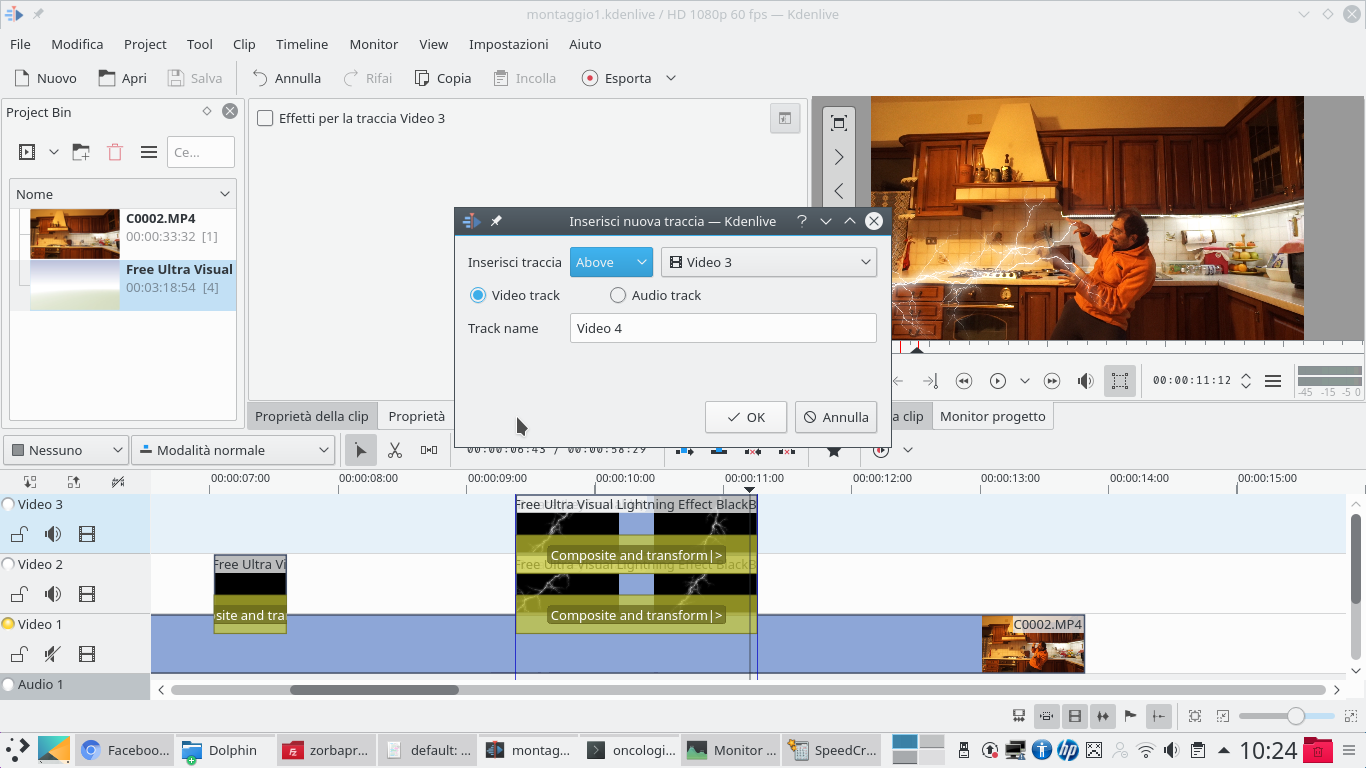 2 NEW TRACK – Now we have to refine the effect, but to do it we need a new video track. Just right click on the last track, the Movie3 , and choose Insert new track , specifying that you want it above a Movie3 .
 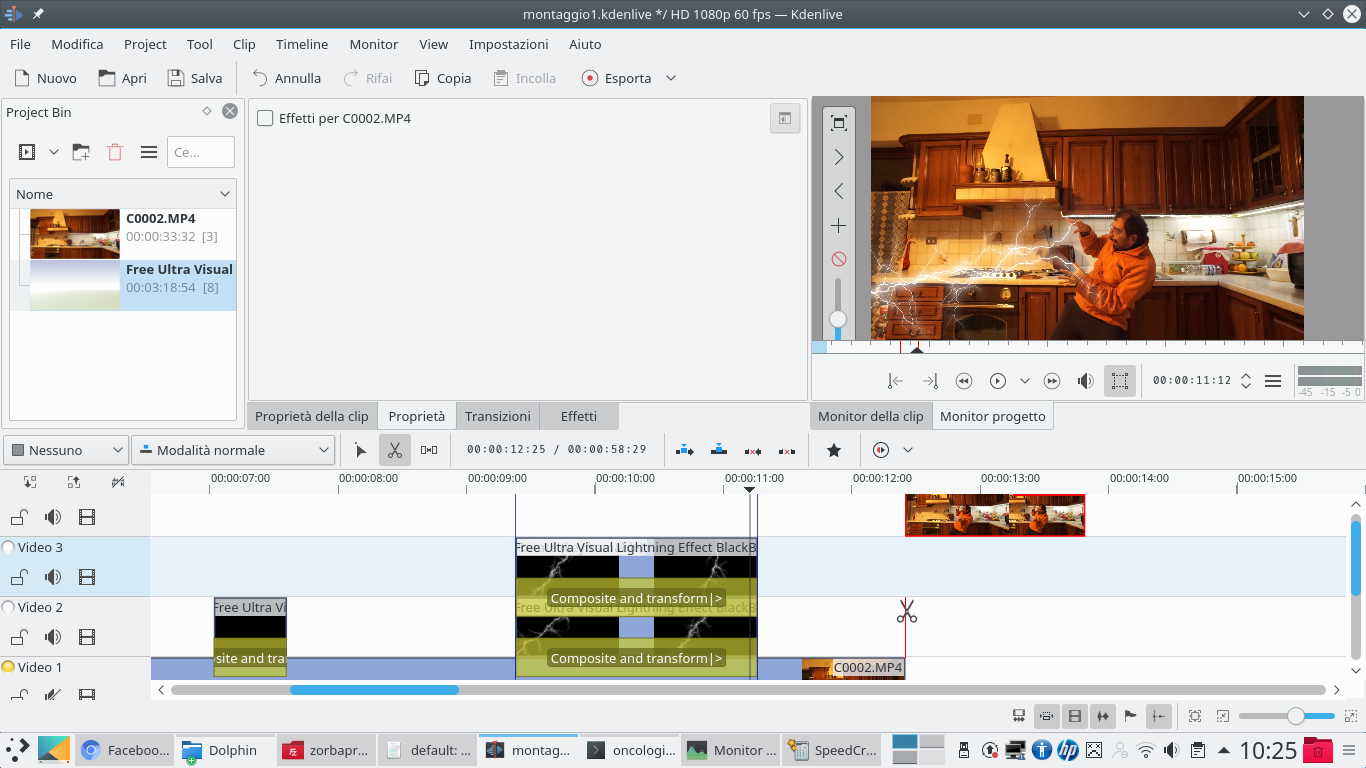 3 DOUBLING – Now we have to split the actor’s clip, positioning it in the track Movie4 so that it is synchronized with that of the track Video1 . The easiest way is to cut the track Video1 , move one of the two pieces into Movie4 , and then extend them.
 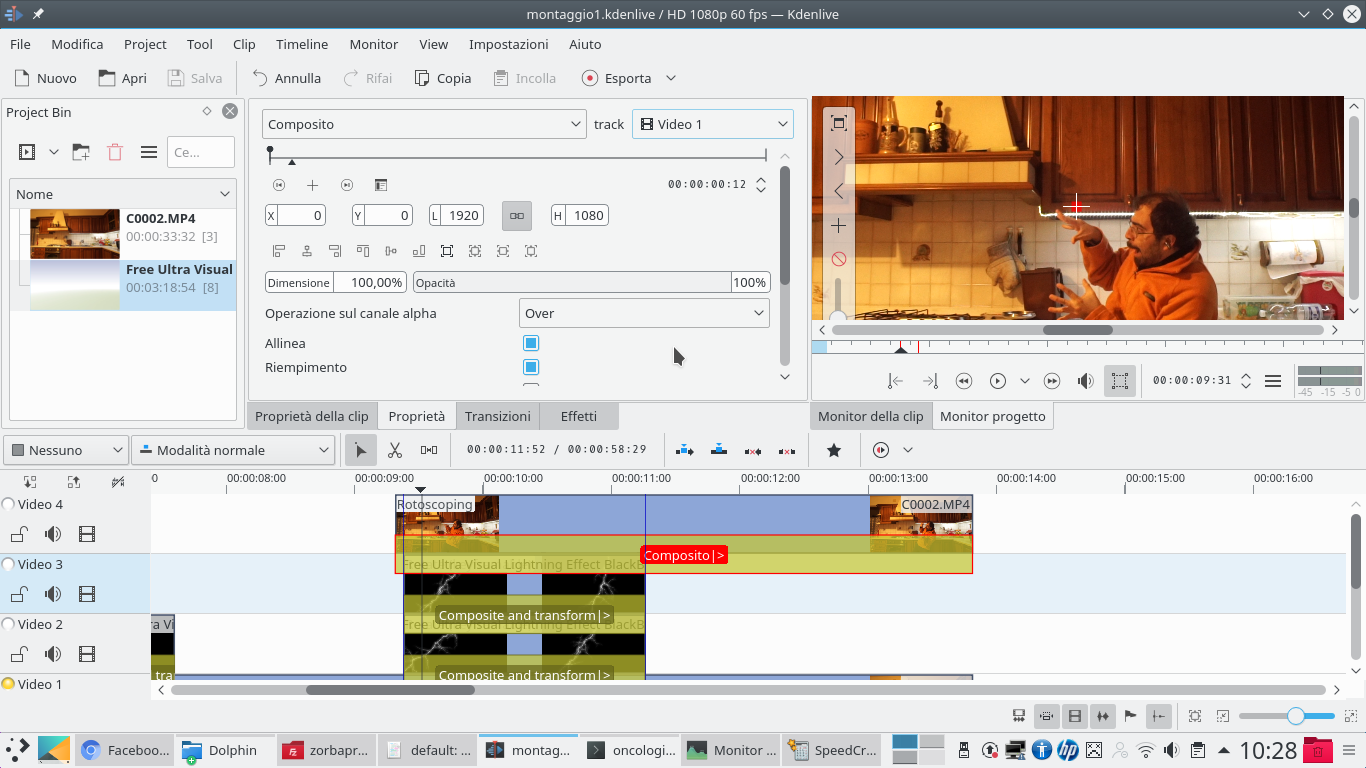 4 A TRANSITION – In this way, the alignment of the two clips is maintained. The clip that is, in this way, in the track Movie4 must have a type transition Composite , referred to the track Video1 .
  5 THE ROTOSCOPING – A type effect is then added to the clip rotoscoping , whose outline must be drawn following the actor’s hands (at least in the parts that must not be covered by lightning).
  6 MOVE THE POINTS– By adding keyframes we can change the shape of the rotoscoping to follow the movement of the hands. By covering the parts of the hands (or body) that according to the scene must be in front of the lightning, a more realistic effect is obtained.

