Shooting a scene in the rain can be annoying and dangerous. Much better to film under the sun and then add the rain in post-production with Kdenlive. Using a couple of tricks we can get a realistic result.
One of the situations that one can find oneself having to stage is the rain: a dramatic scene can be helped a lot, in one’s performance, by the presence of the rain. It is a situation that induces a sense of sadness or tension in the audience, and can help us tell a story. Of course, filming a scene in the rain can be more complicated than it seems at first glance. In fact, there are a number of technical problems: to begin with, you risk wetting the video camera, damaging it. Even a camera with underwater housing would not be immune to drops of water on the lens, which obviously ruin the image. In addition, a condensation coating may also form. Then there are problems for the whole crew: the director will have difficulty controlling the camera, while the actors will risk pneumonia by being completely drenched in the rain for a long time. Lightning strikes can be a serious risk for everyone. The best thing to do, therefore, is to fake the rain using a couple of visual effects that we can achieve with Kdenlive. This means that we can achieve our recovery on a sunny day, with all the necessary calm. To make the effect well we need some effect “in the room”: in particular, the actor present in our shot must obviously be wet, otherwise the final movie will not make sense (anyone would notice that the rain is not wetting the actor). This will not be a problem, however: if we are filming in the sun, it will certainly be a bit hot, so the actor will be at best happy with a refreshing shower. In general, it is not necessary to wet the rest of the scene as well, the attention of the audience is still directed to the actor. The rain will then be added in overlay with Kdenlive simply by taking it from a repertoire video clip. Where to find the rain clips? On the web there are several. For the cost of 1 dollar you can get to this address https://gum.co/BPxh (the The online viewer does not work, but the package is downloadable) two videos of rain from far and near at low resolution. Low resolution shouldn’t be a problem, since the rain must always be a little blurry anyway, otherwise it seems fake. If you want high resolution videos, they can be found on the website https://www.detfilmshd.com/G_Collections_Rain_01.html . In t in all cases, however, rain is always provided on a black background, which we can easily make disappear with the overlap mode Screen in Kdenlive. Alternatively, you can also film the rain yourself: you need to find a fairly isolated area at night, like a large agricultural field, so as not to have clearly visible objects such as buildings, lampposts, or trees. Then just get a radial watering can and light the water with a backlight, to make it more visible. In this way we should get a completely black background with fake rain that glitters in front of the camera thanks to the light that passes through the water that we pour from the watering can. As always, you can see the example video at the following address: https://www.youtube.com/watch?v=MzEp2DVXSTw
 The image we filmed with the camera
  The result obtained after applying the various effects
 How to light up a rainy day
To make the effect well, correct lighting is required. When it rains the clouds cover the sky making the sunlight very diffused. We can simulate this by canceling out the shadows on the actor: first of all, it is good that the actor is lit from behind by the Sun, then we can use a reflective panel (aluminum foil) to bounce the light off his face. The best way to give the idea that the actor is soaked with water is to dip his shirt in a basin and then wring it out, so that it is only wet. Then the actor can wet his face as if to wash it, without obviously drying out, a few moments before starting shooting, so during the recording there will still be drops of water dripping from the actor’s face. Using the reflective panel to make these drops of water sparkle adds considerable realism to the scene.
Prepare the rain clip
DetonationFilms clips have a logo which we must delete
 1 ACTOR AND RAIN – Let’s start by uploading the two fundamental video clips into the project: that of the actor, and the one with the rain on a black background. Working on this clip, let’s position ourselves in the viewer when we sweep the logo and the rain appears.
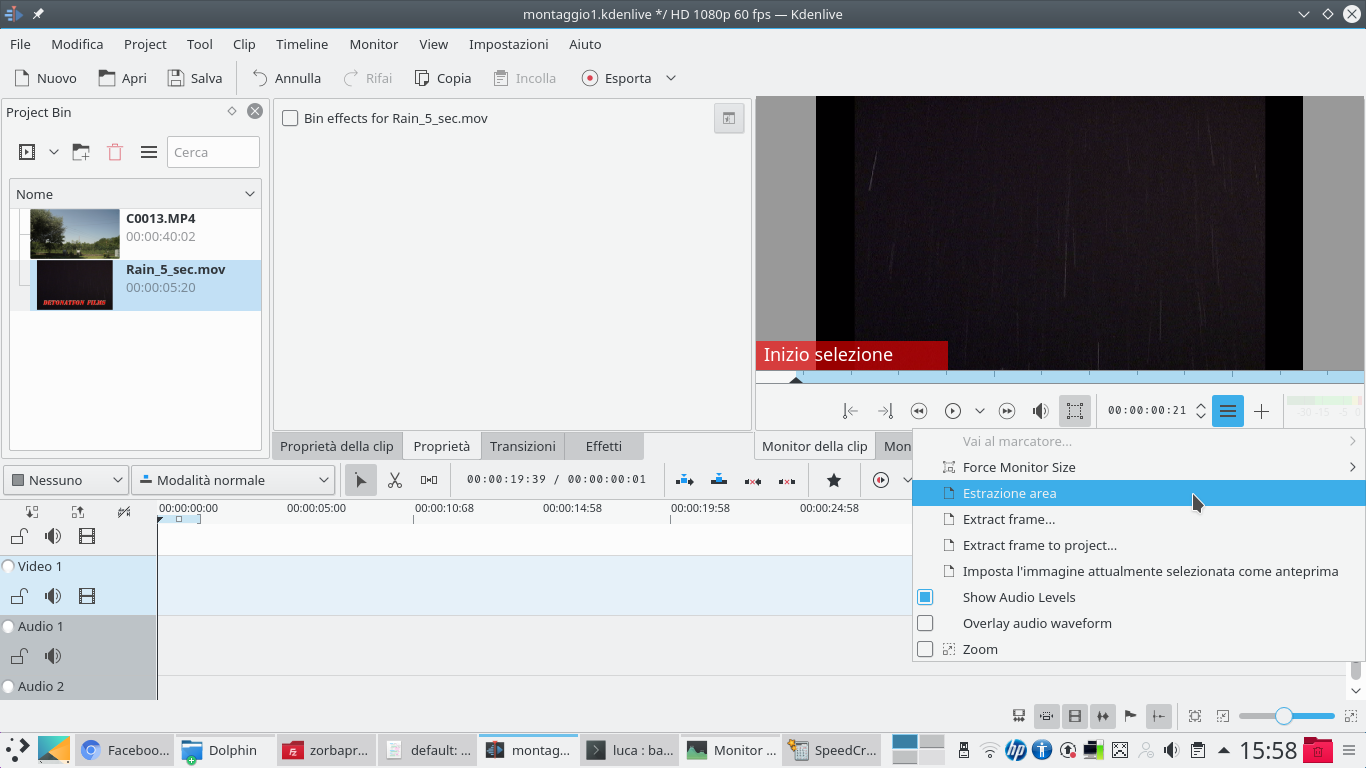
  2 CUT THE CLIP – Click on the button to set the start of the selection, then click on the menu and choose Area extraction . In this way we create a copy of the clip without the initial logo, which we can then use several times in a “loop” without problems.
 We overlap the rain
We place the rain clip over the actor, to obtain a simple overlap
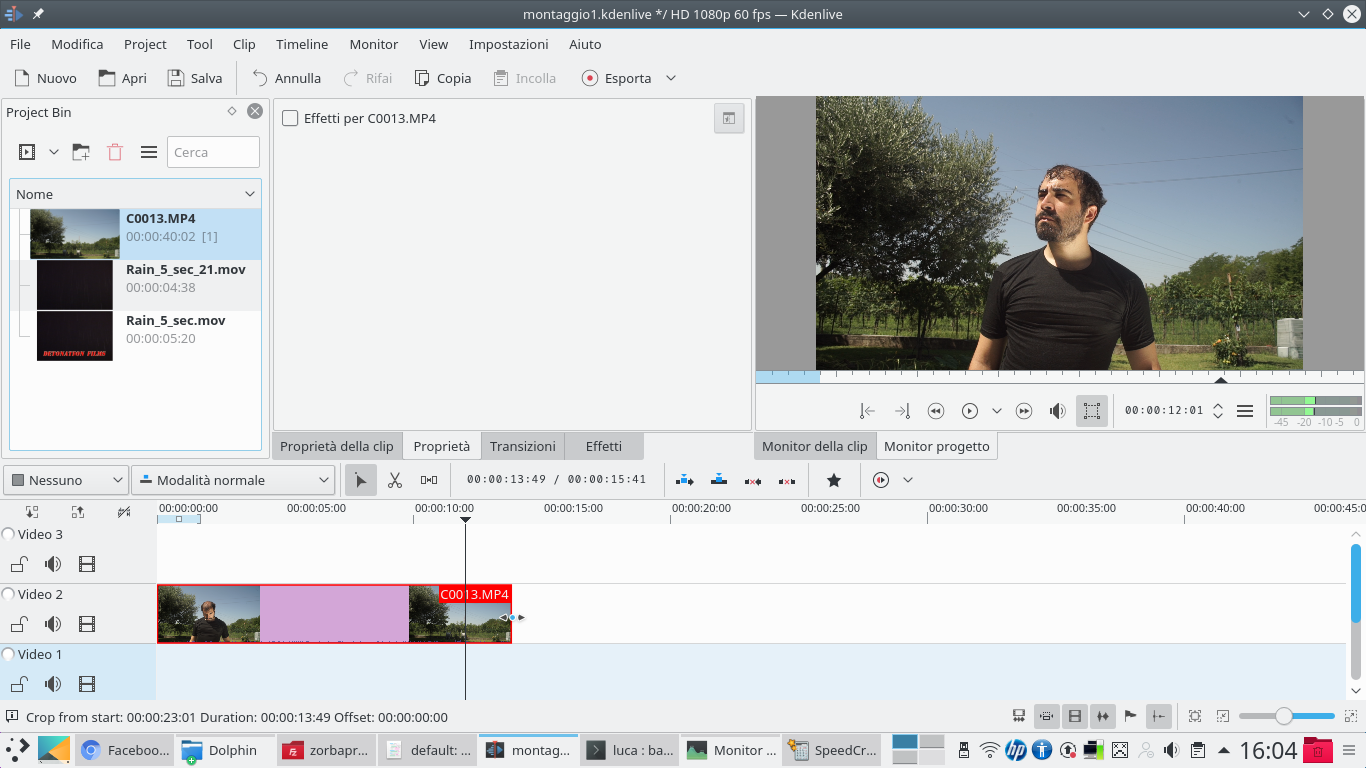 1 TRACK VIDEO 2 – Now we can start inserting clips into the timeline. The movie containing the actor must be positioned in the track Video2 , the intermediate one. Using the tool scissors we can cut unnecessary parts of the clip.
  2 THIS IS THE RAIN – In the track Movie3 , above the actor’s clip, we can instead place the rain clip, in the version we modified by cutting the initial logo. Since the clip is short, we can insert it several times until the actor’s clip is completely covered.
  3 COMPOSITION – Between tracks Movie3 is Video2 we have to insert a transition of type Composite and transform . At the transition we have to give the type of Compositing Screen . Also, check the box Distortion .
  4 SOME CLOUDS– If the sky taken in the clip with the actor is too flat, cloudless, we can add them now. Just look for a nice photo of storm clouds on Google Images, for example looking for “storm clouds”.
 A little bit of clouds
We replace the sky by adding storm clouds
 1 LOCATION AND ZOOM – If we have decided to add clouds, their photograph must be inserted in the track Video1 , and we need to assign the effect to this clip Position and zoom . This allows us to correctly position the clouds: we tick the box Distortion .
 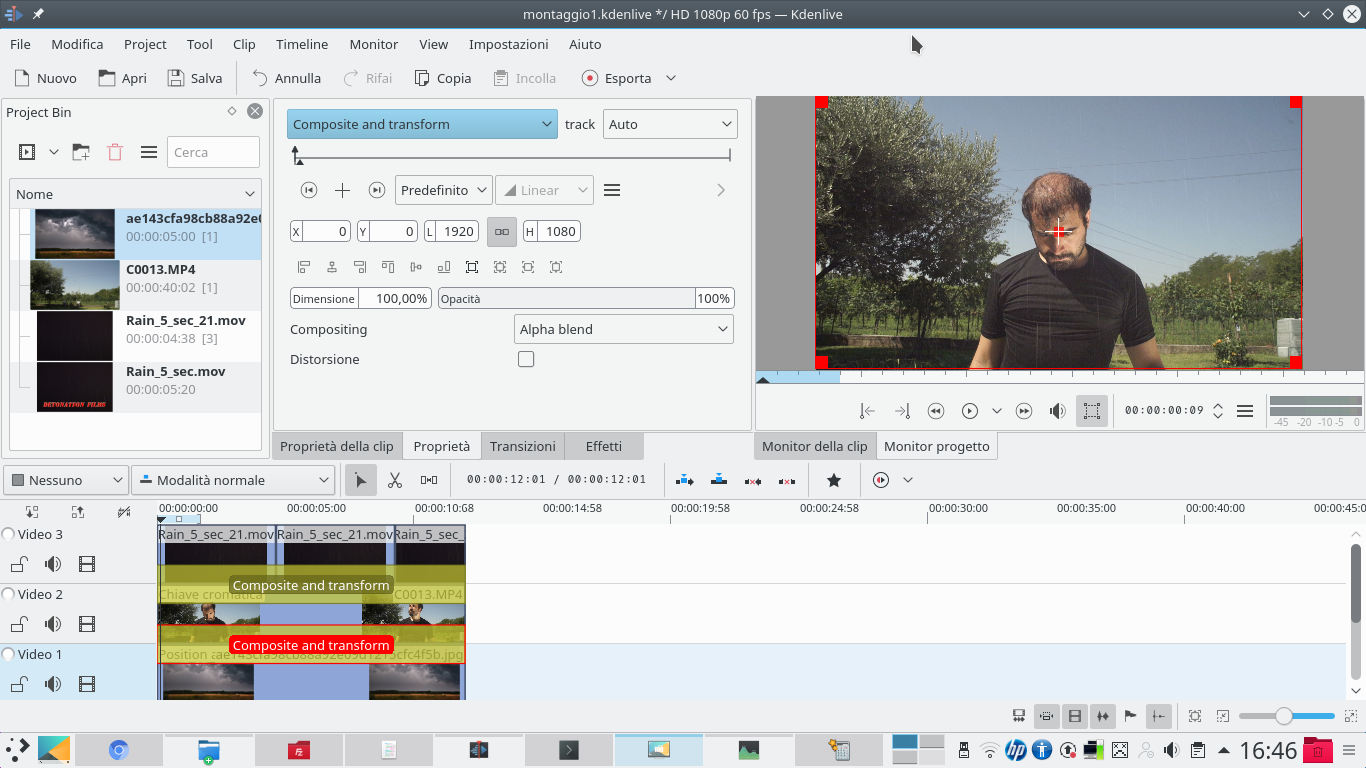 2 A TRANSITION – Distortion allows us to adapt the photograph to the proportions of the movie. Between the tracks Video1 is Video2 you have to insert a transition, of type Composite and transform . The transition settings should be left as they are.
  3 THE CHROMA KEY – Now, working on the actor’s clip, let’s add the effect Chromatic key selecting the color of the sky. In this way we will make the clip’s sky disappear, to make the clouds of the track below appear. More than one effect can be used Chromatic key .
  4 THE CURVE OF LIGHT – After completely replacing the sky with the effect Chromatic key , we can adjust the colors of the clip by adding the effect Curve setting it for the channel Luma . We want to draw a concave curve, to reduce brightness.
 Treat the overlay
We check the light and the edge of the tracks to have a homogeneous image
 1 THE TRANSITION – To make sure that the rain overlay is still clearly visible on the whole clip, let’s go on the transition between the clips Video2 is Movie3 , and make sure that this transition refers to the track Video1 .
  2 VISIBLE RAIN – We can also make the rain a little more visible. Just add the effect Curve the first clip of the rain, in the track Movie3 . The curve must be convex, raising both the lights and the shadows a little.
  3 ON ALL CLIPS – Since we have several rain clips in the track Movie3 , we will have to apply the same curve effect to all of them. We can do this by clicking on the effect menu and choosing Save effect . It is now in the list of effects and we can assign it to the other clips.
 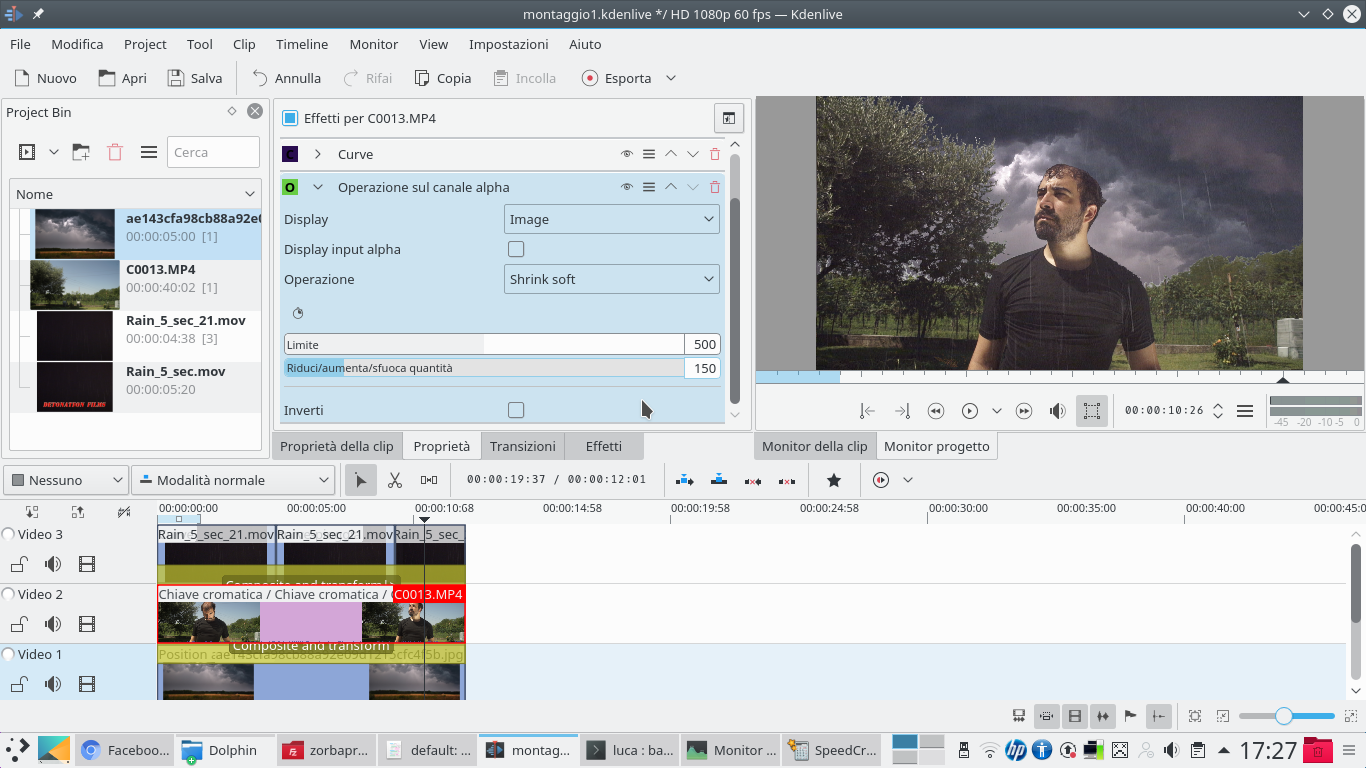 4 THE ALPHA CHANNEL – Going back to work on the track clip Video2 , we make the outline of the sky less clear by adding a type effect Operation on the alpha channel . We will choose the operation Shrink soft or Blur , depending on the result we see.
 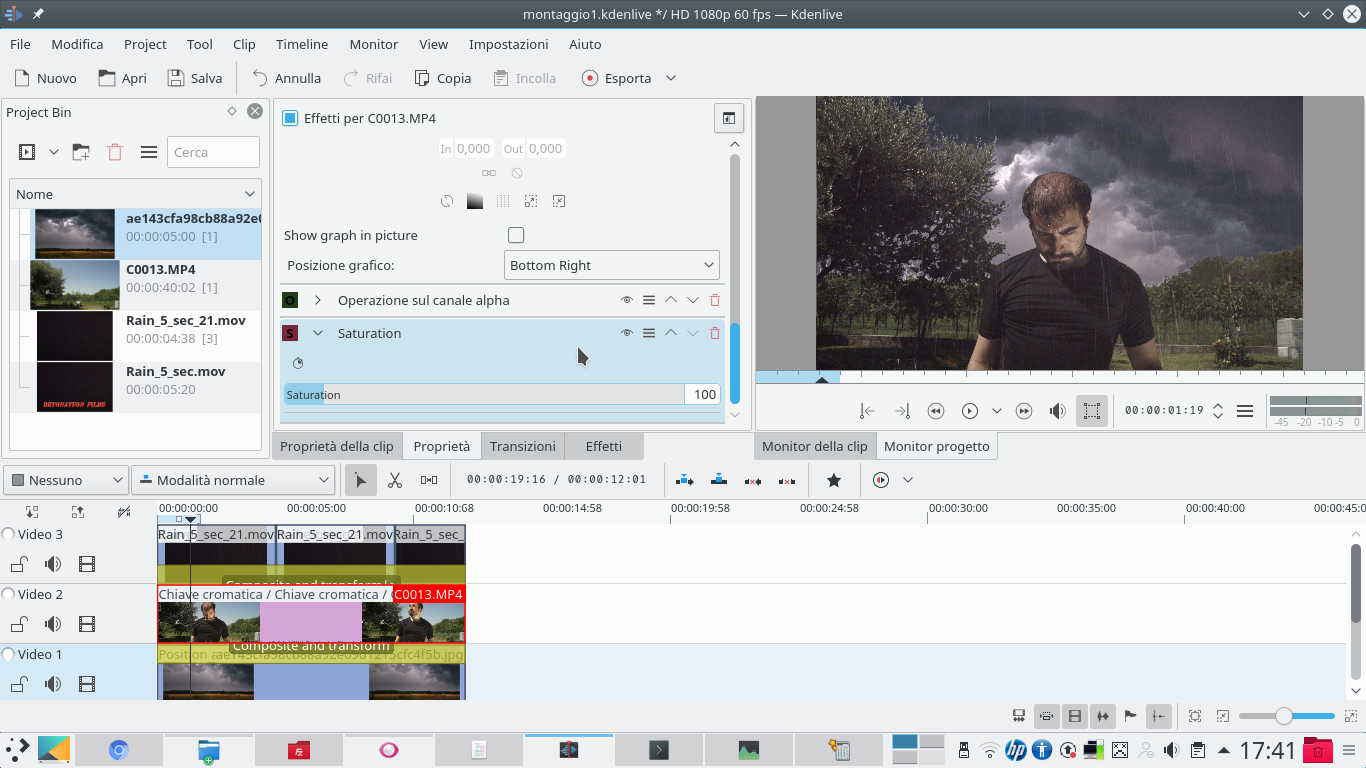 5 A LITTLE GRAYER – The images during the rain seem a little all tending to gray. For this we add the effect to the actor’s clip Saturation , decreasing the saturation a little. The starting value is 125 , so we can bring saturation to 110 or 100 .
 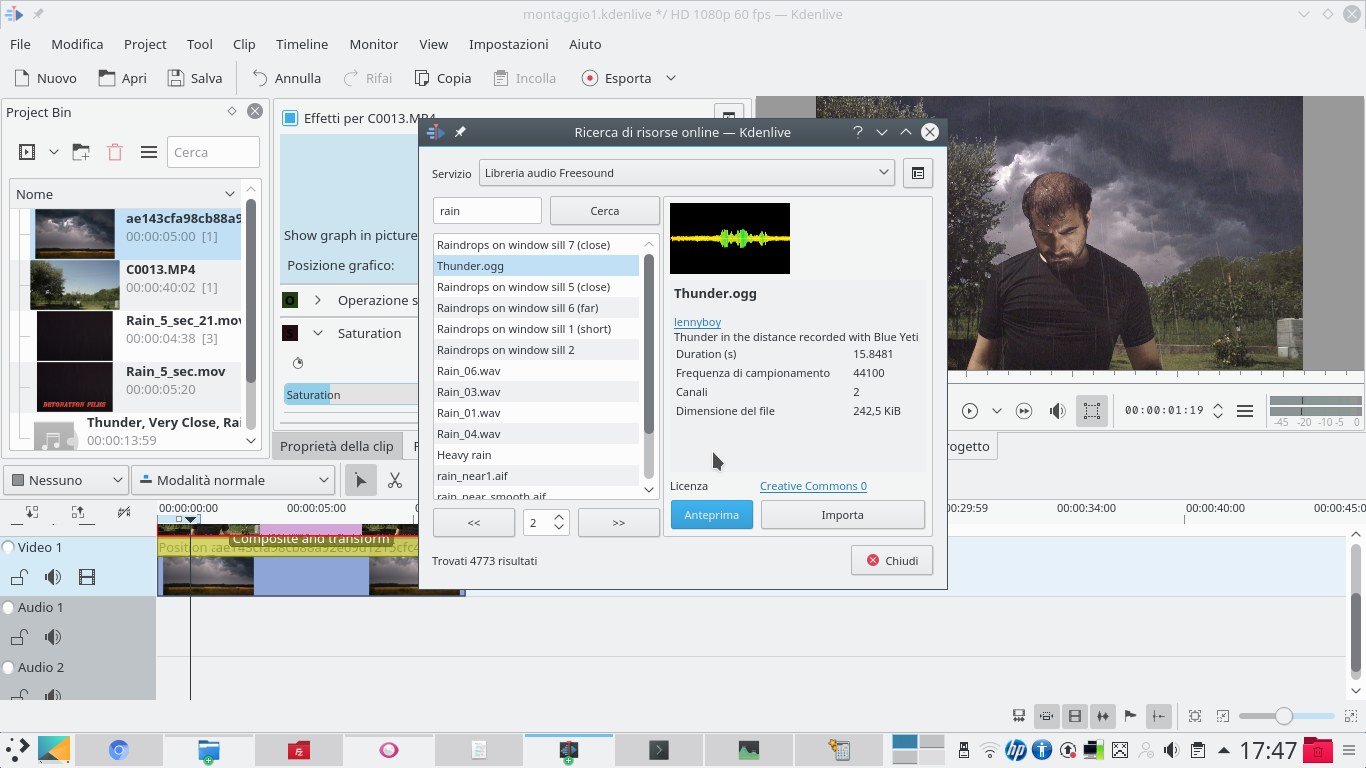 6 AUDIO EFFECT– To completely convince the public that the scene contains rain, the sound effect must be added. Just click on the menu Project / Online resources , and look up the word “rain” on Freesound.

