Have you ever thought of making an actor disappear inside a box, among flashes of light? Probably yes, especially when he complains. You can do it with Kdenlive, without risking a report for mistreatment. And even without too much effort.
The Poltergeist – Demonic Presences movie from 1982 is now a great horror classic. The idea of the TV that sucks the little girl has become the starting point for many directors, who in the following years invented various expedients to make a person disappear inside an object. The poltergeist works practically like a black hole, with the difference that in the collective imagination it emits rays of light, while a black hole is obviously dark. Have you ever thought of sucking one of your actors into some demonic object, for example a box? You have probably also thought that it is complicated and expensive to achieve such an effect. It is not exact: thanks to Kdenlive we can obtain a good yield at zero cost and with little effort. The effect must be divided into two parts: one is the actual disappearance of the actor, or rather his movement towards the inside of the box. The other part is constituted by the appearance of the rays of light. As for the first part of the effect, just get a photograph of the actor and deform it with Kdenlive until it enters the box. It is not necessary to use a movie for the actor (which could still be done with a chroma key), since the effect is usually so fast that viewers do not even have time to realize that the actor does not it is moving because it is a photograph instead of a video. Obviously, we can extract the photograph of the actor from the footage we shot, by deleting the background with GIMP. There are several possibilities to manipulate the image of the actor, but what matters is above all to lengthen his figure in height. You can then decide to rotate the actor on himself, and thanks to Kdenlive we can perform the rotation in 3D, controlling the three axes. To give the idea that the actor is really getting into the box, it is then sufficient to use an overlap on several levels: the base will be the background layer, the one in which the whole scene is present but without the actor. Then we will have the level containing the actor with his movement, and finally above all the others a level with the box: in this way the box will seem to be positioned in front of the actor. If the box is large, we can leave its back wall in the background, and put the front one in the foreground. Then we have to create the ray of light. For this, it is sufficient to use a white colored clip, superimposing it on the movie with an overlay transition. In this way, everything covered by the white clip appears illuminated. To give the light, which would otherwise be spread over the entire scene, a shape similar to a ray, just use the rotoscope tool and draw a pyramid. Using the effect feathering we can also make the edges of the light beam more blurred and therefore more realistic. The problem is that the rotoscoping effect requires a composite transition: it exists for a little trick. In fact, we can use a gray intermediate clip. So, we are going to superimpose with the composite the white beam on the gray clip, and then the gray clip through overlay on the movie. We choose the gray color because with this color the overlay effect appears neutral, and therefore you will notice changes only in the areas covered by the white ray (and not in the gray ones). As always, you can see the example video at the following address: https://www.youtube.com/watch?v=sXDUUi4ZIDk
 The actor is sucked into the box
 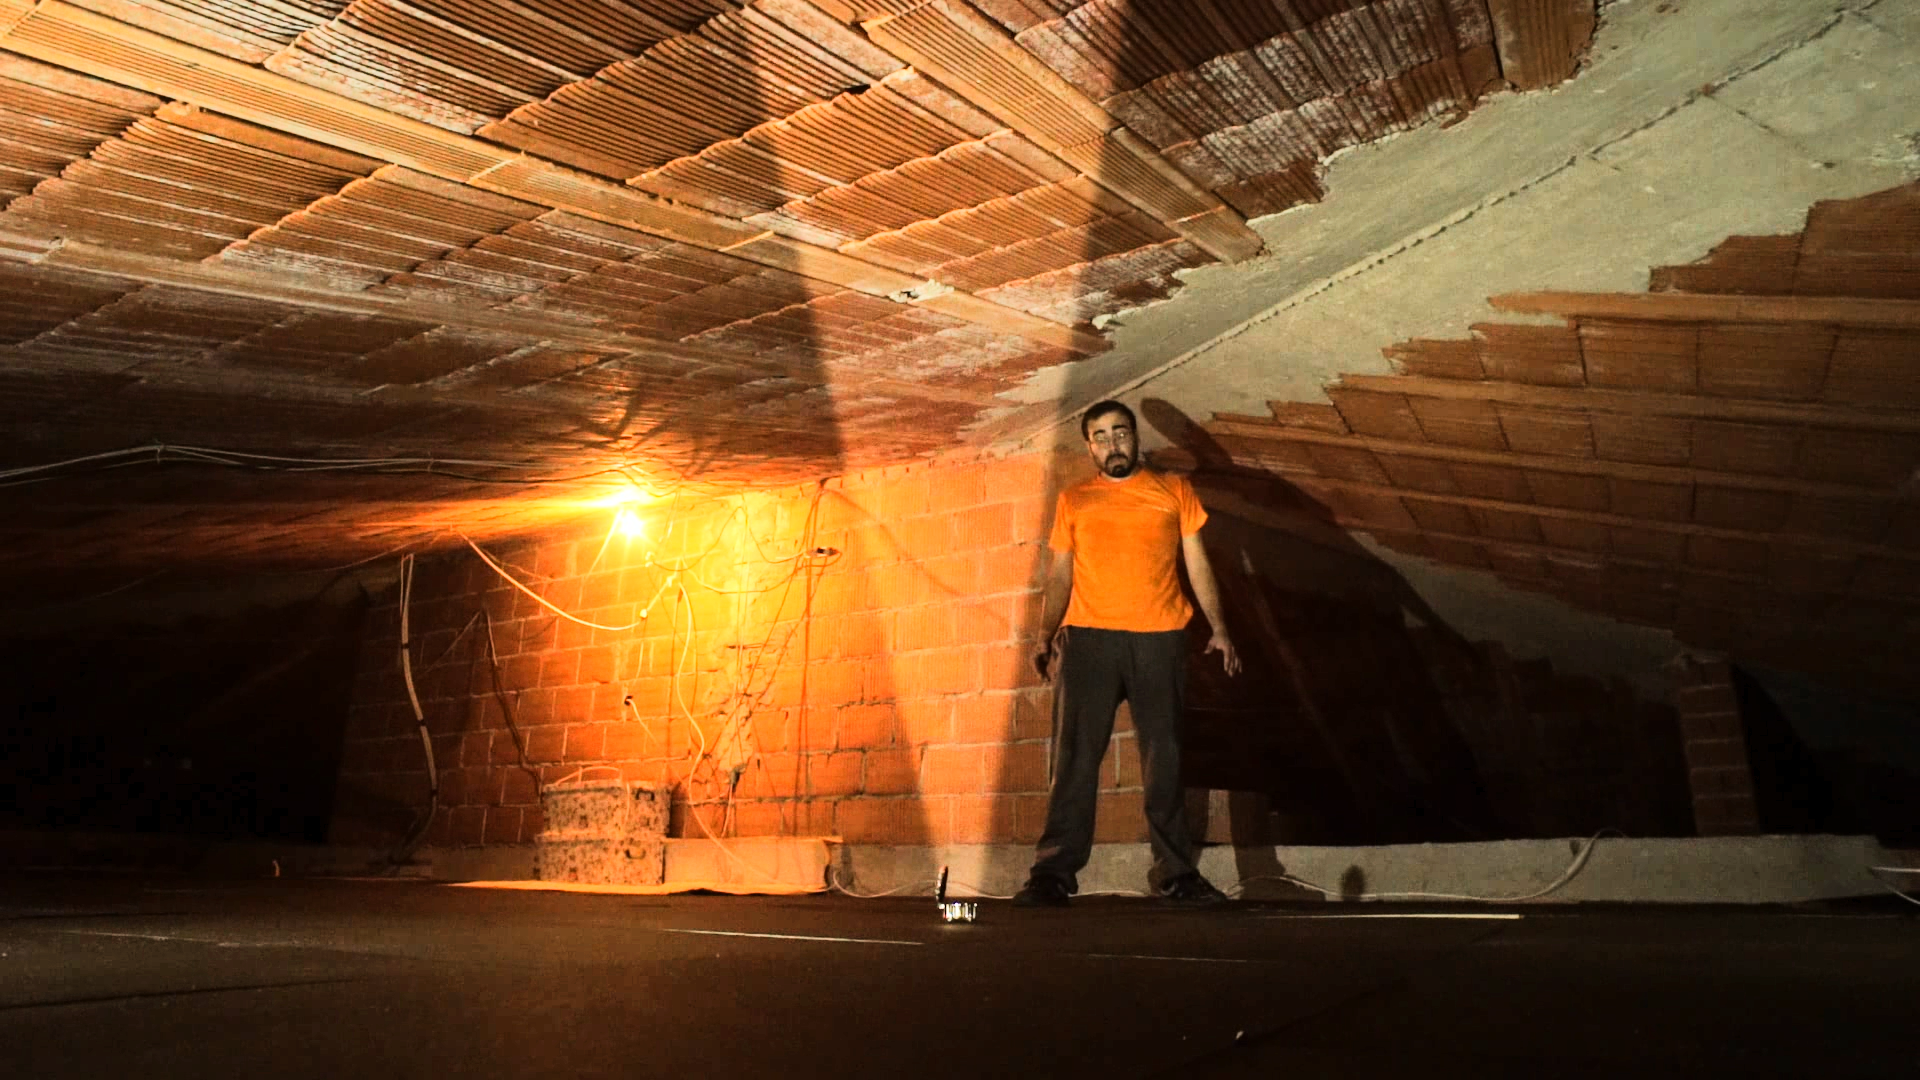 The ray of light comes out of the box
 Explosions of light and dark rays
Of course, with the same method presented for the light beam, it is possible to make a “dark” beam appear. In fact, simply replace the white clip with a black one, and the beam will make the scene darker. It is then possible to deform the radius: since we designed it with rotoscoping, we can animate it directly in Kdenlive. For example, we can gradually enlarge the pyramid drawn until it fills the entire frame, transforming the image into a complete white (or black). This is very useful if you want to switch to another shot. To obtain this result it is better to set the transition mode of the gray clip to hardlight instead of ad overlay . We can also gradually make the ray of light appear by changing the opacity of the transition of the white (or black) clip.
We isolate the actor from the scene
We cut the actor from the background with GIMP
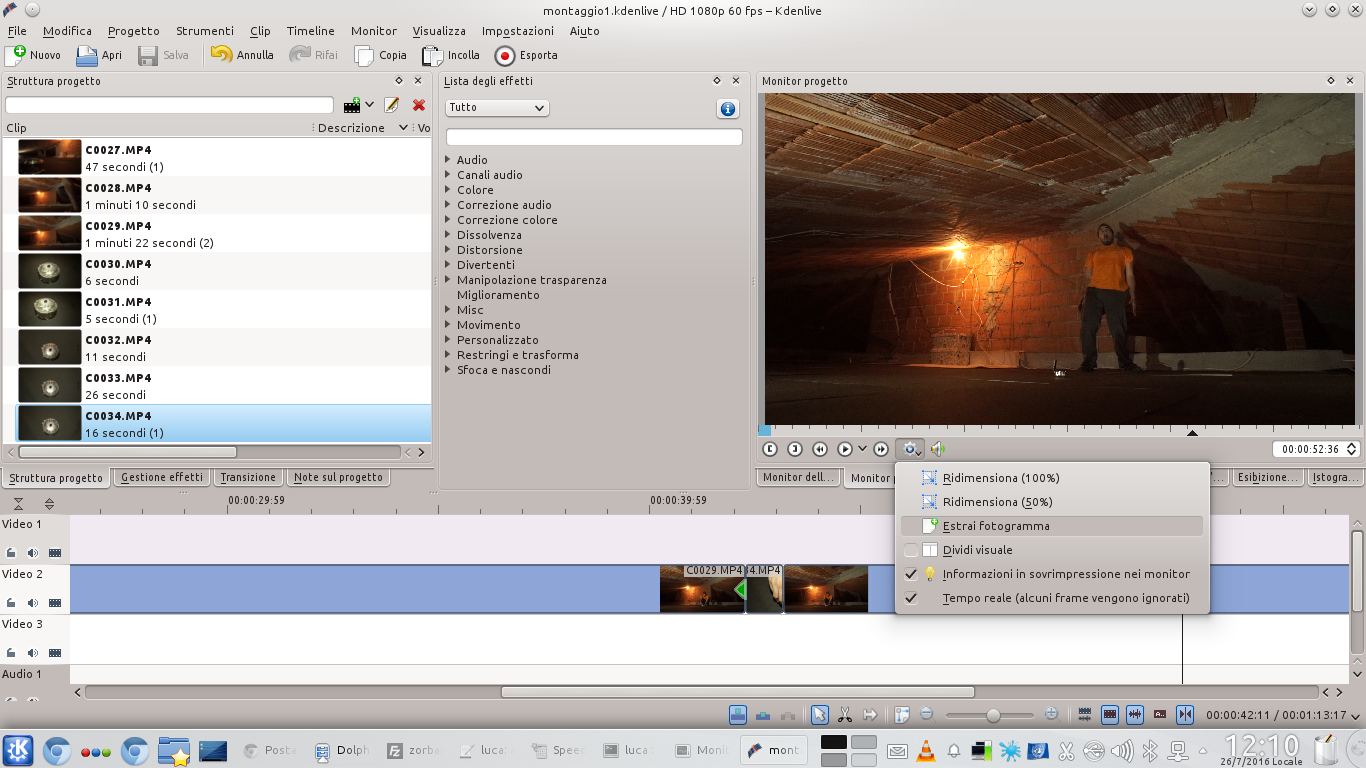 1 THE PHOTOGRAM – To begin with we need to load the original movie into the track Video2 by Kdenlive. Scroll to the point where the actor must disappear and extract the frame by clicking on the gear-shaped button choosing Extract frame .
 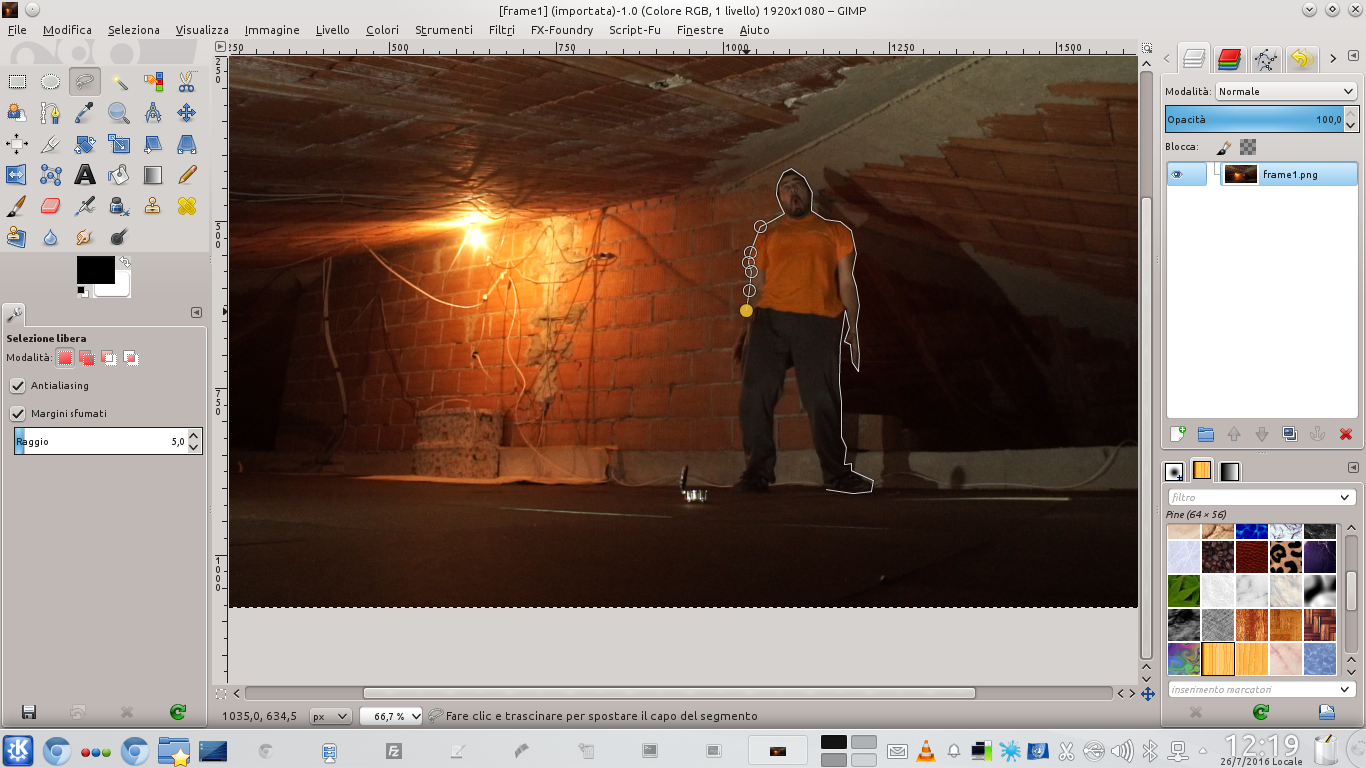 2 CHANGE IN GIMP – We open the extracted image in GIMP, and we cut out the figure of the actor. We can do this using the selection Lazo , with soft edges for a radius of 5 pixels. We delete the background with the button Delete and export the image to a PNG file.
 Distort the figure of the actor
We resize, rotate, and move the actor towards the box
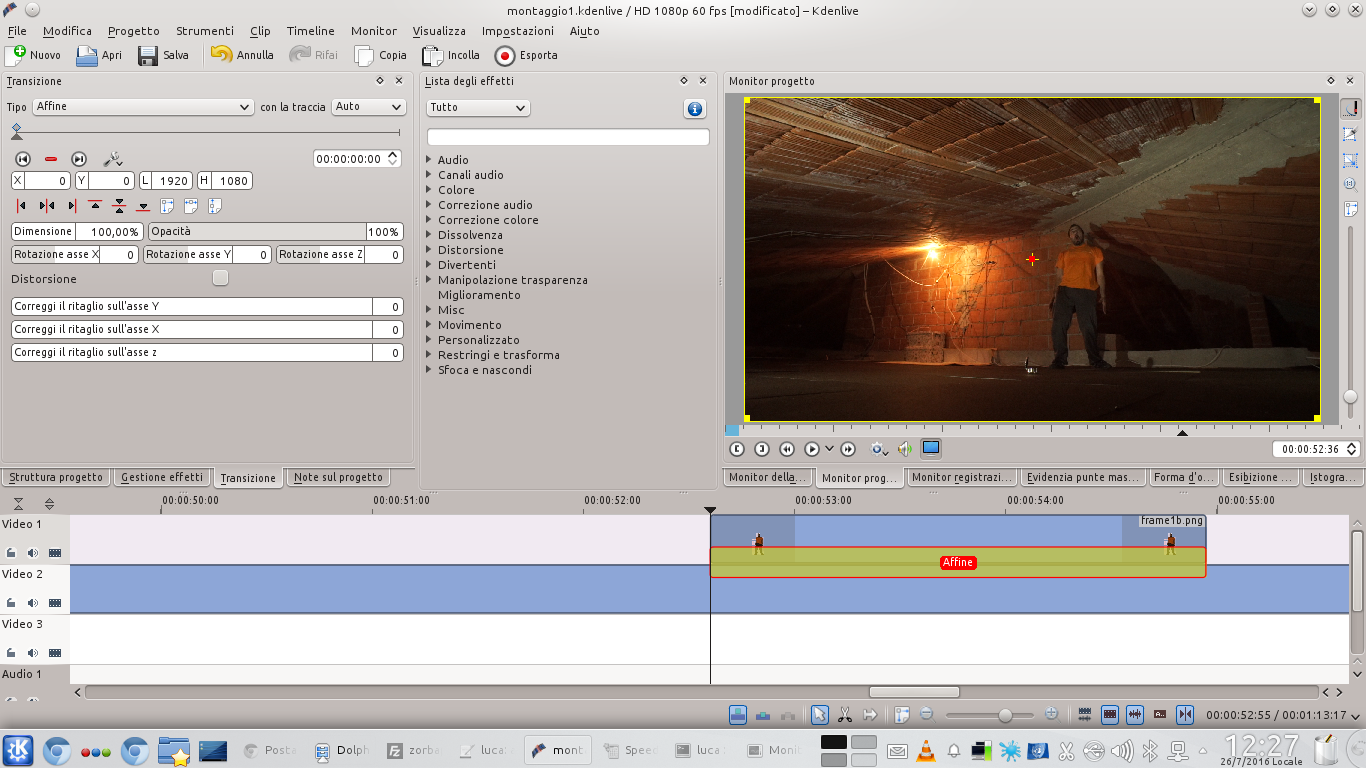 1 THE IMPORT – We import the image with transparent background exported from GIMP to Kdenlive. We have to place it in the track Video1 , right above the original movie making it start at the point where we extracted the frame and making it last no more than 1 or 2 seconds.
  2 WITH DISTORTION– We add a transition of type Affine between the two overlapping clips, and we create a new key frame a few frames after the starting one. We tick the box Distortion and stretch the image, to stretch the actor in height.
 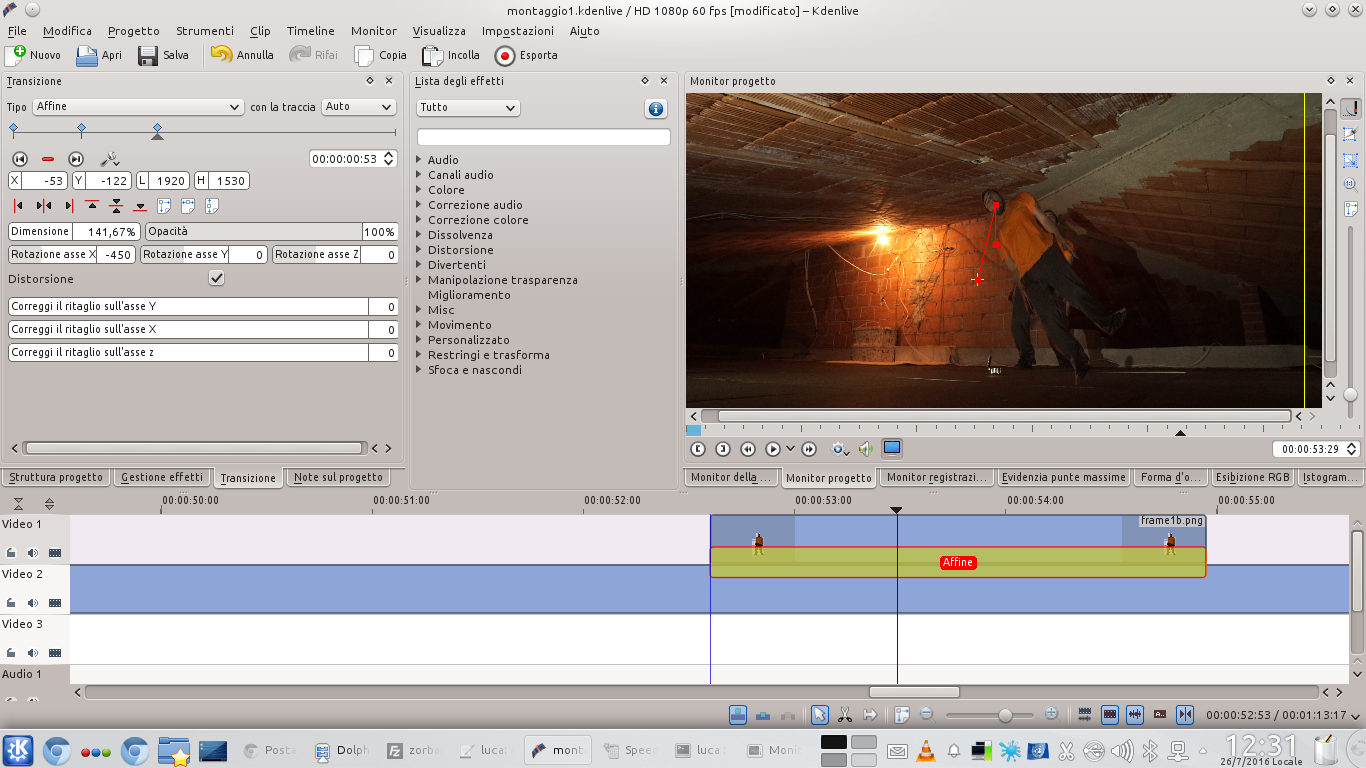 3 ONE ROTATION – We create an additional key frame a few moments after the previous one: now we can use the X axis rotation to rotate the actor in the direction of the box in which he must disappear. We can also use the other rotations to spin the actor on himself.
 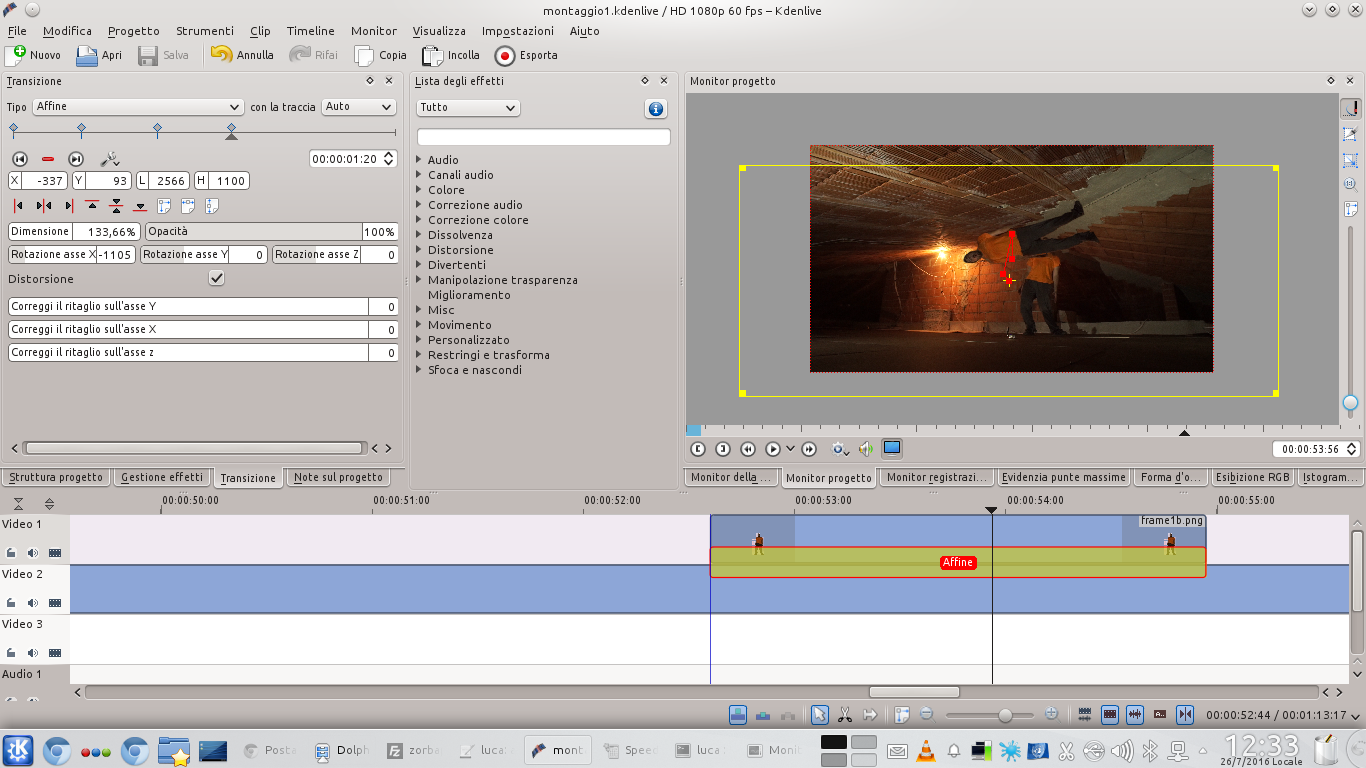 4 INSIDE THE BOX – We can continue to rotate, resize, and move the actor until he is positioned so that he can enter the box. We apply all the changes necessary to distort the actor’s body and give the illusion that it is subjected to incredible forces.
 The right depth of the scene
We place the box in front of the subject and the background behind it
 1 UNDER THE BOX – The last key frame to be made is the one in which the actor’s image is dragged under the box. If we retrace the trajectory, we should have given the idea that the actor is entering the box.
  2 BACKGROUND CLIP – Now let’s position in the track Movie3 the movie containing only the background, or the scene without the actor. Then we create a new video track before the track Video1 and insert the background clip back into it without the actor.
  3 A ROTOSCOPING – In the new clip Video1 we insert a transition of type Composite on the track Movie4 . Then we apply an effect rotoscoping drawing it so as to cut out the box and the floor under it.
  4 A SINGLE ACTOR – Similarly, we apply an effect rotoscoping to the track clip Movie3 in order to make the actor disappear. Let’s make sure all transitions refer to the track Movie4 . Now we should really see the actor enter the box.
 A beam of light
Let’s detonate a ray of light from the mysterious box
 1 ONE BLURRING – We add to the track clip Video2 an effect Out of focus cube . We want the horizontal multiplier is equal to 1, while that vertical at least 5. Then, the blur factor must be set to 1.
  2 TWO COLOR CLIPS – We create two color clips: one white and one neutral gray (the darkest gray in the list). Color clips can be created from the menu Project / Add color clip . We also create two new video tracks above the current one Video1 .
 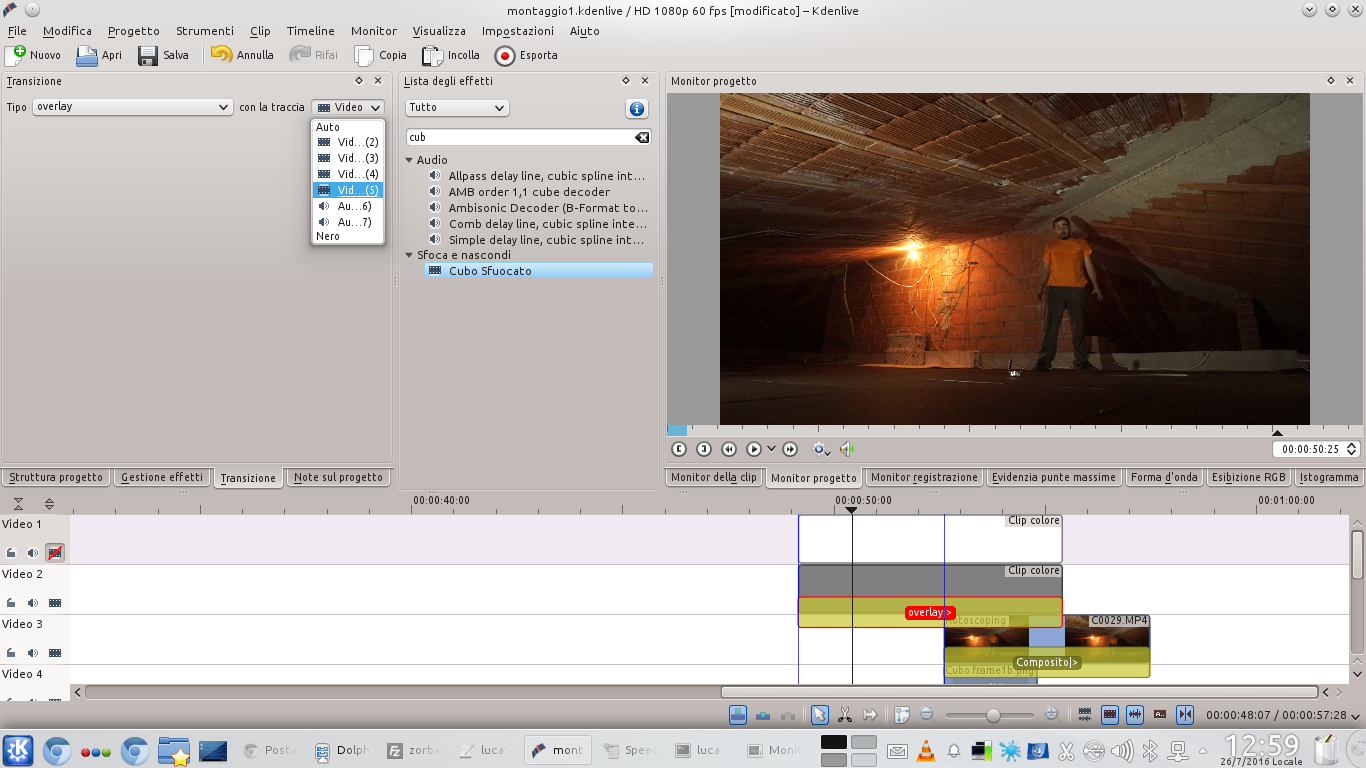 3 OVERLAP – We place the gray clip in the track Video2 , with a type transition overlay relative to the last available video track. The track must begin before the actor begins to disappear, and must end after he enters the box.
  4 THE COMPOSITION – Let’s put it in the track Video1 the white clip, with the same duration and position as the gray clip. This clip should have a type transition Composite relative to the track Video2 .
 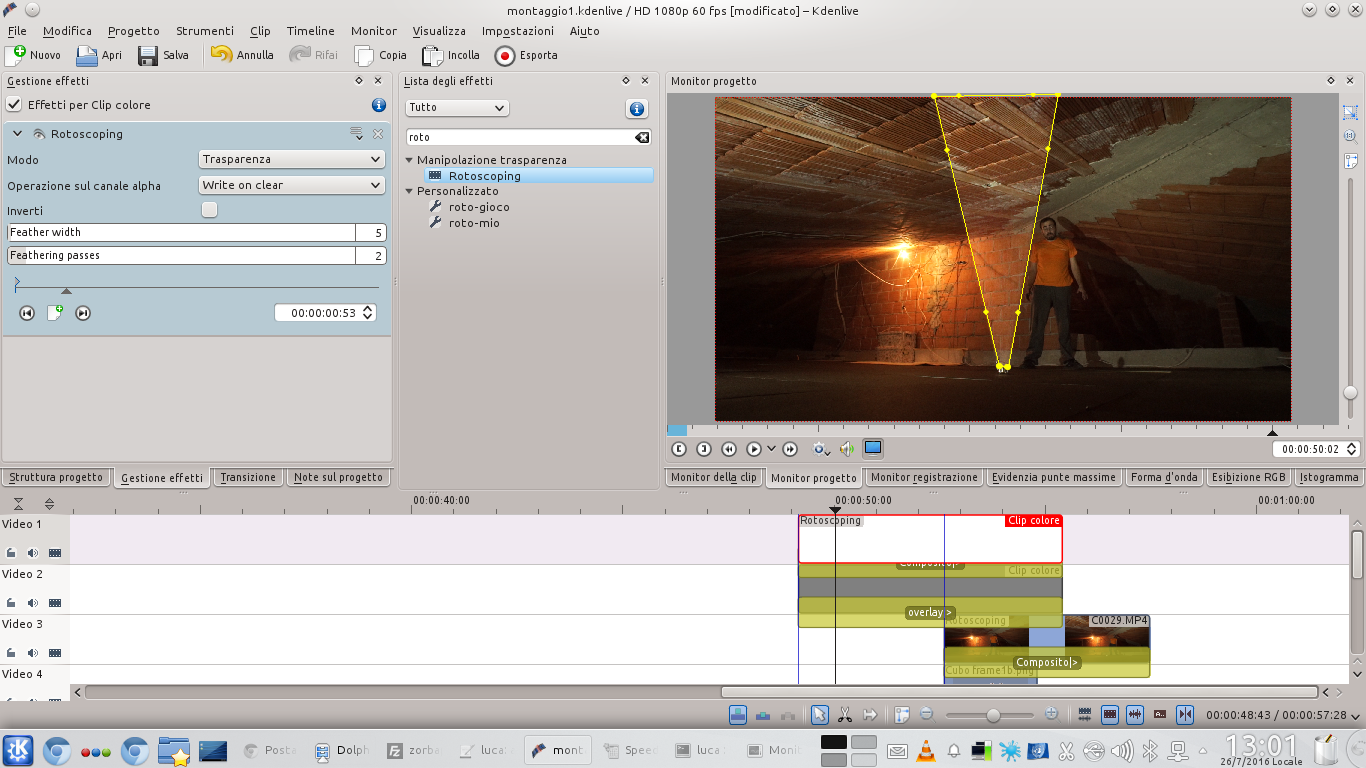 5 A ROTOSCOPING – We add an effect to the clip of track Video1 rotoscoping drawing a pyramid that comes out of the box and ends beyond the frame of the room. We set feather width to 5 e feathering passes to 2.
 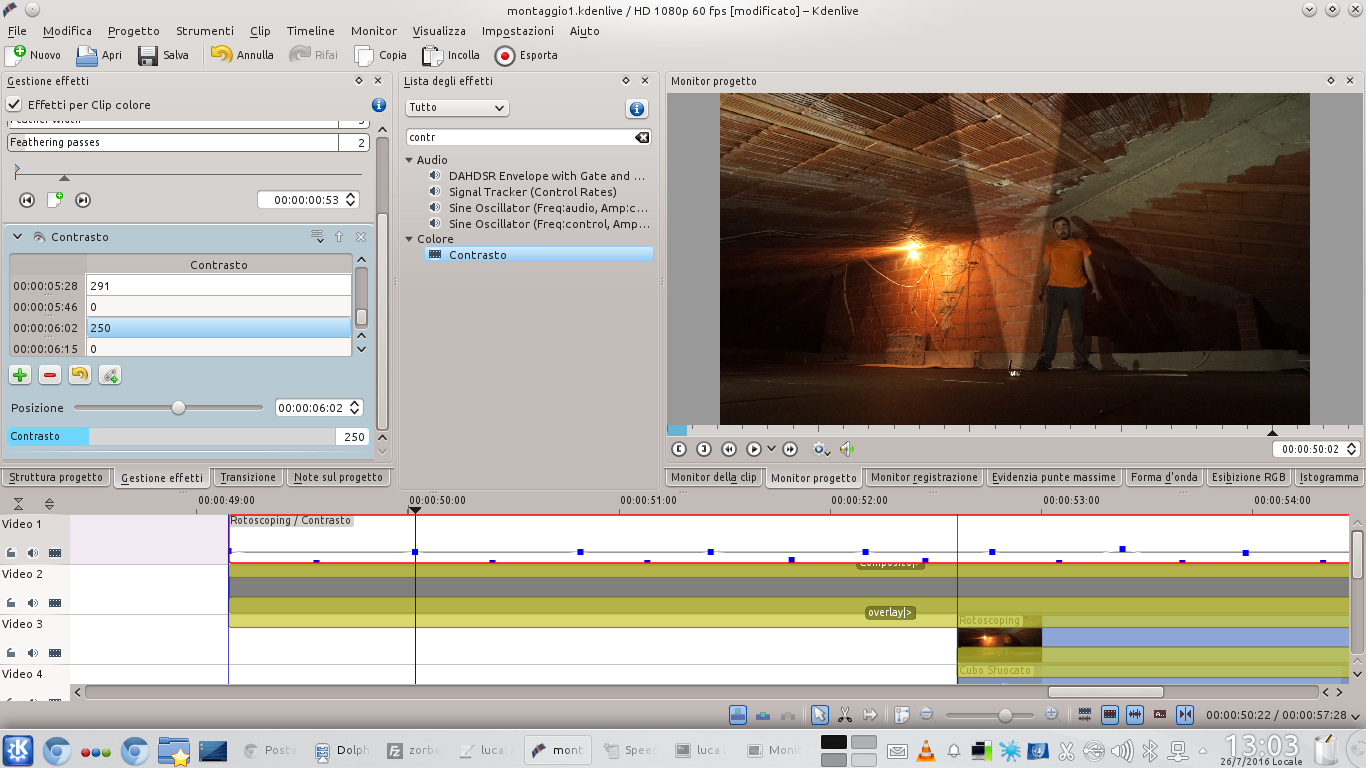 6 IN OSCILLATION– To swing the light beam just add a type effect to the white clip Contrast , modifying its key frames (by clicking on the line at the bottom of the clip in the timeline). Just swing the contrast between 0 and 250.

