Shooting movies in low light conditions is not impossible: just follow some rules. And if your camcorder makes too much noise in the shadows, the problem can be solved with Kdenlive’s color correction tools.
The new digital video cameras allow the recording of excellent images in many situations and with very high resolutions. However, they are still poor in one particular aspect: shooting in dark conditions. The sensors of the cameras are in fact rather small, therefore they tend to overheat easily and produce a certain “noise” in the image, especially in correspondence with the shadows (ie the darkest areas of our scene). Of course, in dark conditions you can increase the ISO sensitivity of the sensor, making it more sensitive to light and therefore obtaining brighter images. However, the increase in sensitivity also leads to an increase in overheating and consequently an increase in ISO noise. The problem also related to the fact that while our eyes are able to adapt easily to the brightness of a night road, the camera cannot do it: the light of a match may be irrelevant to our eyes in a sunny meadow, but capable of illuminating a entire room in complete darkness. Instead, for the video camera, the light is always the same: if the match is irrelevant under the sun, it is also irrelevant in a closed room. This means that while our eyes allow us to see a road illuminated only by the Moon, the camera would not see anything. What can we do? Applying a simple brightness curve does not solve the problem, because if we make the image brighter in post production (with our Kdenlive or with a similar program) we would end up making the noise more visible. And, moreover, if we have not been able to shoot a part of the scene because it appeared completely black, this part will certainly not magically appear in post production: if we have not filmed it, it will never be able to appear in the movie, even if the brightness in postproduction. The only option, therefore, is to get a shot that is already good in itself: for example using a high ISO value and a lens with a very small aperture. If you are Stanley Kubrick, you can ask NASA to get you Zeiss F / 0.7 lenses designed specifically for moon missions. If you are not Stanley Kubric, you will have to settle for F / 2 or F / 1.4 lenses. And you will have to go up a lot with the ISO: certainly beyond the 800 value. But how can you avoid finding yourself with an excessively noisy recovery? The solution consists in choosing the minimum ISO value necessary to see the majority of the objects present in the scene (it is generally not recommended to go beyond ISO 3200 if you don’t have a full frame camera). In this way the noise is obviously present but limited to the darker areas of the image and to any points of light (for example street lamps). We can remove this noise thanks to the trusty Kdenlive. Unfortunately, there is no “ready” effect to eliminate noise. Or, better, there are some of them but they generally do a bad job, because ISO noise is influenced by different factors, and it looks different in every movie we shoot. So you cannot build a ready-to-use effect: there are too many parameters to adjust. No problem, of course, as we will build our own noise reduction effect ourselves. As always, you can see the example video at the following address: https://www.youtube.com/watch?v=tAtd1R0O-Xs
 The image before (above) and after noise reduction and brightness increase
 b>
 Using a diffused light and exploiting the reflectivity of the objects it is possible to illuminate the whole scene
 A “shiny” image
Have you ever noticed that in the movies the scenes shot at night outdoors always appear as if a storm had just ended? The streets and buildings are wet. It is no coincidence: in large film productions, the set is wetted with large water tankers before shooting a scene in the moonlight. This offers two particular advantages: the first is the illusion that each surface is shiny, which is pleasing to the eye. The second is that thanks to the light patina of water, the asphalt of the road and the walls of the buildings manage to reflect the light. This makes them brighter, and therefore visible. Furthermore, the details become evident: a hole in a wall or some stones on the asphalt would not be noticed in the dark, but thanks to the brightness produced by the water, any imperfections become visible. Of course, you can’t buy water trucks in low-budget productions, so the easiest way to get this typically Hollywood look is to wait for it to rain. To improve the rendering of close-ups we can use a very diffused light positioned on the same axis of the camera, so that it uniformly illuminates all the objects of the scene, without producing too many shadows. The lamp must be just enough to show the objects of the scene: if we use too powerful light, the feeling of darkness that must instead remain will be lacking.
Three times the same clip
Overlap our video clip three times on itself
 1 OVERLAPPING CLIPS – Obviously, we have to start by loading the clip we shot in dark conditions into Kdenlive. We will have to place this clip in the three video tracks, so that it is always perfectly superimposed on each of them.
  2 THE BLOWN CUBE – We apply to the clip positioned in the track Video1 the effect Out of focus cube . The blur factor it must have at least the value of 10: in the preview, we should note that the image appears blurry enough to confuse the edges of the objects.
 A diffuse glow
We eliminate the ISO noise from the lights transforming them into a “glow” effect
 1 THE TRANSITION – Now we need to add a Composite transition between the track Video1 and the Video2 . In this transition we can indicate the opacity of the upper clips: we want this value to be the 50% , so as to obtain a semi-transparency.
 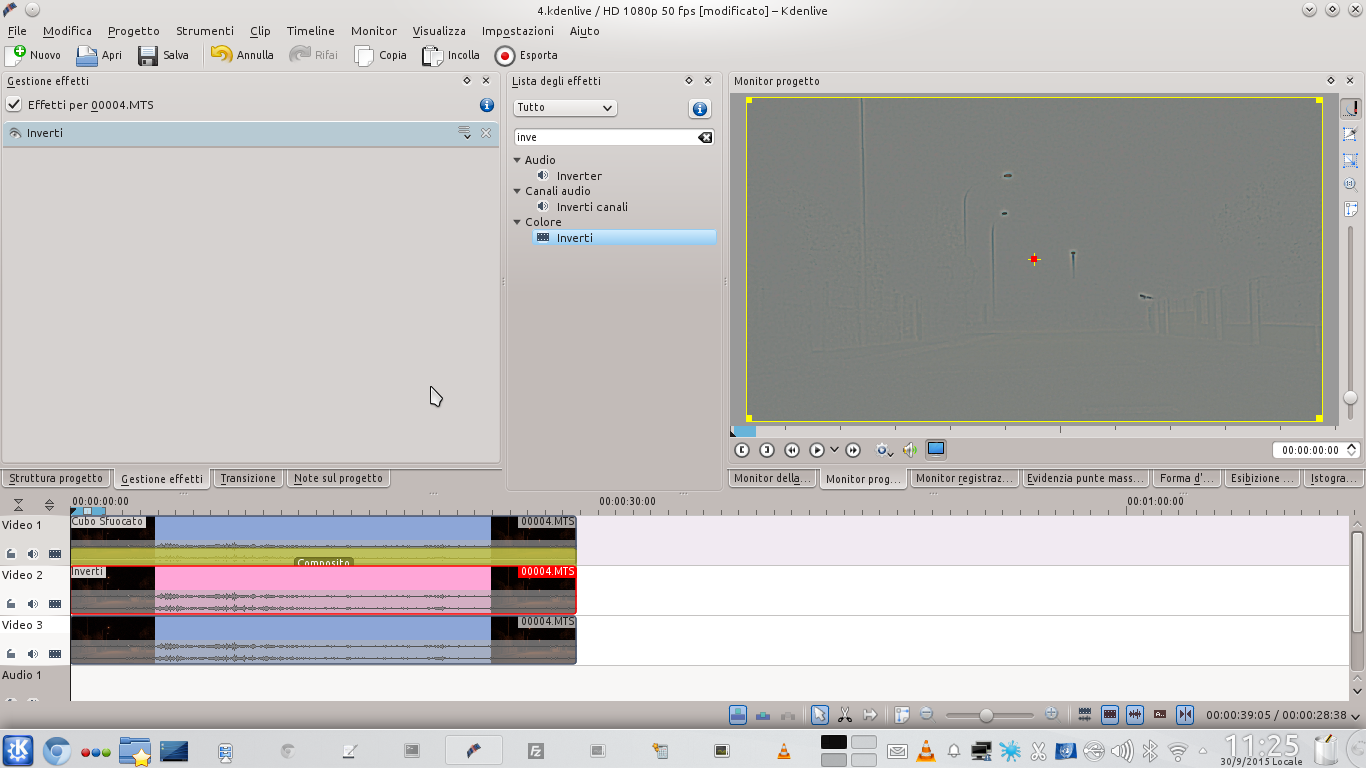 2 COLOR INVERTS – Now, let’s add the effect Invert to the track clip Video2 . In the preview we will see a stylized version of the scene appear: thanks to our trick, we obtained a cantilever map, in which all the areas without outlines are gray.
  3 A SOFTLIGHT – To apply the newly created cantilever map, just add between the track clip Video2 and the Movie3 a transition of type softlight . We should get a sort of “glow” effect, a luminous glow diffused along the contours of each object in the scene.
  4 LEVELS OF LIGHT– We can gently increase the brightness of the image applying the effect Layers to the track clip Movie3 : just decrease the level of the by a few hundred points incoming white , and a few dozen the level of the White color .
 The outlines must be clean
We sharpen the outlines of objects to prevent the image from appearing blurry
 1 ON EXPORT – The first phase is over: we have to render the video. Just click on the button Export , and be sure to export the movie with a fairly high bitrate (at least the value is recommended for HD movies 40000 ).
  2 NEW PROJECT – Now let’s create a new Kdenlive project, loading the newly rendered file into it. Again, we position the video clip in all three existing tracks, so that the three tracks are superimposed perfectly.
  3 THE BLOWN CUBE – Now let’s apply to the track clip Video1 the effect cube out of focus , as we did in the previous case, with a blur factor equal to 10. However, this time we also add the effect Invert to this same clip.
  4 SEMI-TRANSPARENT – We can overlap the track Video1 to the next thanks to the transition Composite . Again, we need to set opacity to 50% . Unlike the previous time, we now get a cantilever map that enhances the contours of the objects.
 The right colors
We use color correction to hide noise in shadows
 1 A HARDLIGHT – We apply the cantilever map by positioning between the track Video2 and the Movie3 a transition of type hardlight . The result will be an image with decidedly clear contours, unlike the previous procedure which produced a diffuse glow.
  2 SMALL BLUR – Let’s add in Movie3 an effect Square Blur setting his kernel at a rather low value, approx 5 . In fact, we want the contours of the objects to remain clean thanks to the cantilever map, but the content of the objects must be slightly blurred.
  3 SATURATION… – We can also slightly decrease the saturation of the track clip Movie3 by setting the saturation effect to a value lower than 90 . In this way we balance the effect of oversaturation of colors due to the cantilever map.
  4 …AND THE CONTRAST – Now we can correct the contrast of the image by inserting the effect Layers in the track Movie3 . We can raise the black input level to 100, lower the white input level to 700, bring the black output to 80 and the white output to 800.
 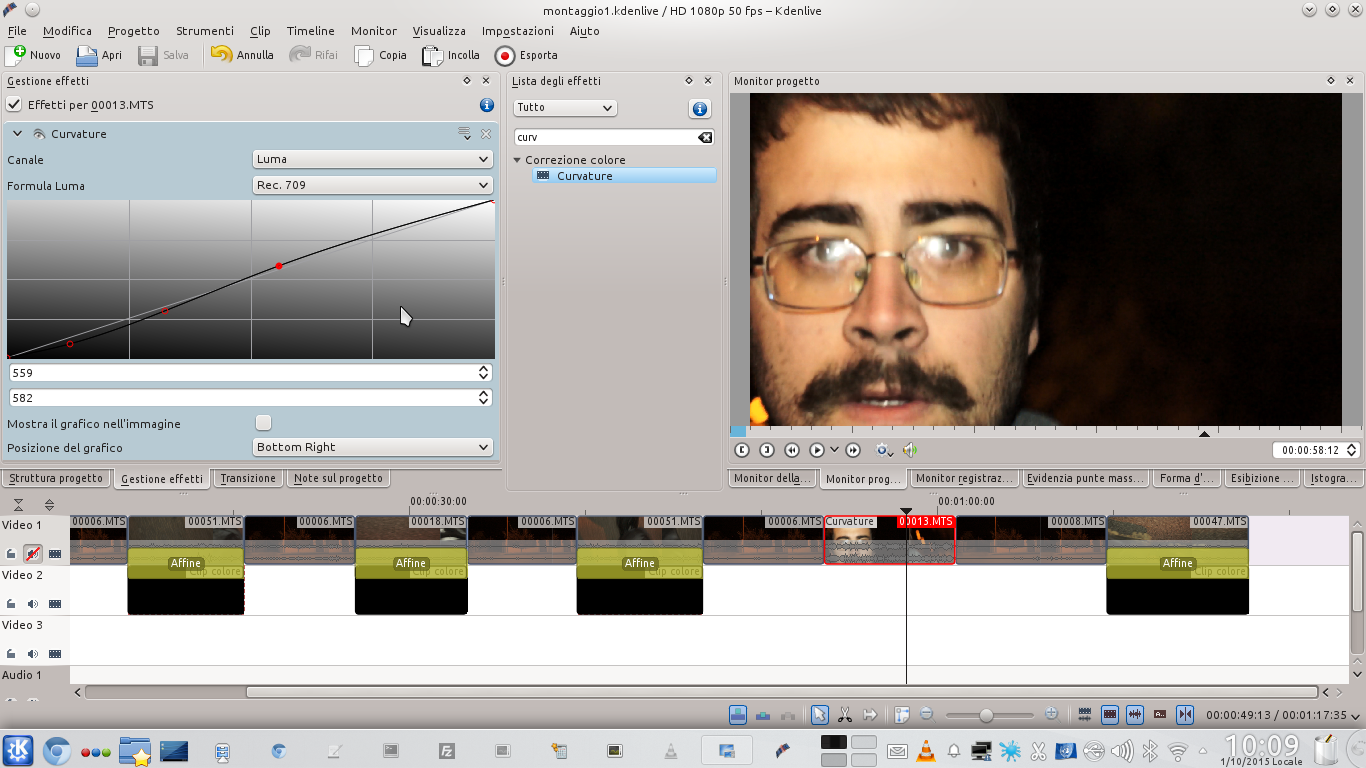 5 DARKER SHADOWS – We have to hide what’s left of the noise in the shadows: the solution is to apply it to the clip Movie3 the effect Bends set on the channel luma . The curve must be faithful to the diagonal between lights and halftones, lowering only the shadows.
  6 RED CURVE – Working with a high ISO, the image appears very red. We can correct the defect by applying an effect Curvature On the canal Red . The curve must lower the midtones and partly the lights: the image will turn green.

