Inserting explosions into your movies is the most common special effect among filmmakers. But to make a credible explosion it is necessary to take into account all the details: in this article we see a procedure to give the scene maximum realism.
Once the explosions of the films were true: a building was built, it was filled with explosives, and it was blown up in front of the cameras. We often made models, to take fewer risks and have less costs, but sometimes we worked at full size. Today, real explosions are still used, but only in small and harmless cases. For the rest, the explosions are made in computer graphics. In high-budget films, the scene is reconstructed using camera tracking with a program such as Blender (or other commercials) and an explosion is simulated in a big way, with smoke and flame simulators. Instead, when the budget is lower, ready-made films are used, which simply have to be superimposed: this is the case that we will see in this article. These films are usually real explosions filmed on a uniform background: with the chroma key technique the background is removed digitally. In general, the explosions are all the same: basically it is a bubble of gas and smoke, it does not have a precise orientation. This means that if the situation is not too complex, the technique of superimposing the video of an explosion can give excellent results. There is a problem, however: simply superimposing the explosion on our movie does not provide a good result: firstly because being positioned above the original video it will also cover objects that should instead be in the foreground. For example: usually an actor is blown up in front of the explosion, to make it more likely: by superimposing the explosion on the original movie, the actor will be covered by the blaze. This problem can be solved with rotoscoping: it is sufficient to superimpose the explosion on the original film, and in turn the original film on the explosion. The last level, however, must be masked, so that you only see the objects that must be in the foreground, in front of the explosion. There is, however, one further question to be taken into account: the crater. If an explosion occurs on the ground, a hole will form. It is therefore evident that a hole must also appear in our video. The simplest method is to shoot the original movie with the crater, and then digitally make a version of the same movie with the terrain properly reconstructed. In the end, with a simple transition between the two versions of the movie, the crater will appear at the right time. Reconstructing the ground is simpler than you might ask: what we will do is to superimpose the original movie itself: in the superimposed layer a mask must be applied to make visible only a part of the video, the one we intend to use to reconstruct the ground. In our example, we have made a portion of the grass visible. Using the composite transition, it is possible to move the superimposed video track to cover the crater: of course, the operation must be repeated until the entire crater is completely covered by grass. Also in this case it will be necessary to apply an additional layer on top of all the others, to make sure that the actor is not in turn hidden by the grass that we have copied and pasted. You can find the example video at the following address: http://www.youtube.com/watch?v=uLKYmRmpsF8
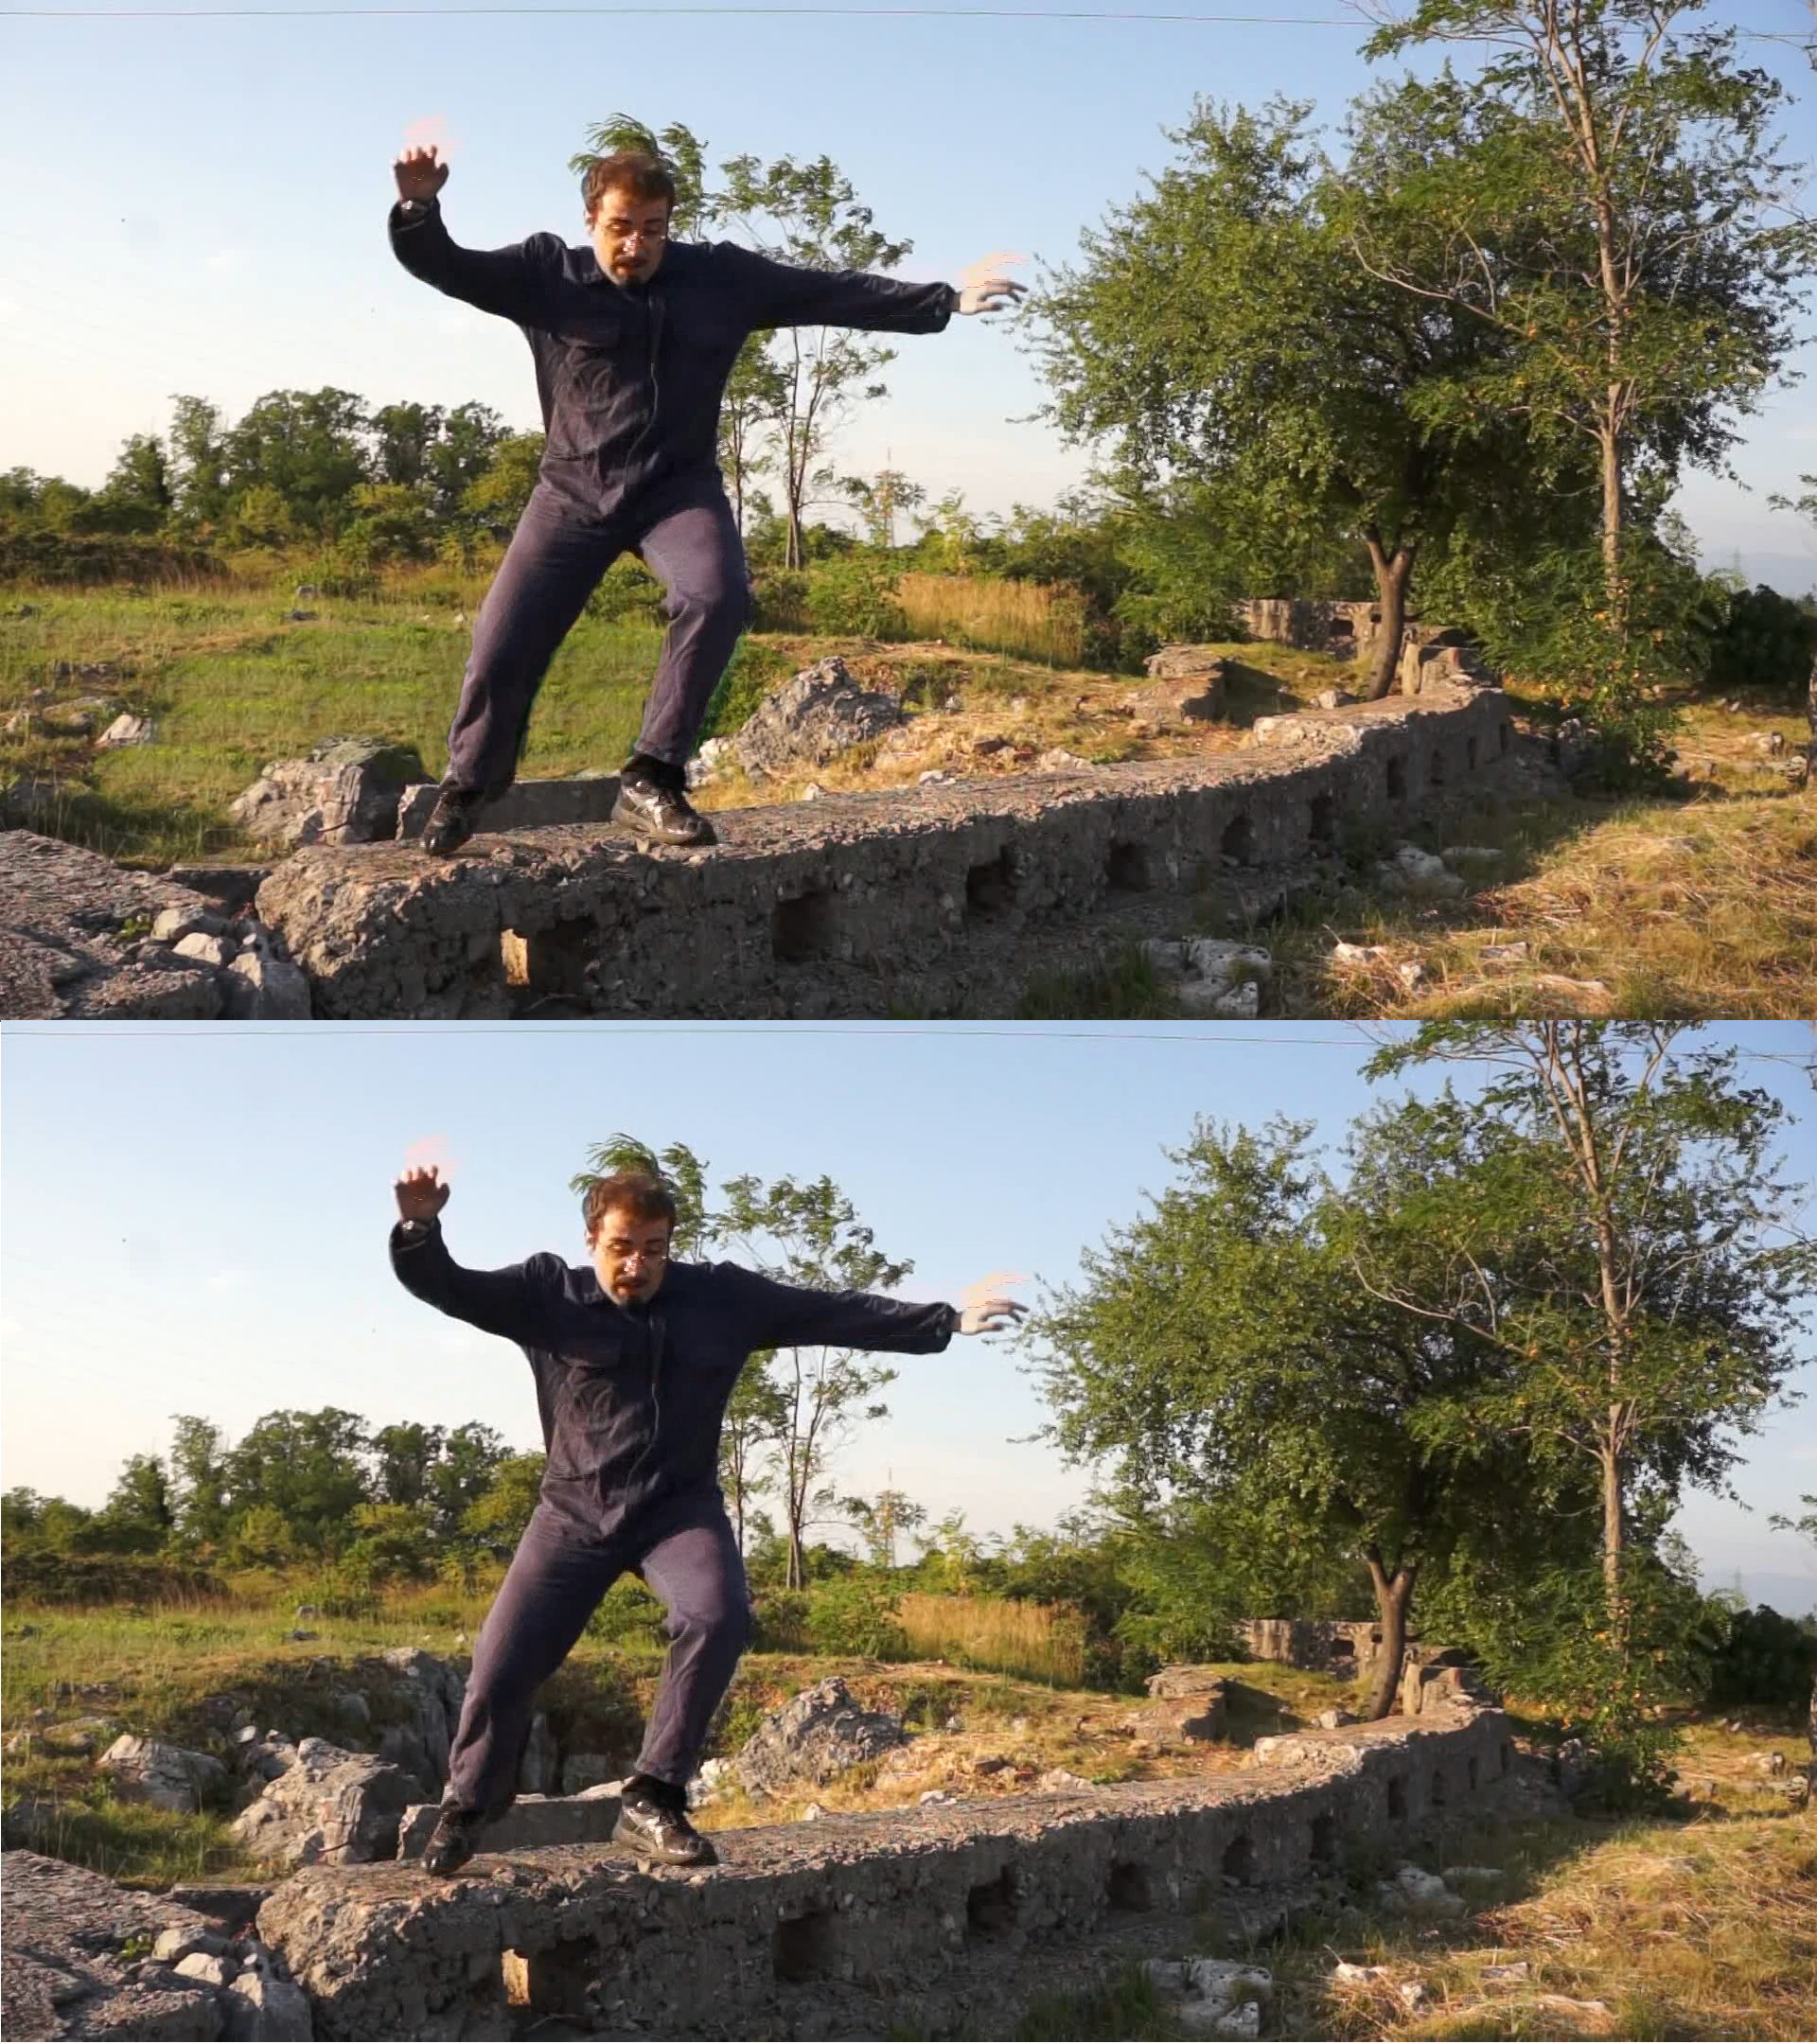 The reconstructed and original terrain
 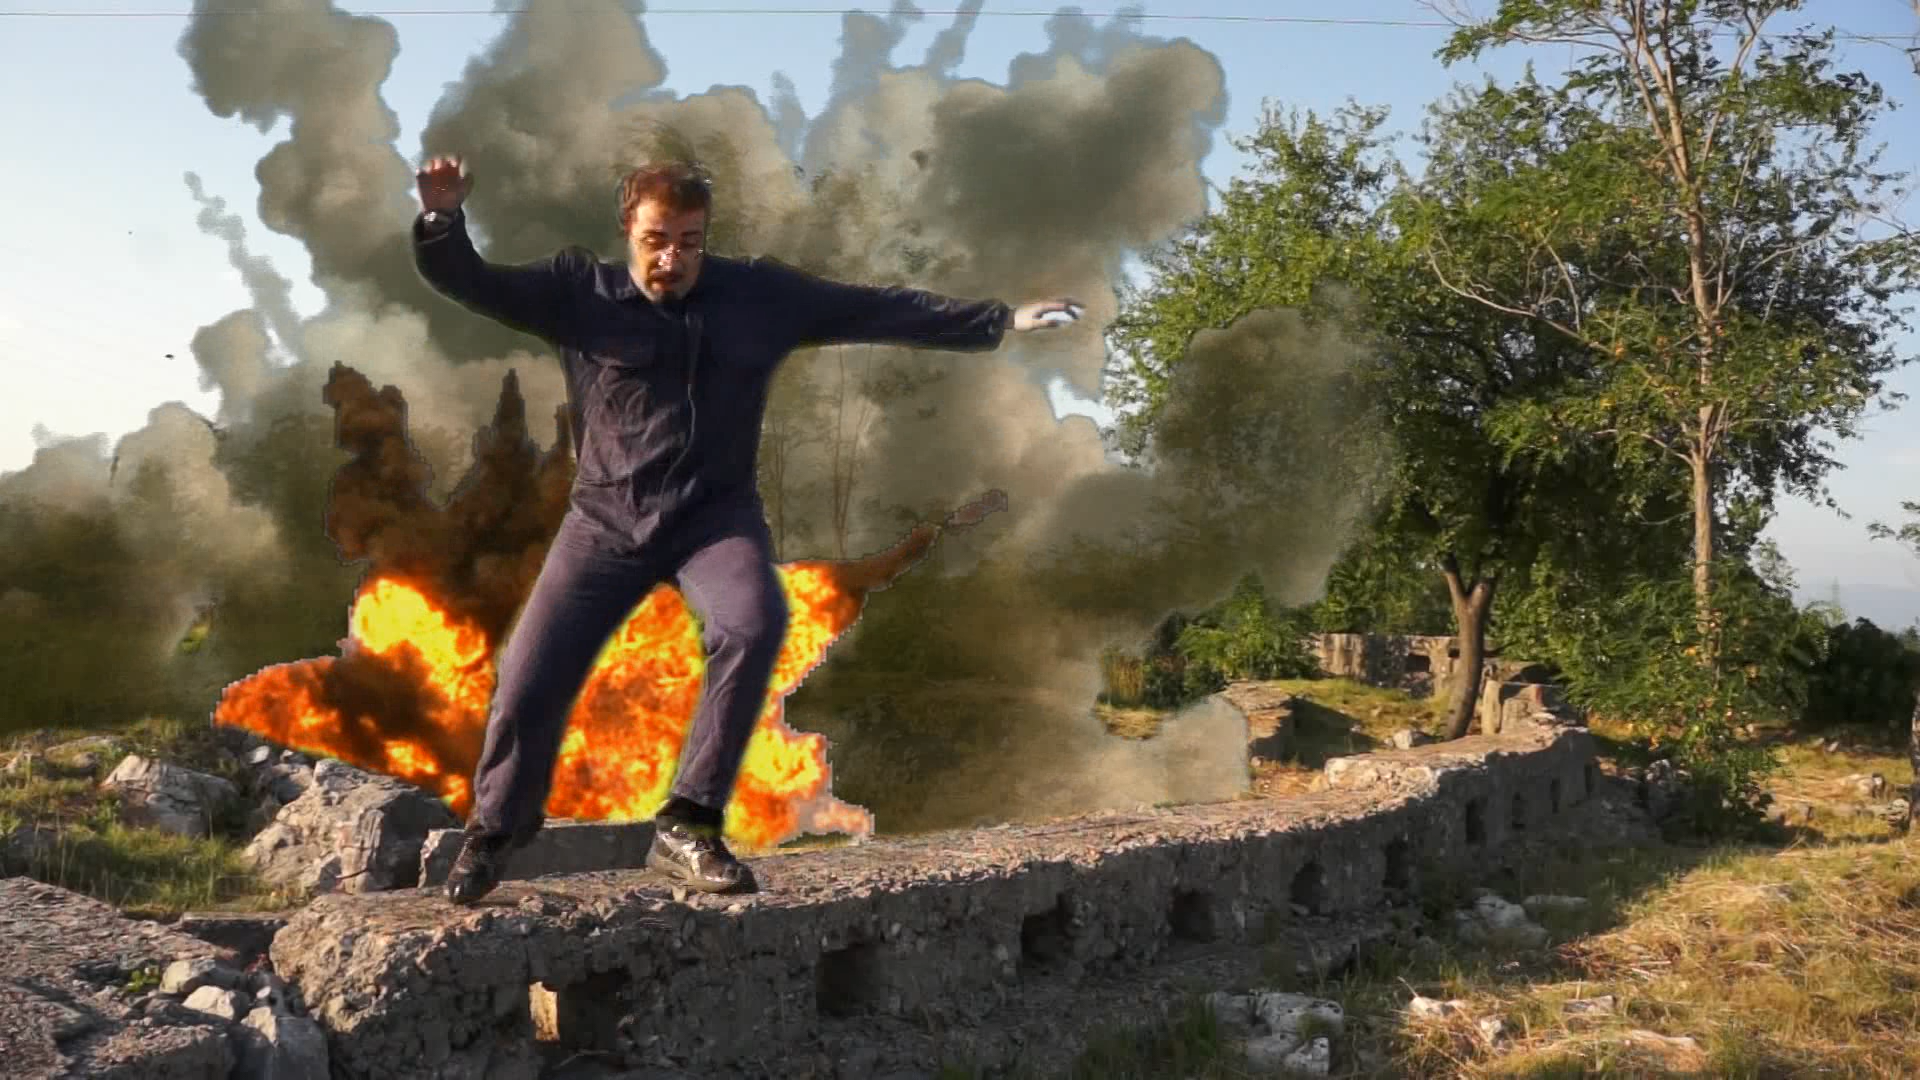 The simulated explosion
 Where to find the effects
In our examples we used two ready-made effects found on the site http://detfilmshd.com/ . This site provides dozens of movies of various special effects, of decidedly high quality. The videos are available in two versions: the original one, with a blue or green background, and the one with the chroma key already applied (therefore with a transparent background). We, in our example, have decided to use the PK versions, that is PreKeyed, without background: this in fact allows us to skip a rather annoying passage. The effects of detfilmshd are not free, but being able to buy each effect individually it will not be necessary to spend large amounts: with $ 28 you can have the effect of the main explosion ( https://www.detfilmshd.com/G_Collections_PK_Explosions_01.html ) and for the same amount the cloud of smoke ( https://detfilmshd.com/G_Collections_PK_LandMines01.html ).
All the clips we need
We prepare the necessary to realize the effects
 1 THE ORIGINAL CLIP – Let’s start by taking the clip on which to apply the effect (the one with the explosion crater) and placing it on the last video track (the 3). Then we insert the same clip into the next upper track (the 2) so that the two are perfectly superimposed.
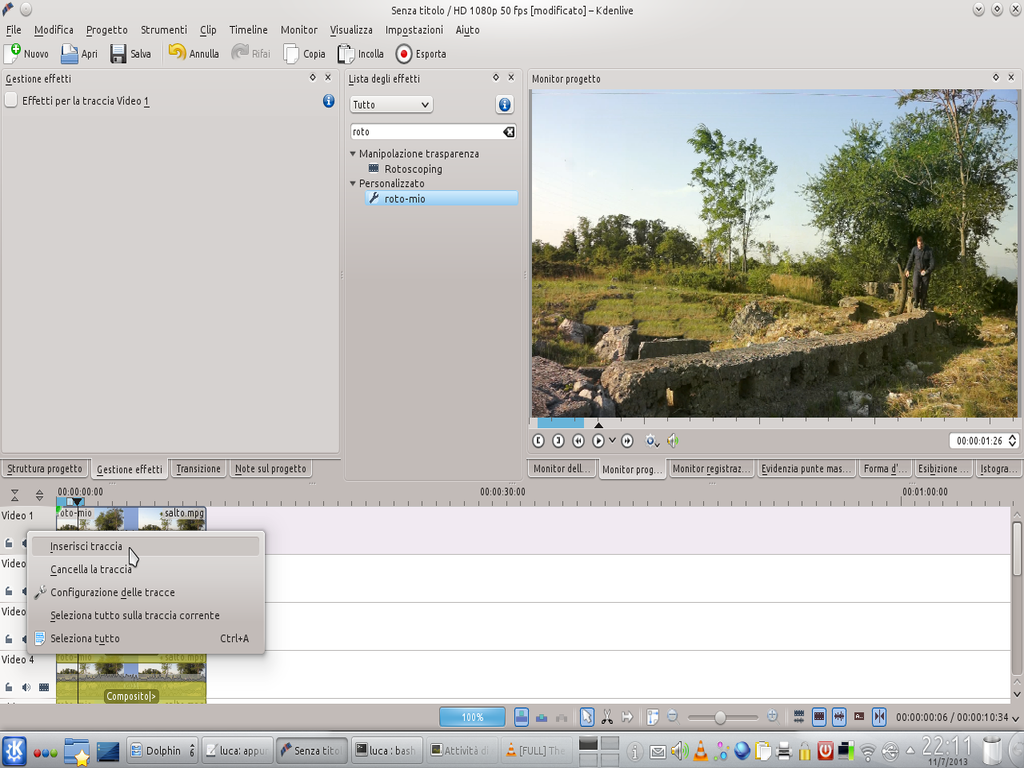
 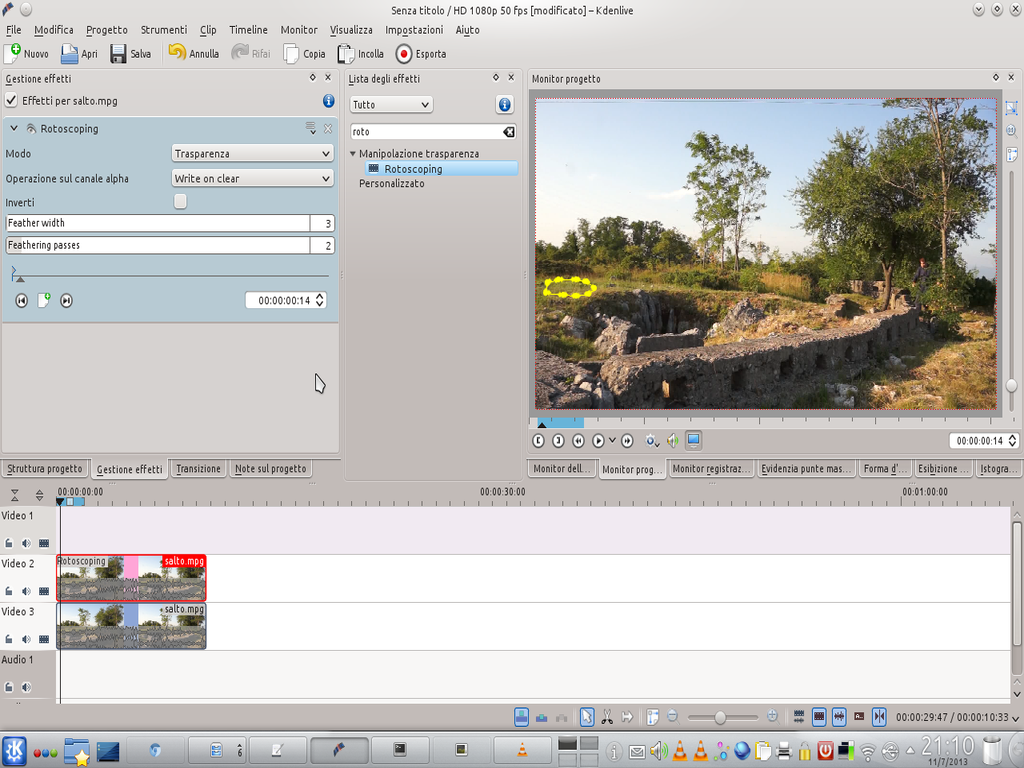 2 THE AREA TO COPY – Working on the clip of the upper track, we apply the Rotoscoping effect and click on the project monitor to draw the area we want to copy: in our case, we want to copy a part of the grassland. We set the Feather width and passes at 3 and 2.
 Let’s put on a patch
Let’s rebuild the ground where the crater is present in the movie
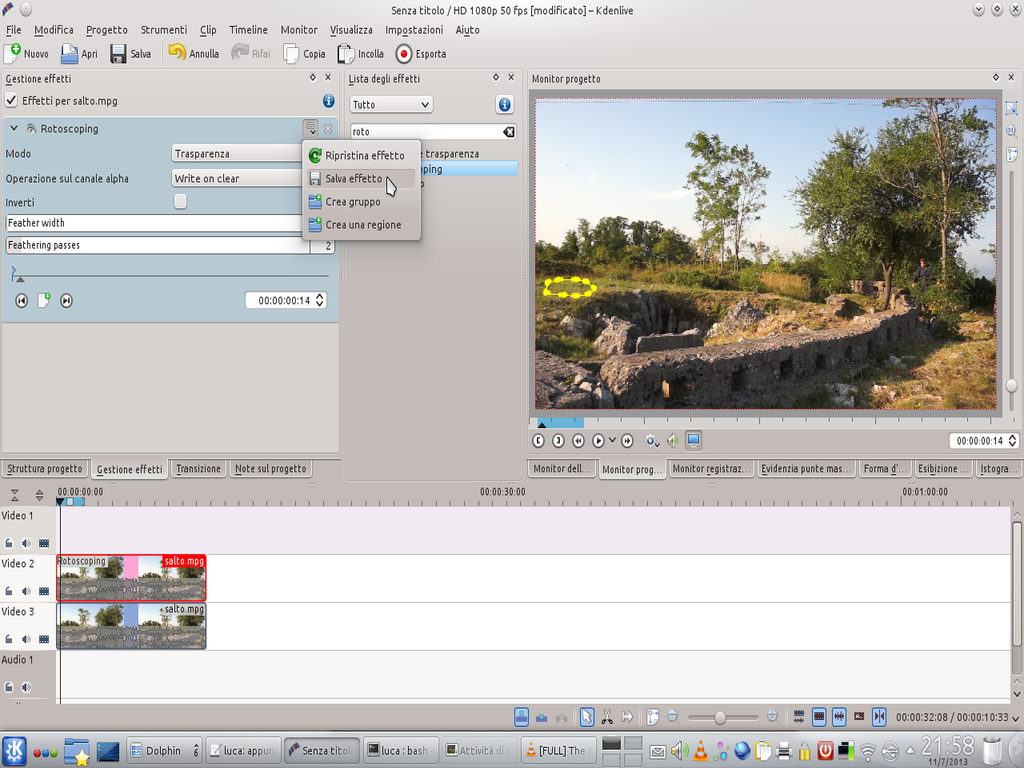 1 A RESCUE – By clicking on the actions button of the rotoscoping effect we can choose the item Save effect . This will allow us to replicate it on the next tracks only by dragging the new effect on the clip, without having to do it all over again.
  2 AND A TRANSITION– Now we need to add a type transition Composite covering the entire duration of the clip. We set as the reference trace the one placed below ( Video 3 ). Then we move the image (into the project monitor ) to cover part of the crater.
  3 ANOTHER COPY – Probably, this first copy operation will not have covered the whole crater. So we have to insert the clip again in the first free track at the top and apply the effect we saved to it (in the example we called it “ roto-my “).
  4 OVERLAPPING – This clip must also have the transition composite , identical to the first one we applied. After dragging the image to cover another piece of the crater, we can repeat this operation as long as necessary by adding more tracks.
 In the foreground
We bring the actor back to the fore
 1 NEW TRACK – When we have managed to cover the whole crater, it’s time to mask the character, to prevent it from being covered by the other clips. Let’s start by adding a new track, right clicking on the first track and choosing Insert track .
 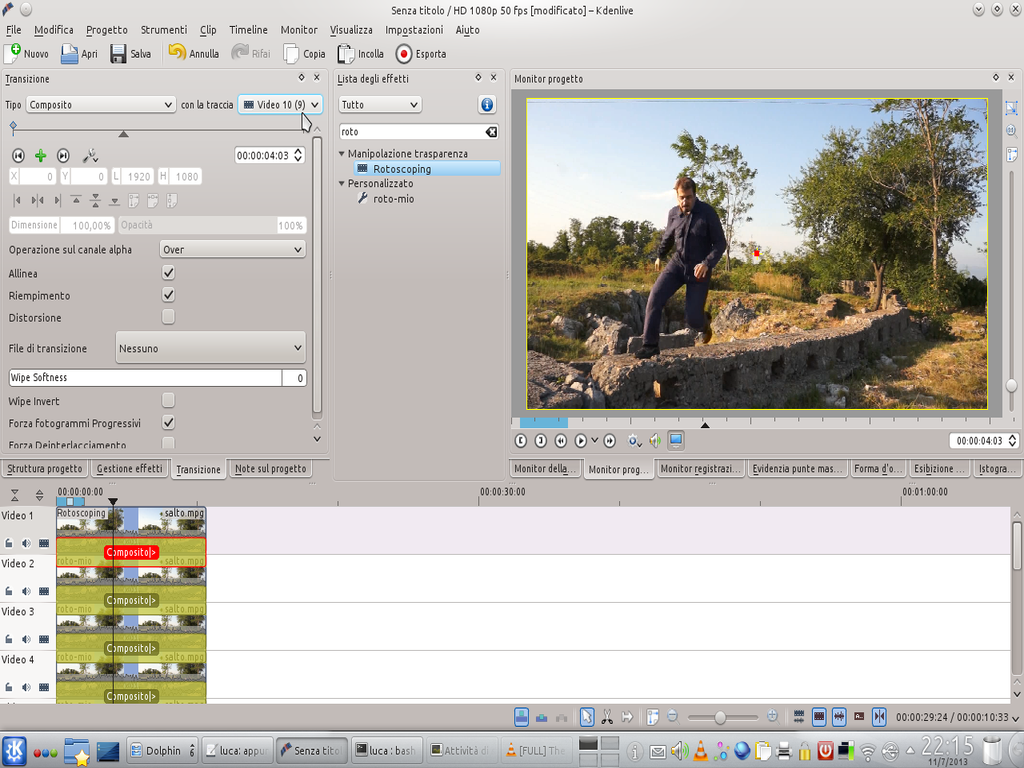 2 IN TRANSITION – We must first, always insert the same clip in the new track, superimposing it on all the others. Then we apply the usual type transition composite : the difference lies in the fact that this time we will not move the image.
  3 WITH THE MASK – We apply the effect to the clip rotoscoping (the original one, not the one modified by us). Then we have to draw in the project monitor the shape of the person to be masked. In our example, it is sufficient to mask the legs.
  4 THE OTHER FRAMES – Now let’s proceed to create all the other frames: we must go forward one frame at a time, create a new keyframe by clicking on the button New in the effect panel, and we correct the position of the mask points. This is the boring part.
 End with a bang
The last operation consists in superimposing the explosion on the film
 1 NEW PROJECT – For our new project you will need the original video (the one with the crater), the one with the reconstructed ground, and those of the explosions. First we prepare 5 video tracks, then we load the reconstructed video in the last one and the original in the penultimate one.
  2 EXPLOSION ONE – We apply to the track Video 4 the classic composite transition, and in the Video 3 we insert the clip landmine . To this we have to cut the first frames, to remove its preview. The clip should be moved so that the explosion starts the moment we want it.
 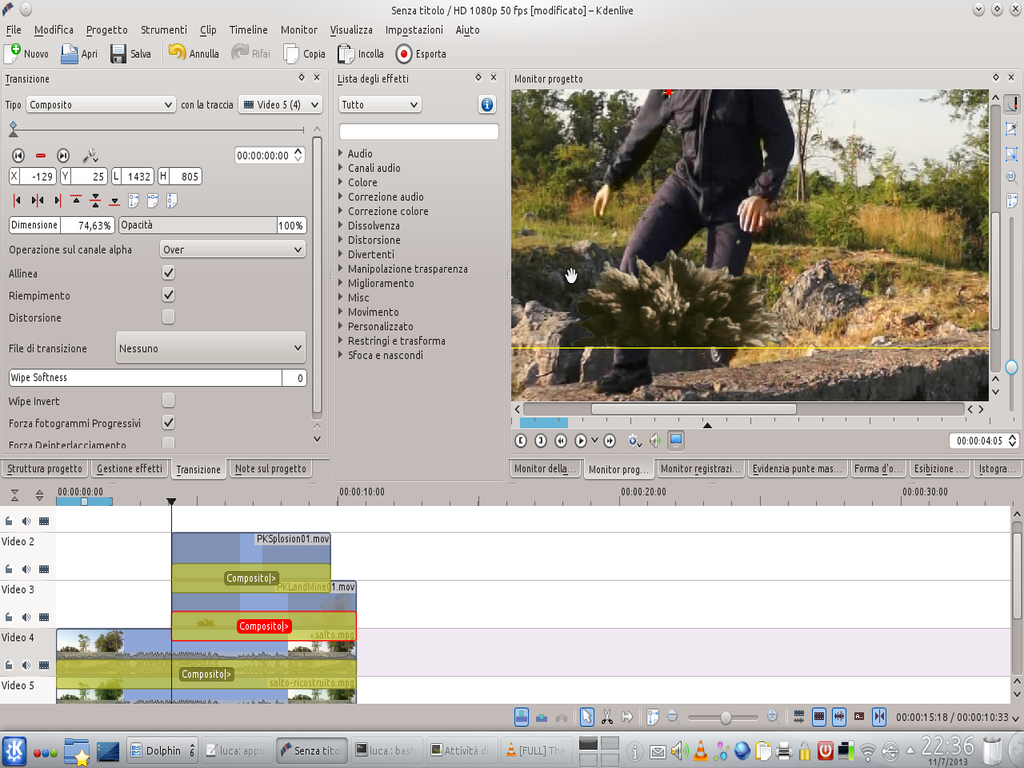 3 EXPLOSION TWO – Now we have to insert the clip with the blaze ( PKSplosion ) in the track Video 2 and apply the transition composite to the tracks 2 is 3 . The transition (with reference Video 5 ) must be resized and moved so that the explosions are in the right place.
  4 THE USUAL CLIP – We insert the original clip into the track Video 1 and apply the usual transition composite . We will need this to make the person appear before the explosions. The transition must therefore refer to the track Video 5 and the image should not be moved.
 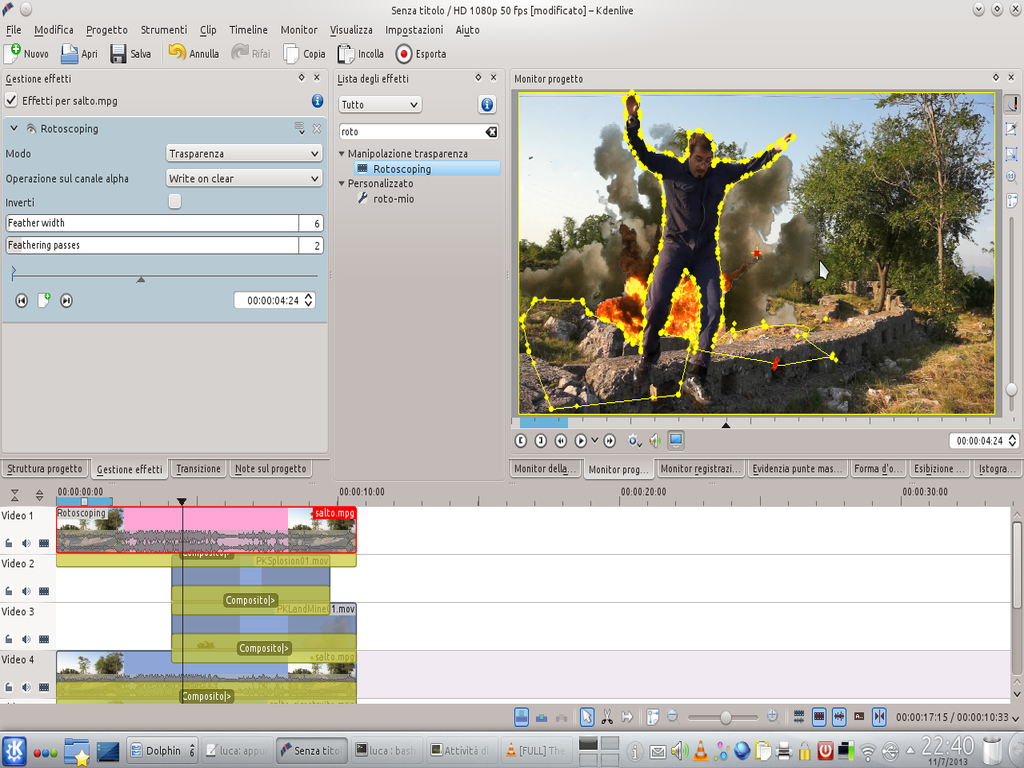 5 WITH THE ROTOSCOPE – Let’s apply the effect rotoscoping to the clip of Video 1, and we mask the actor. This will have to be done as for the video with the reconstructed ground. However, we can also use the rotoscope to cover other objects in the foreground: in our example, the wall.
  6 FAST – Finally, we modify the transition of Video 4 : we must set the opacity of the first frame to 0%. Then we move to the frame where the explosion starts and create a new key frame with 0% opacity. A few frames later, we insert another keyframe with 100% opacity.

