Simulating the injury of an actor with a cutting weapon is a fundamental operation for an action film… and thanks to Kdenlive we can produce a decidedly realistic computer animation without risking to harm someone.
The use of weapons in an action movie is one of the key points. The problem is: how can we engage in various types of fighting without risking injury to the actors? As for the explosions and firearms, we have already dealt with the thing: we have seen that it is enough to superimpose images of flames on the movie to give the idea of the effect and satisfy the spectators. But to throw objects, for example knives or arrows? Here it becomes more complex because while a bullet is not seen on the screen, but only its effects are noticed, a throwing weapon is slow enough to be visible. On the contrary: viewers “believe” the special effect only if they see the object in question hit the actor “victim”. Of course, really throwing a knife at an actor might not be the best choice (if only because you could only work in “good first”, it would be difficult to shoot a second time). Fortunately, the solution is given by computer graphics: just create an animation (a cartoon) of a knife that flies from one point to another on the scene, and superimpose it on the original movie. The trick works because the movie lasts a few seconds, so even if the movement or appearance is not perfect nobody will notice. Of course, the trick can work even if we make the video much longer, perhaps by making it in “slow motion” style. But in this case we need much more attention to detail. Let’s see exactly how we will achieve our effect: for greater security, and also to be able to synchronize the movements of the actors as we please, we will separately shoot the actors “pitcher” and “victim”. In practice, first we will resume the pitcher who makes the gesture of throwing a knife forward (without actually throwing one). Then, without moving the camera, we will shoot the actor pretending to be hit. The victim must already have the fake knife on him at the start of the recovery. In practice, the actor puts himself in position with the fake knife already in place; after a few seconds he will act as if he has just been hit. At this point you will ask yourself: why should the knife appear in the shot before the victim is hit? It will not appear, of course, because we will make it invisible by superimposing a portion of the background with Kdenlive on it. This will allow us to make the handle of the knife appear on the victim at the exact moment we want it. Then it will be sufficient to create an animation, directly in Kdenlive, of the knife that flies from the thrower to the victim. Animations can be produced with the transition Affine . To correct everything, simply overlay the original film again, so that those portions of the knife that need to be hidden disappear. For example, we can hide a part of the knife blade when it is superimposed on the body of the victim actor, to give the illusion that it has entered the body. The trick is much simpler to carry out if the victim is placed so that the handle of the knife is parallel to the shooting surface of the video camera. As always, you can see the example video at the following address: https://www.youtube.com/watch?v=hMPVbSOtygU
 The knife is flying, but nobody will get hurt
 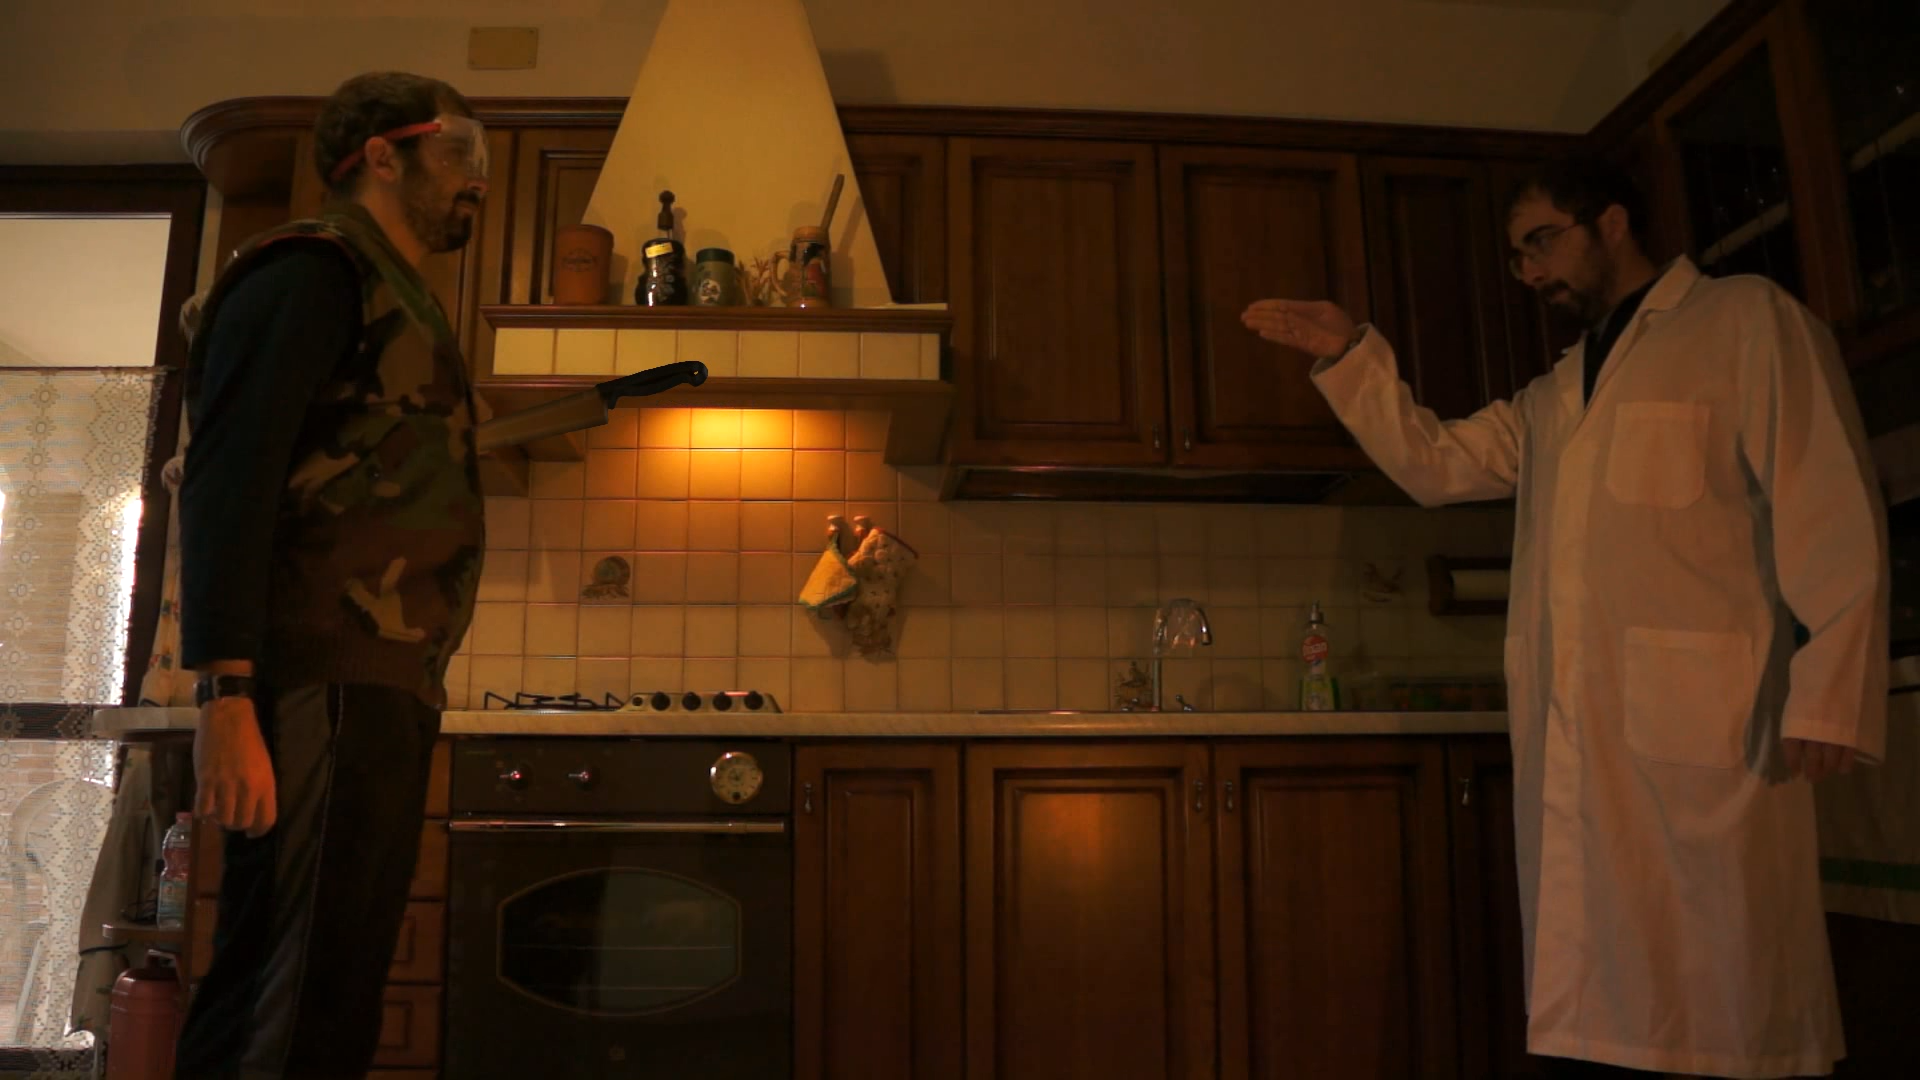 The knife hits the actor… but it’s an animation
 Building a fake knife
To get a good effect, you need a pair of knives: a real one and a fake one. The real one is used in close-ups and its image will be used for the animation of the knife. However, being real and therefore dangerous, it must never be launched. In fact, the actor only has to make the gesture of throwing a knife, without however holding anything in his hand. The fake knife, on the other hand, is the one that must be placed on the actor who plays the victim. Of this, however, you can only see the handle: here, then, that the construction of the fake knife is almost trivial. It is enough, in fact, to get a knife to which the blade is removed. Many knives have screws which, if removed, allow the blade to be removed. In other cases, however, just cut it with a hacksaw from metal, of course, being careful not to injure yourself. Then, it is necessary to file well what remains of the blade, to avoid any damage to the actor who will play the victim. The handle of the knife can then be glued to a plexyglass rectangle: thanks to it we will be able to insert it into the slits of a fabric making it appear as if it were really inside the actor’s body. If the knife is to be placed on the head, there are special fake knives with circles to hide in the hair. They are not very credible up close, but if shot in the long shot they appear quite realistic.
Join the two actors
We need to merge the images so that both actors appear
 1 TWO ACTORS, TWO CLIPS – Let’s start by opening Kdenlive and loading the two starting clips in two superimposed video tracks: the one with the subject hit by the knife, and the one with the person throwing the knife. A transition of type must be placed between the two clips Composite .
  2 ON SUPPLEMENT – We apply an effect to the clip placed in the upper track rotoscoping . The effect can have one feather width equal to 4, to have a more homogeneous image, and we need to merge the two clips together making both actors appear.
 First it disappears, then it appears
We make the knife invisible until the moment the actor is hit
 1 A CLEAN FRAME – Let’s take now a frame of the clip in which the subject “victim” is not present. When we find the frame we want, we can extract it to a file by clicking on the gear-shaped button and choose the item Extract frame .
 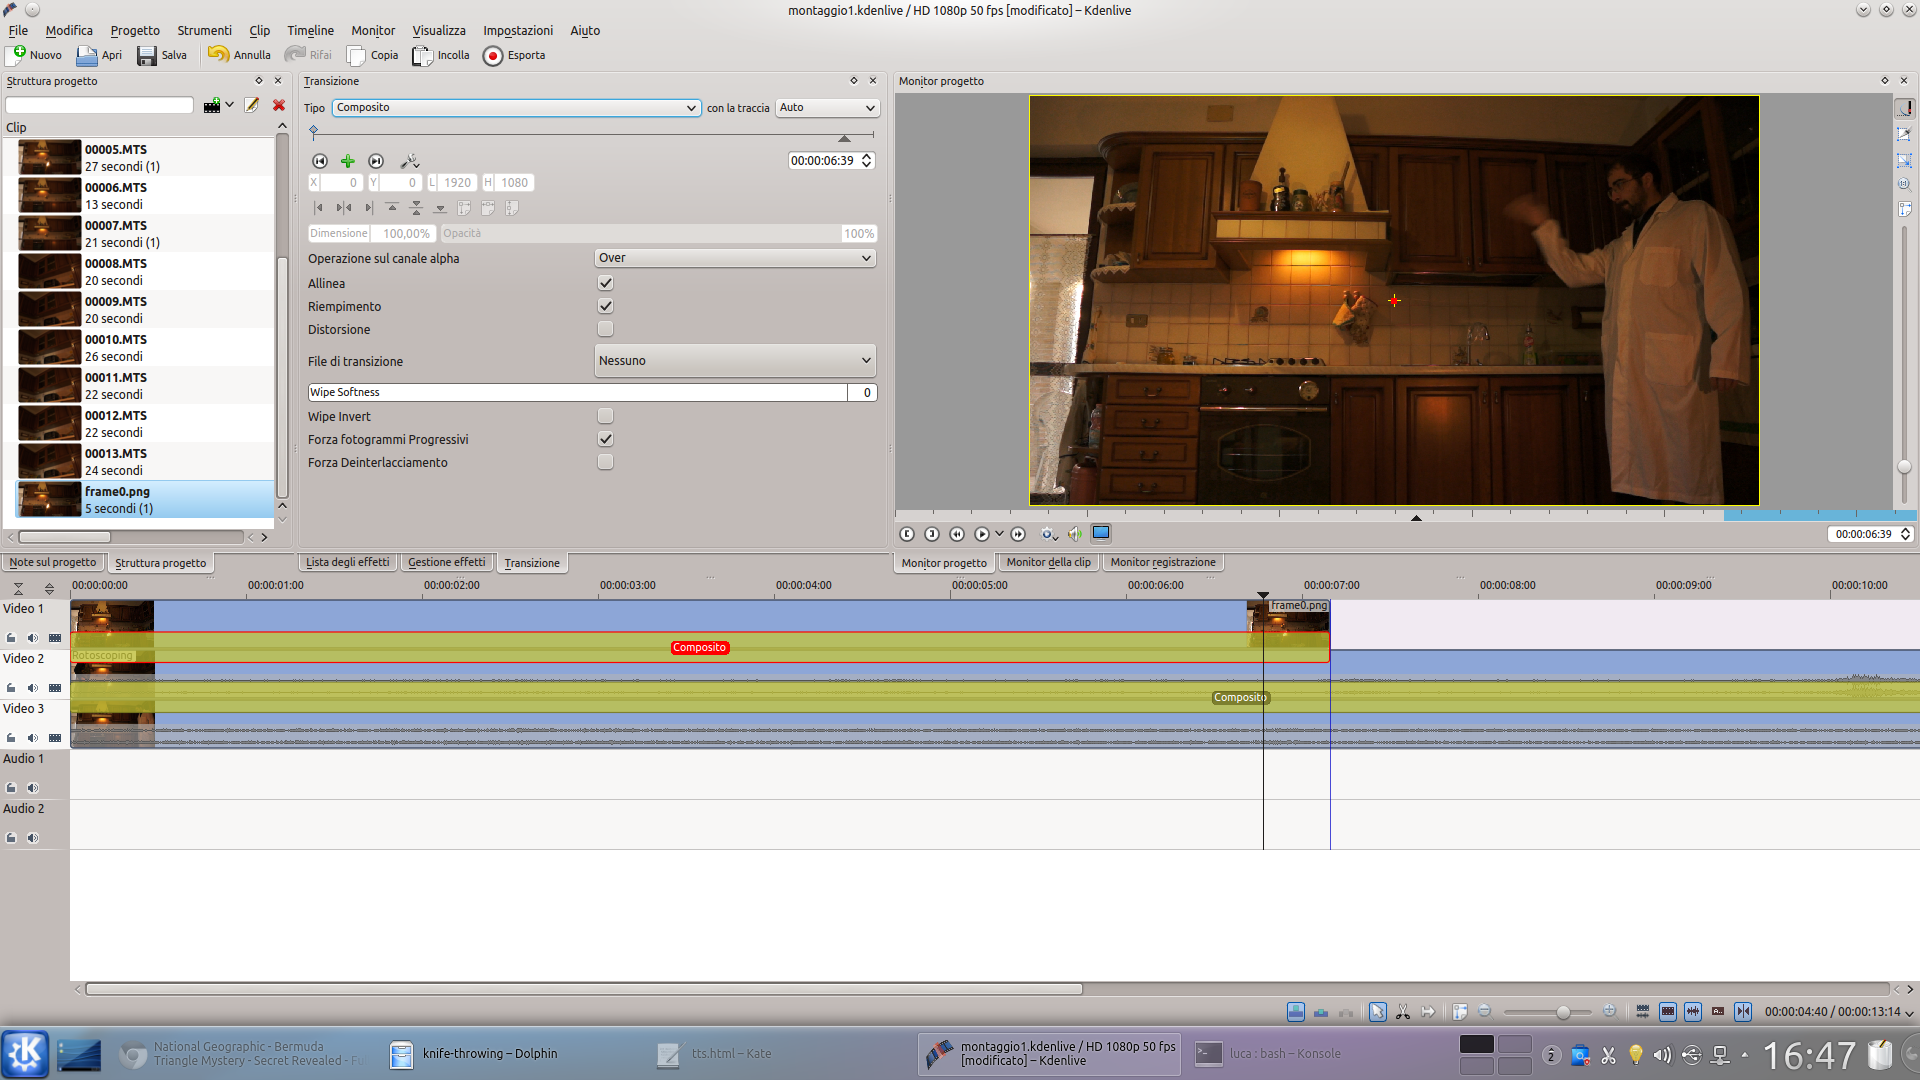 2 VA SUPERIMPOSED – We load the newly exported image file into the project, and place it in a track placed above those that contain movies. This new clip should be extended from the beginning of the footage to the moment we want the knife to appear.
  3… AND CUT – A transition must be added to the clip Composite and an effect rotoscope . This should be designed so that the clip covers only the part of the image where the knife is present. We can set the feather width to 4.
  4 WITH KEYFRAMES– Of course, the effect must be corrected with the keyframes, to follow the movement of the victim actor. The result, if we make the rotoscope correctly, is that the knife cannot be seen until the moment the actor reacts as if he has been hit.
 The knife to be thrown
We prepare with GIMP the image of the knife to be superimposed on the movie
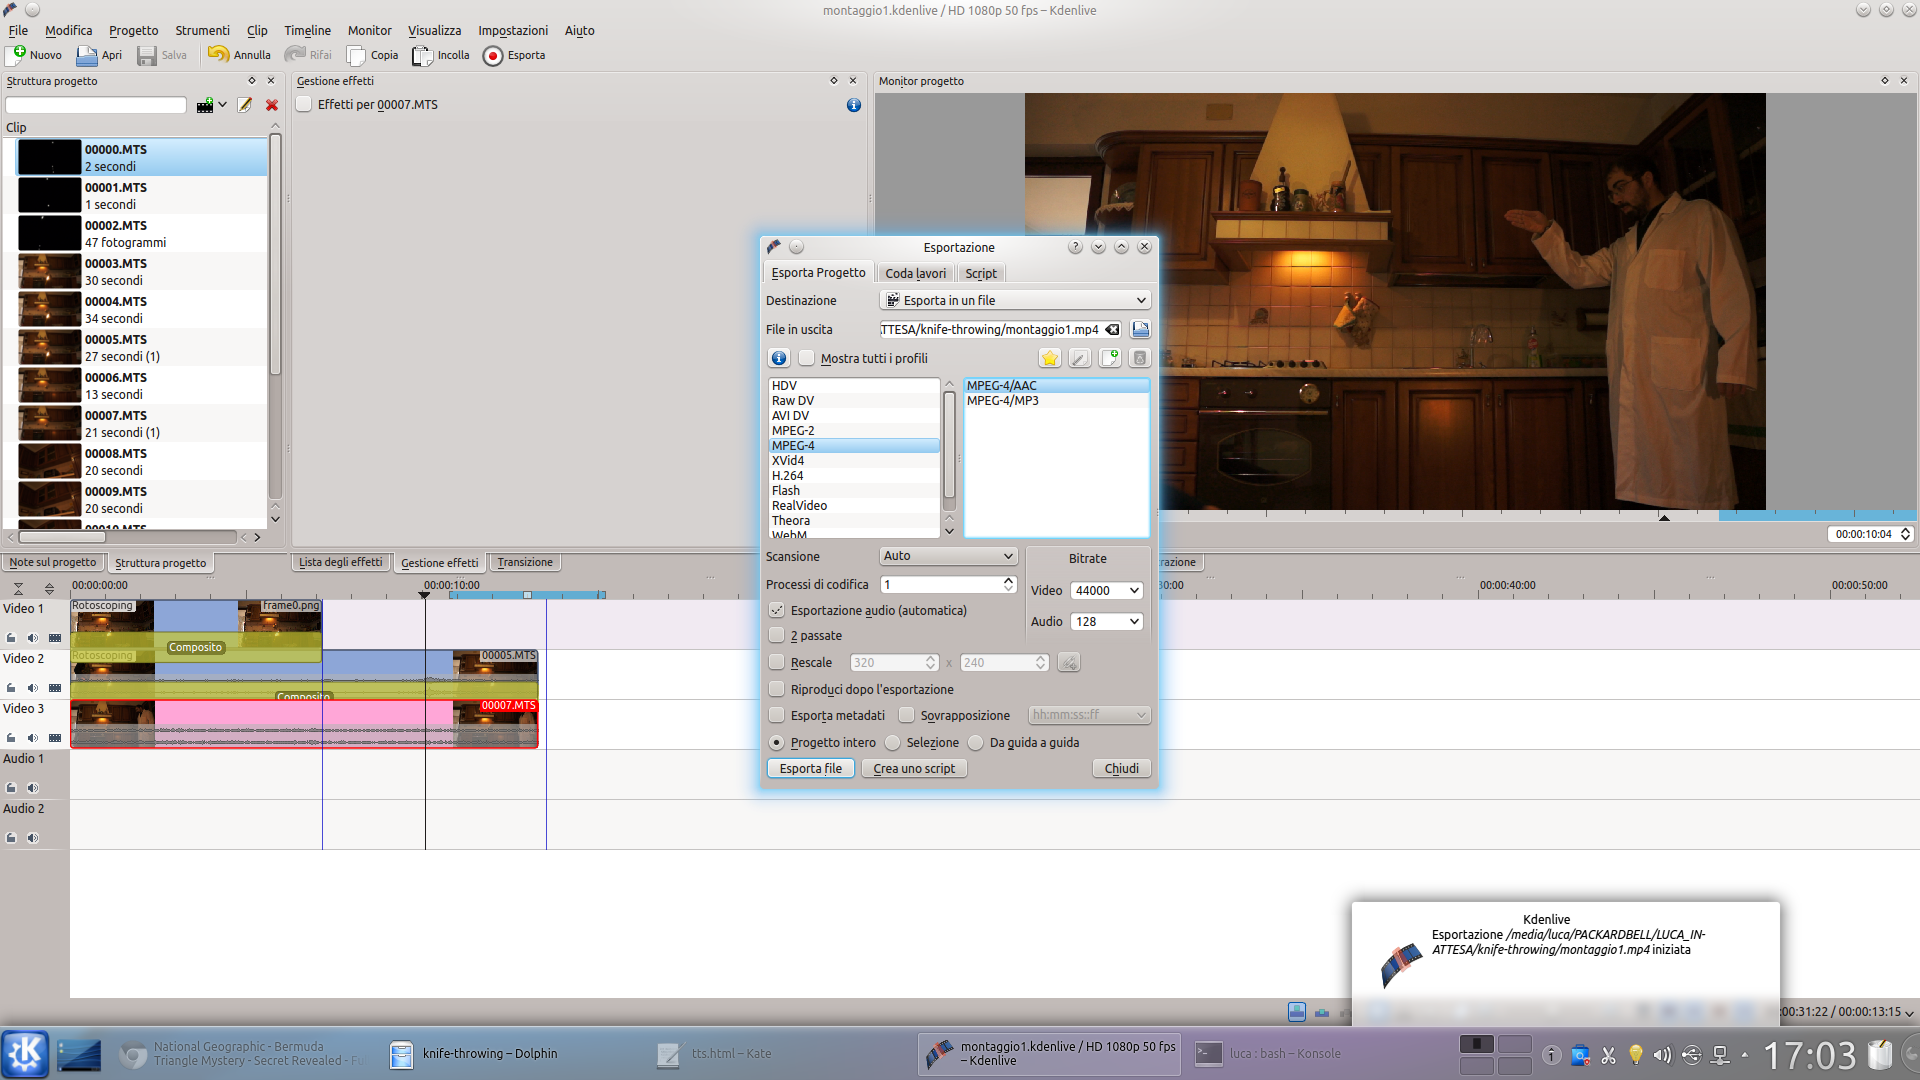 1 ON EXPORT – So we have an “overall” video in which an actor is seen making the gesture of throwing an object, and after a few fractions of a second the handle of a knife appears on the body of the other actor. We export the movie in high quality.
  2 HERE IS THE KNIFE – We open the photograph of the knife with GIMP and begin to select the knife itself with the selection tool Lazo . We can also set the soft margins. Then, click on the menu Select / Floating .
  3 IMAGE AREA – We insert the content of the selection into a new layer, and delete that of the background. Then, we automatically crop the image by clicking on the menu Image / Set surface to levels .
  4 WITH TRANSPARENCY – We correct the image with the rubber if necessary. The knife image is ready: now we have to export it by clicking on File / Export . It is essential to choose the export format PNG , because jpeg does not manage transparency.
 A simple 2D animation
Let’s fly the knife… in a computer animation
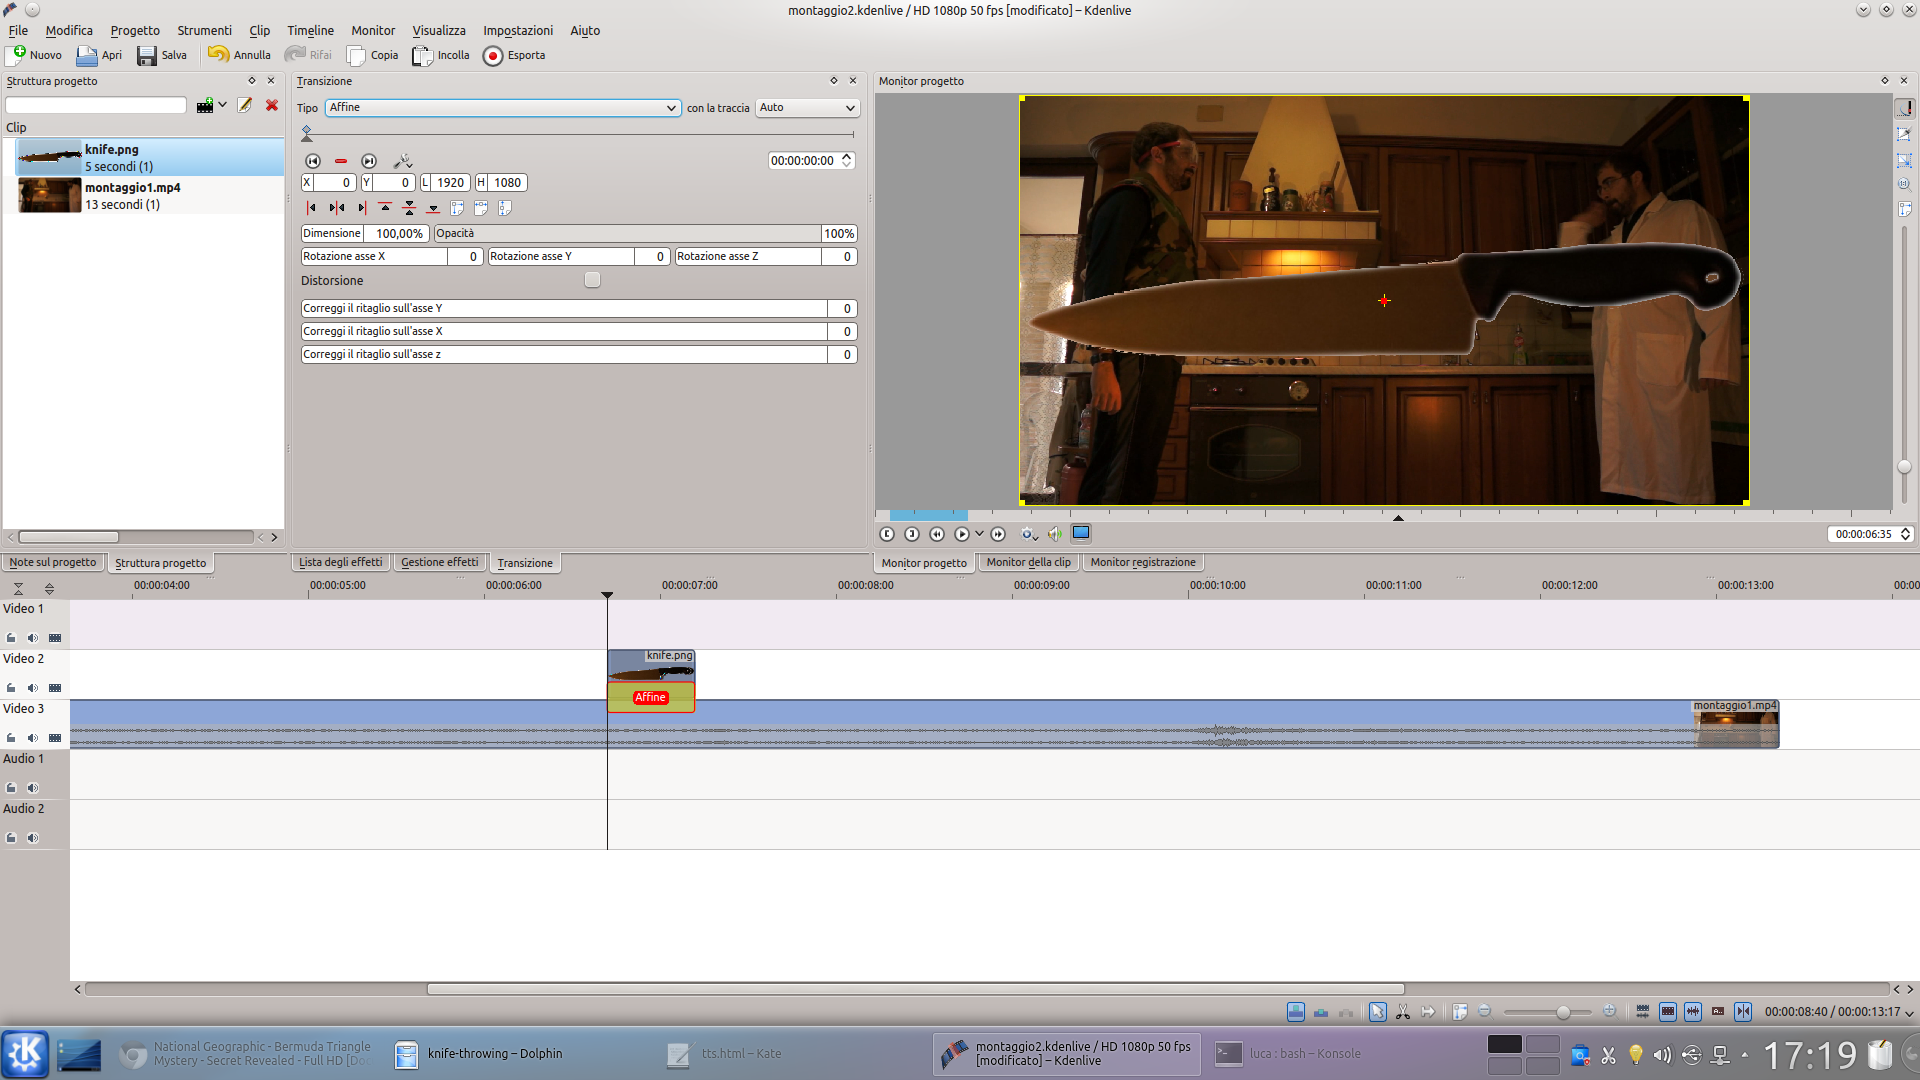 1 A NEW PROJECT – We open a new Kdenlive project, loading in it the exported movie at the beginning of the tutorial on the previous page. Above this is inserted the image clip of the knife created with GIMP, positioned in the range in which the knife is launched.
 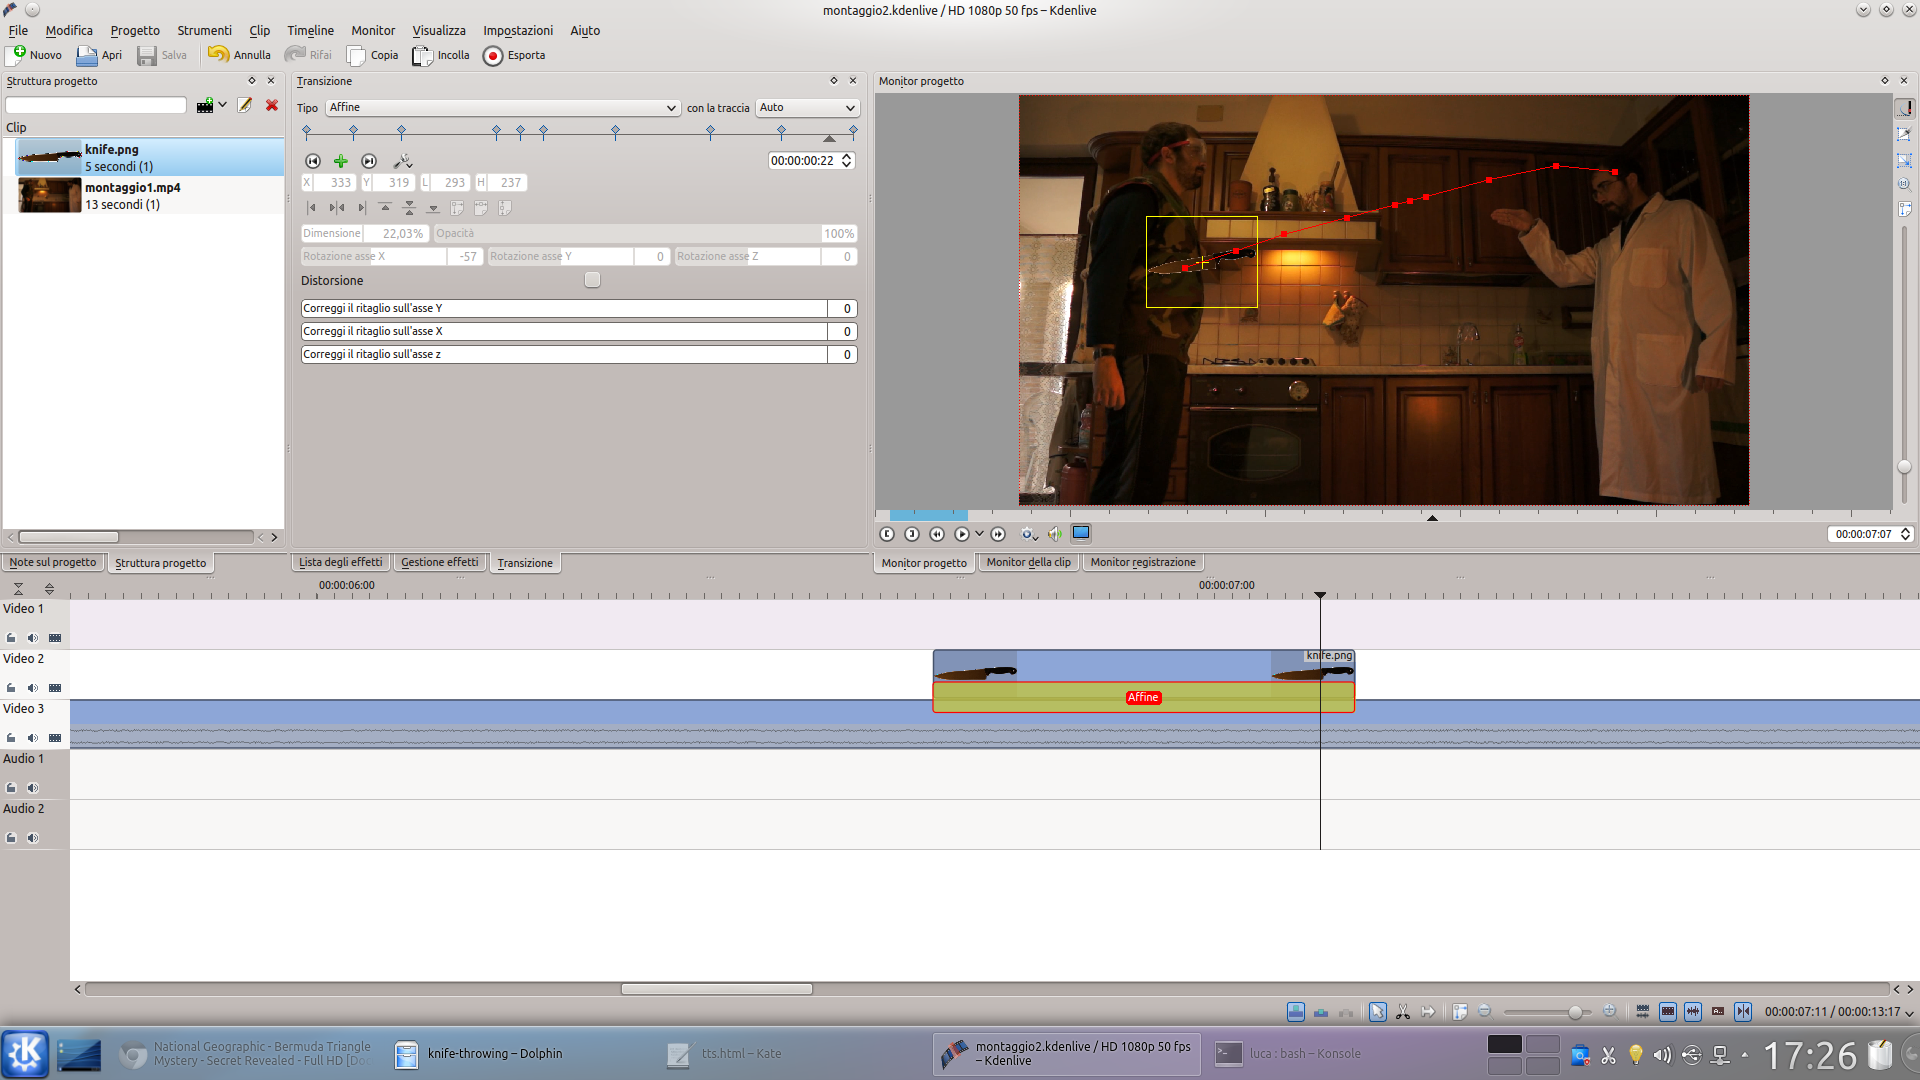 2 COMPOSITE AFFINE – We overlap the two clips with a type transition Affine : we change the scale and position of the knife to be compatible with the scene, and use the X axis rotation to correctly rotate the knife in the various keyframes.
 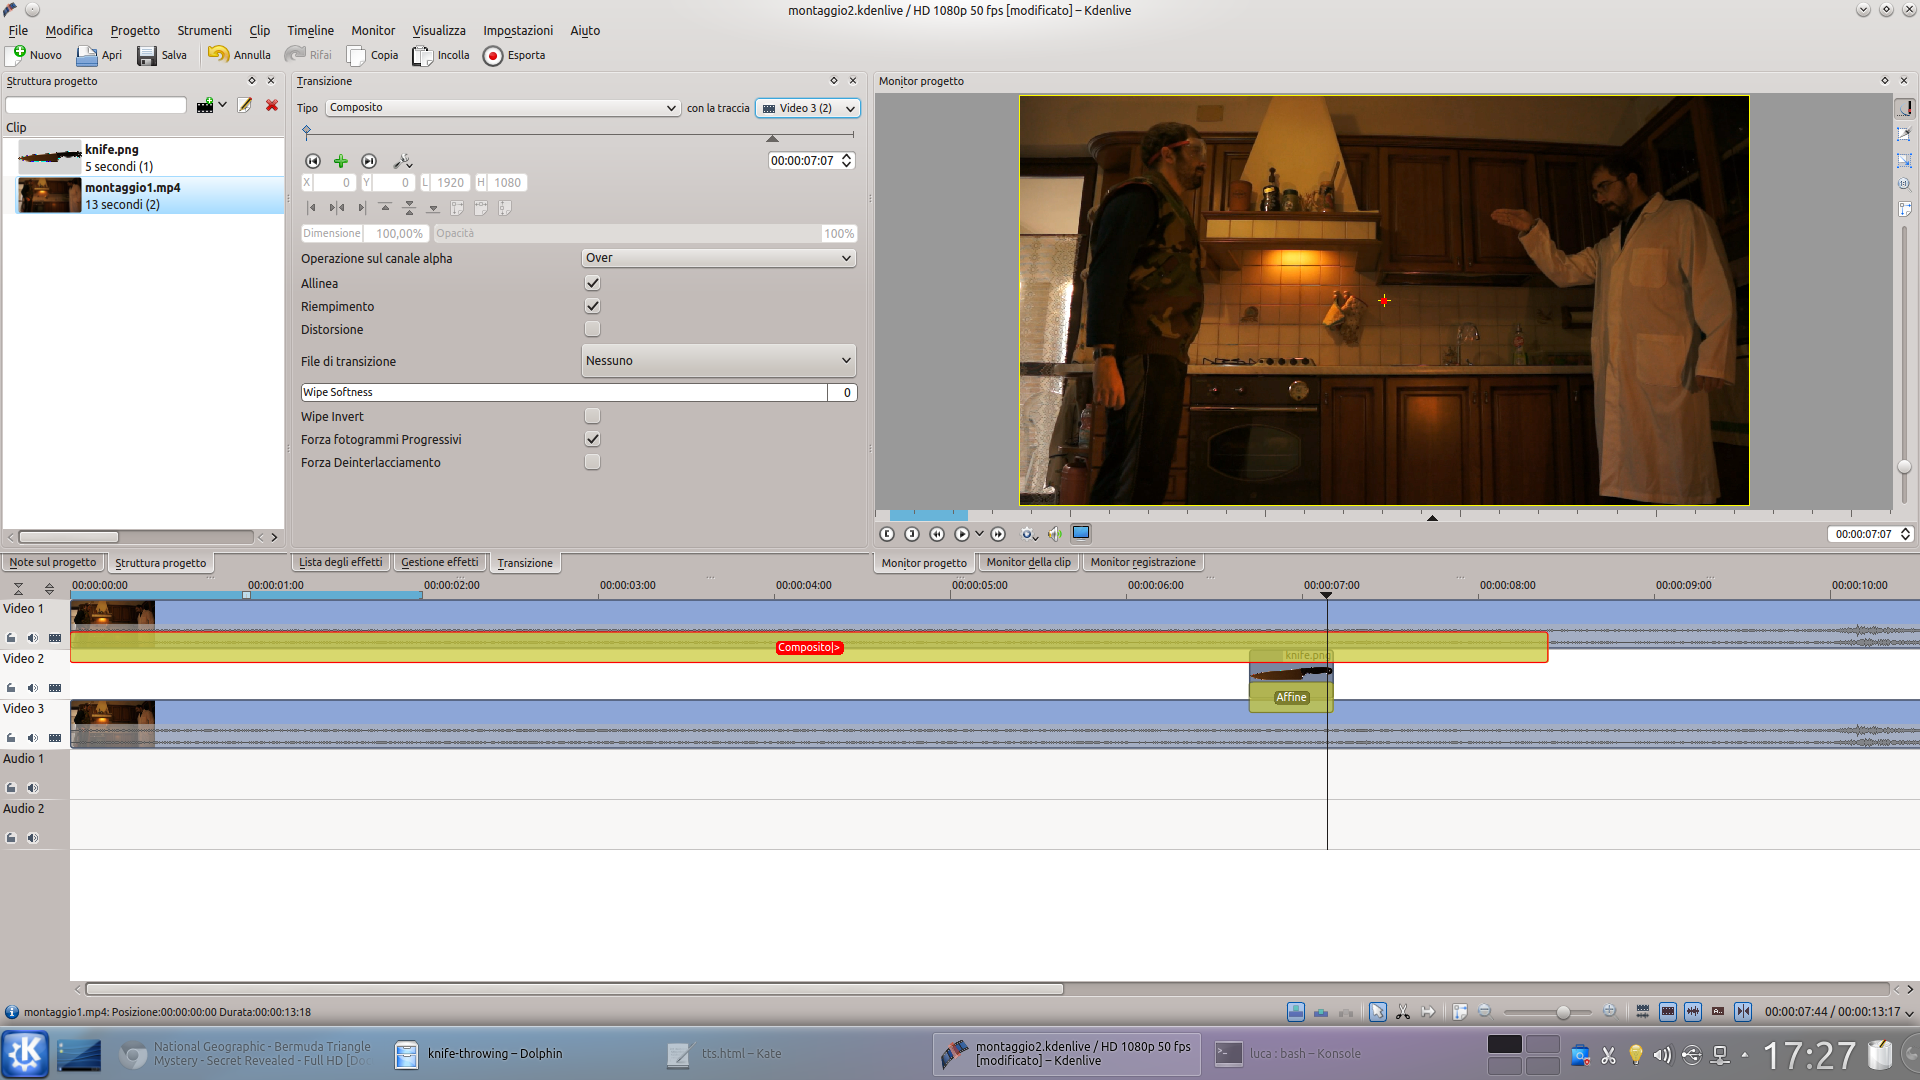 3 THE VIDEO AGAIN – Animated the knife with the frames of the Affine transition, we insert the clip of the movie into the project again, positioning it above the others. This must have the transition Composite set on the lowest track (probably Movie3 ).
  4 THE ROTOSCOPING – We can cut out the clip, because we are only interested in the part superimposed on the animation of the knife. Then, we apply an effect rotoscope drawing it so as to make visible only the parts of the knife that should not be hidden.
  5 FRAME FOR FRAME – The movement of the knife must be followed from the beginning to the end because, for example, when it arrives on the victim’s body you will have to see almost only its handle, since the blade must appear as inserted in the victim’s body.
  6 ON THE MOVE– To make the animation more credible, we add a slight blur on the vertical axis with the effect Blurred cube . Just increase the vertical multiplier (or the horizontal one if you prefer) to 5 .

