Kdenlive allows us to superimpose videos depicting fire on the videos of our camera, positioning them in order to compose the writings. With a few tricks and the right transition, a few steps will be enough to draw texts with fire.
Fire is something that has always fascinated men, and it is no coincidence that the flames are continually inserted into the films: often in the form of candles or torches to illuminate the scene making it more adventurous. Or, a sudden fire to get a dramatic scene. But also something more bizarre: writing with fire. Fire writing is a method used especially in Asian cultures, often in conjunction with fireworks displays, during public events. But in western culture the idea of writing words with flames is often associated with the devil, or with other supernatural causes. Typically, when shooting a film with mediums who contact a ghost, the latter interacts by writing meaningful words on wooden boards, and one of the methods that can be used is writing with fire. Or, a person apparently endowed with supernatural powers can magically bring up fiery writing on a floor. Obviously, an effect of this type can be achieved in the room, without the need for computer graphics: just get a flammable liquid, preferably not too volatile, and use it as ink to write a word. Then just set the liquid on fire with a match, and turn on the video camera. However, this is a bad idea. Because fire is dangerous, however many precautions you can take, it can always get out of our control, and it’s easy for someone to get hurt. Without considering that we may want to make fire appear on objects that we don’t really want to destroy. If we really wrote with fire on the table in our dining room, then we will have lunch with the plate on our knees. Computer graphics, therefore, can be the safest, least expensive, and ultimately most reliable solution, because in the real world it can be difficult to get the image we want, the flames are unpredictable, while with Kdenlive we can give the fire any shape we want. First of all we will need the image of a flame: on the internet there are a couple of sites that offer ready-made videos of burning flames, in some cases even free of charge but generally at a cost of around ten euros. Obviously, the movie takes only one flame, but if we want to write words we will need a line of flames: with a line of fire, we can obviously use it as if it were a “stick” with which to write texts. Have you ever tried to write words with toothpicks? Here, the mechanism is identical. We will therefore use Kdenlive to glue together several flames to form a row: there are several ways to do it, we propose to support them because it is the shape that lends itself to most situations. Once a row of flames is obtained, we will export the video with the fire on a black background. Then, taking advantage of the Screen composition method, which makes black and bright everything else transparent (like on a computer screen), we can insert the line of flames superimposed on the video we made with the video camera. As always, you can see the example video at the following address: https://www.youtube.com/watch?v=ddlSl7BKFpw
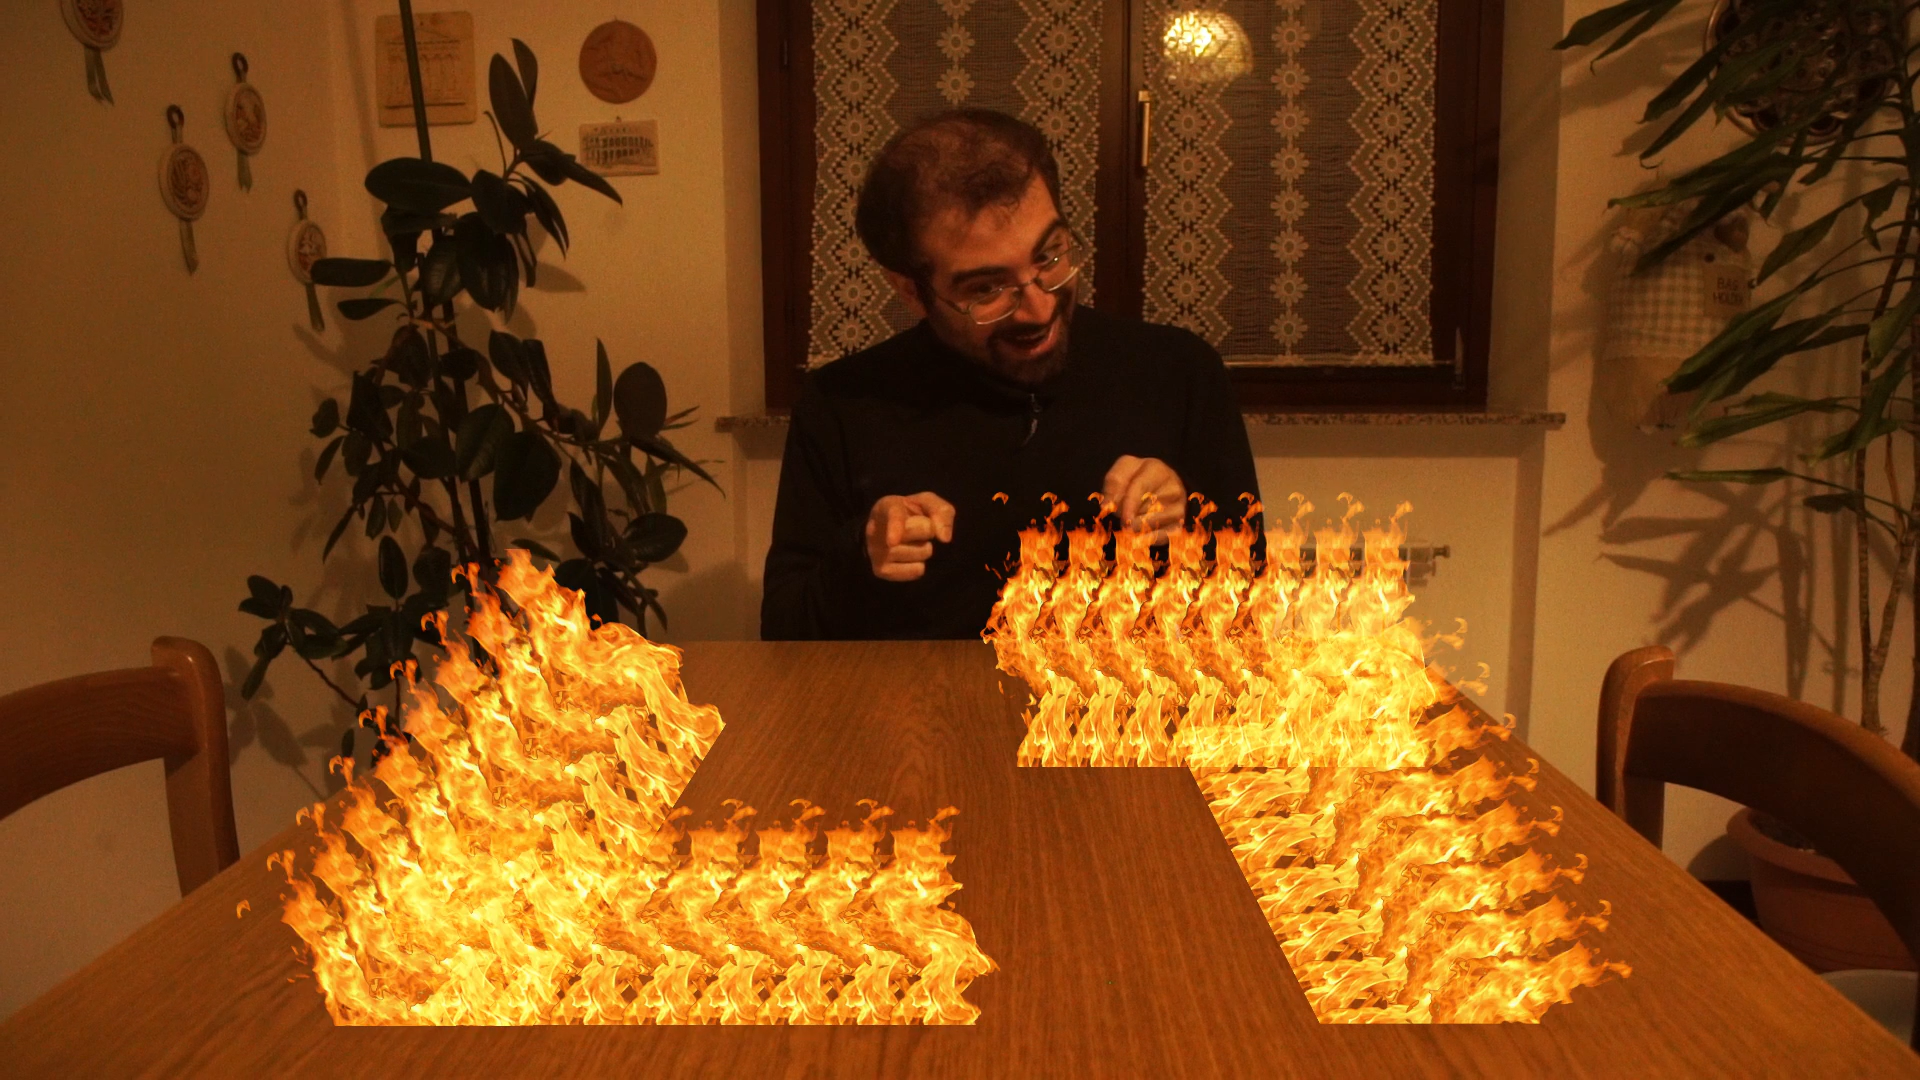 We formed the letters LT with flames
 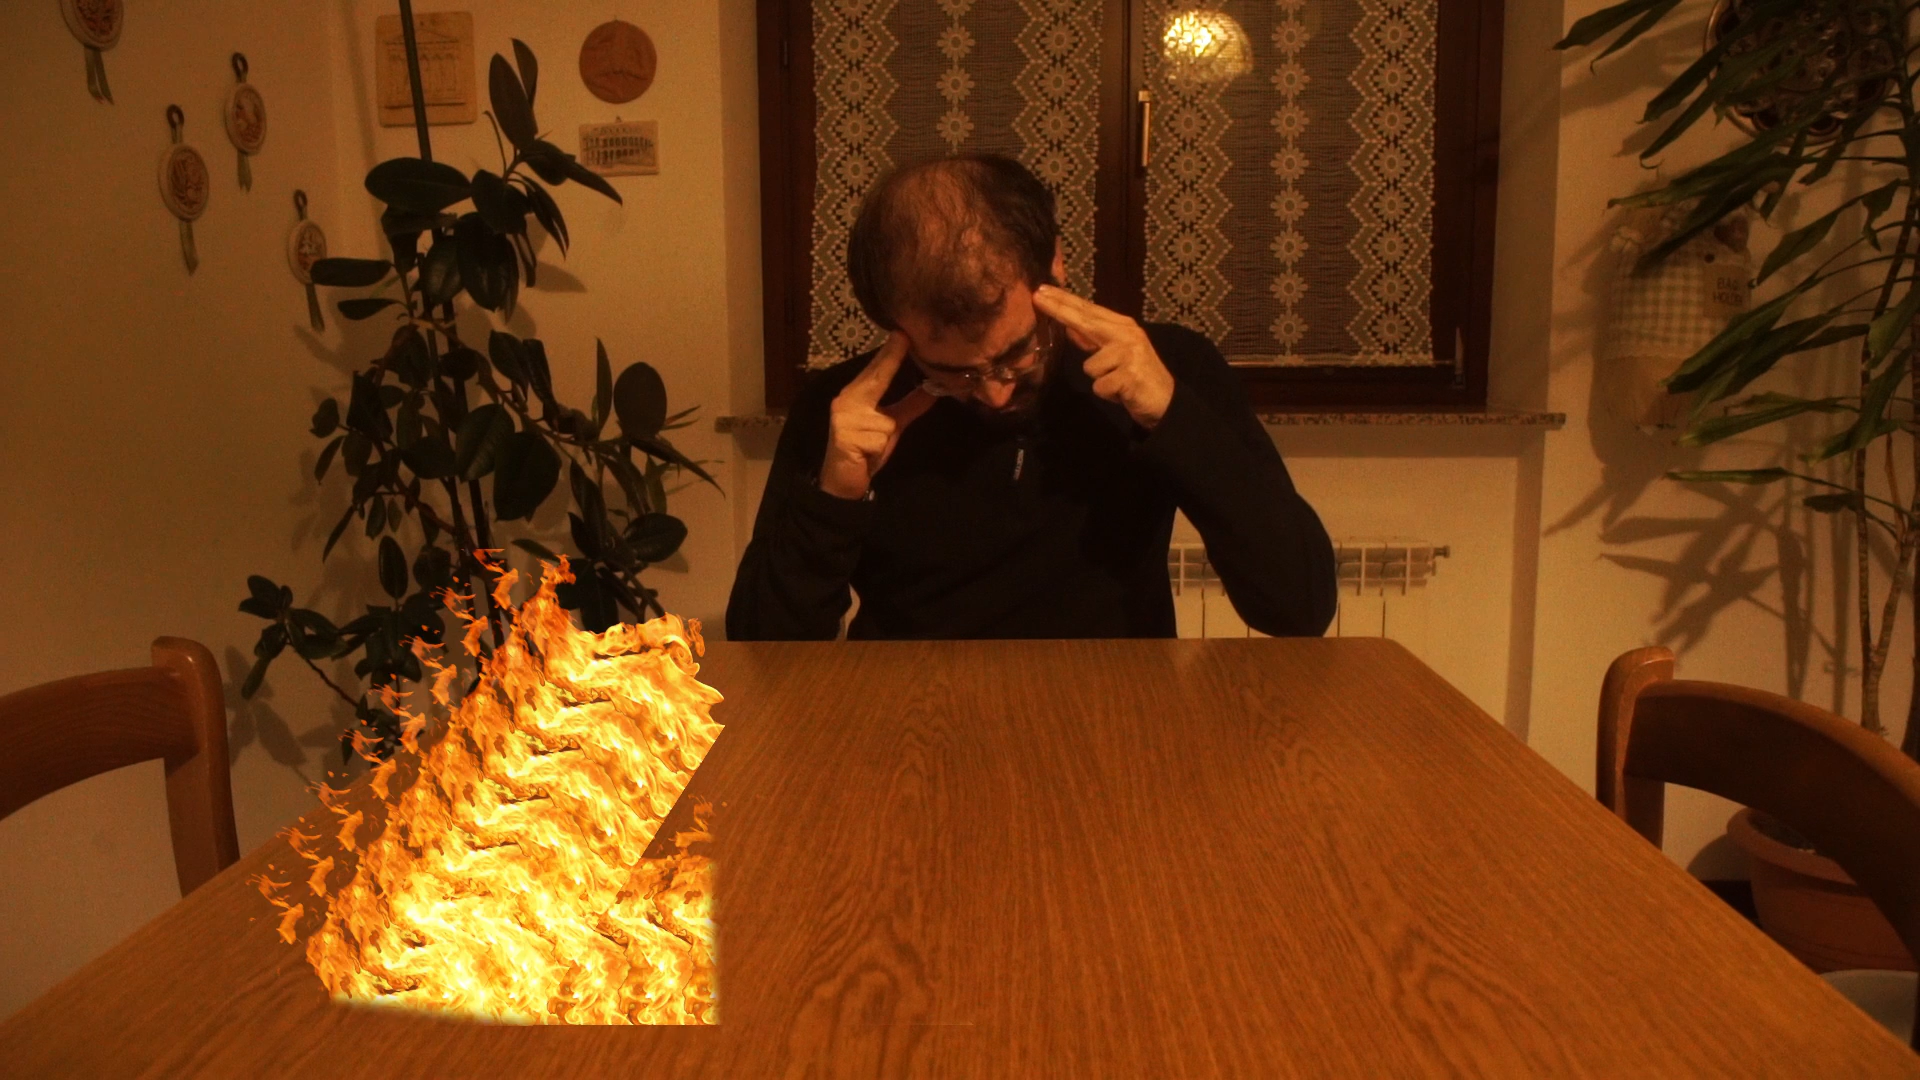 Thanks to the rotoscope we can gradually make the flames appear like in a fire
 Filming a flame
If you don’t want to buy a movie of a flame on the internet, you can make one yourself, obviously paying close attention: fire is dangerous, and you shouldn’t play it unless you know exactly what you are doing. The trick to picking up a flame is actually quite simple: you need to get a black background, preferably made with a non-flammable material such as opaque plastic. The color must be really black, not gray or dark blue. Then just place the video camera in front of this background and between it and the background itself place the flame (for example a candle, or a sheet of burning paper). The camera must be set with very low exposure times, otherwise the image will be blurred, and a very closed aperture. The advantage of a closed diaphragm is that the contrast of the image will be very high, so the flame will be very bright and the background totally black. With Kdenlive you can then make the background disappear with the transition Composite and Transform using the overlay mode Screen .
A flame on a black background
We superimpose the film of a flame on a black background
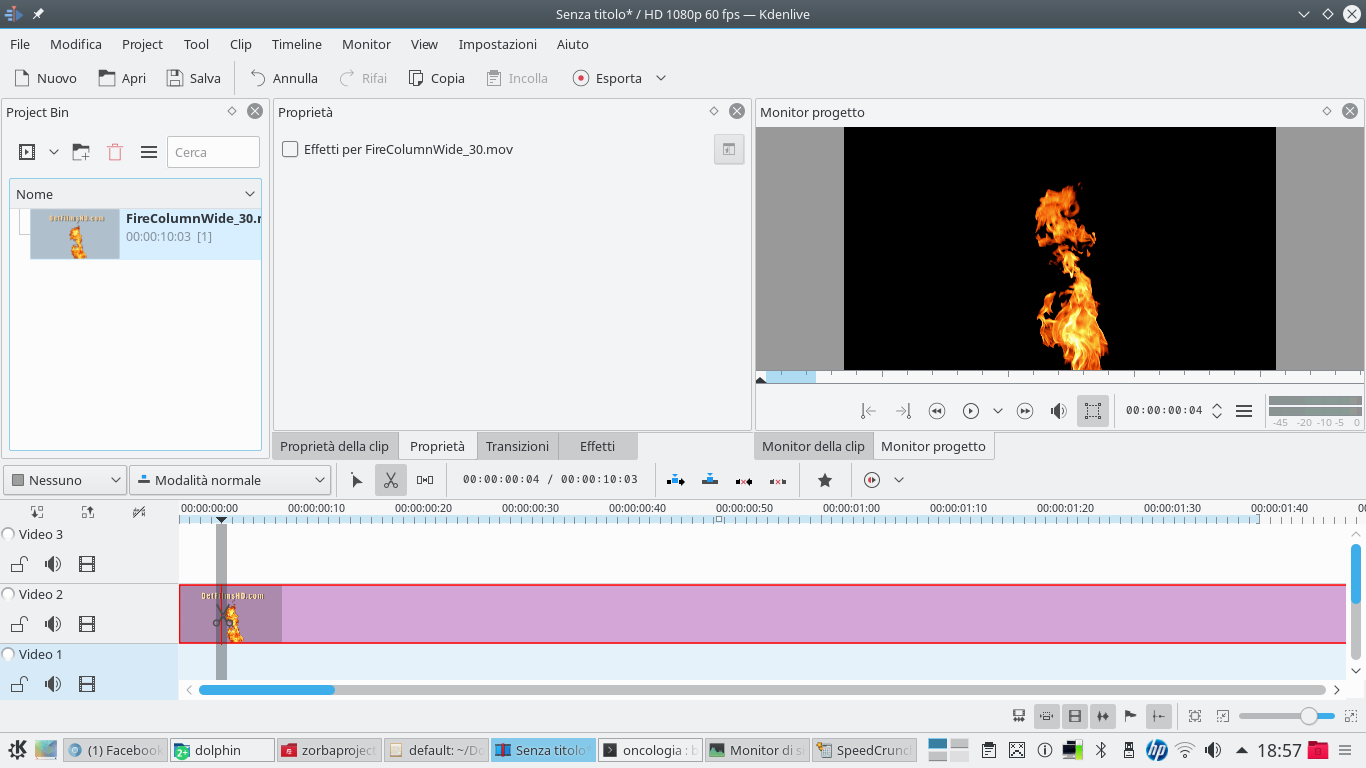 1 FIND THE FLAME – To begin with we need a video of a flame: we can get one at a low price on the site detfilmshd.com , which also has the advantage of already running a chroma key. However, we can also film a flame on a black background.
  2 BLACK COLOR CLIPS – After inserting the flame video into the track Video2 , insert a completely black color clip into the track Video1 . Obviously, the black clip must be extended so that it lasts as long as the flame clip.
 A whole line of flames
We add more tracks so that we can combine more flames
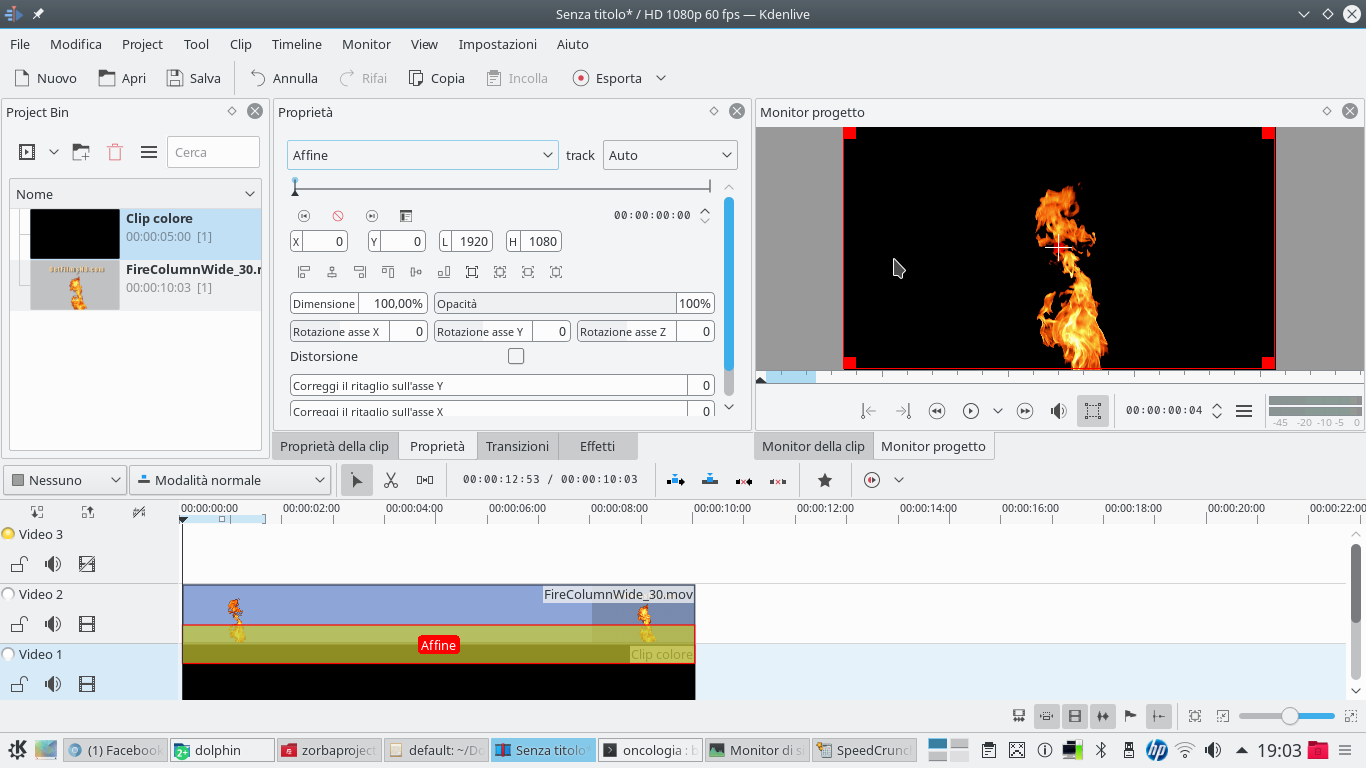 1 A TRANSITION – Between the two clips, present in the tracks Video1 is Video2 , we have to insert a transition of type Affine . This transition must allow the flame to appear on the black background. The image of the flame should not be resized or retouched with effects.
  2 TOWARDS ONE SIDE– All you have to do is use the transition to move the clip to the left side of the frame, making sure that its position on the axis Y (whose value must be 0 ) remains unchanged.
 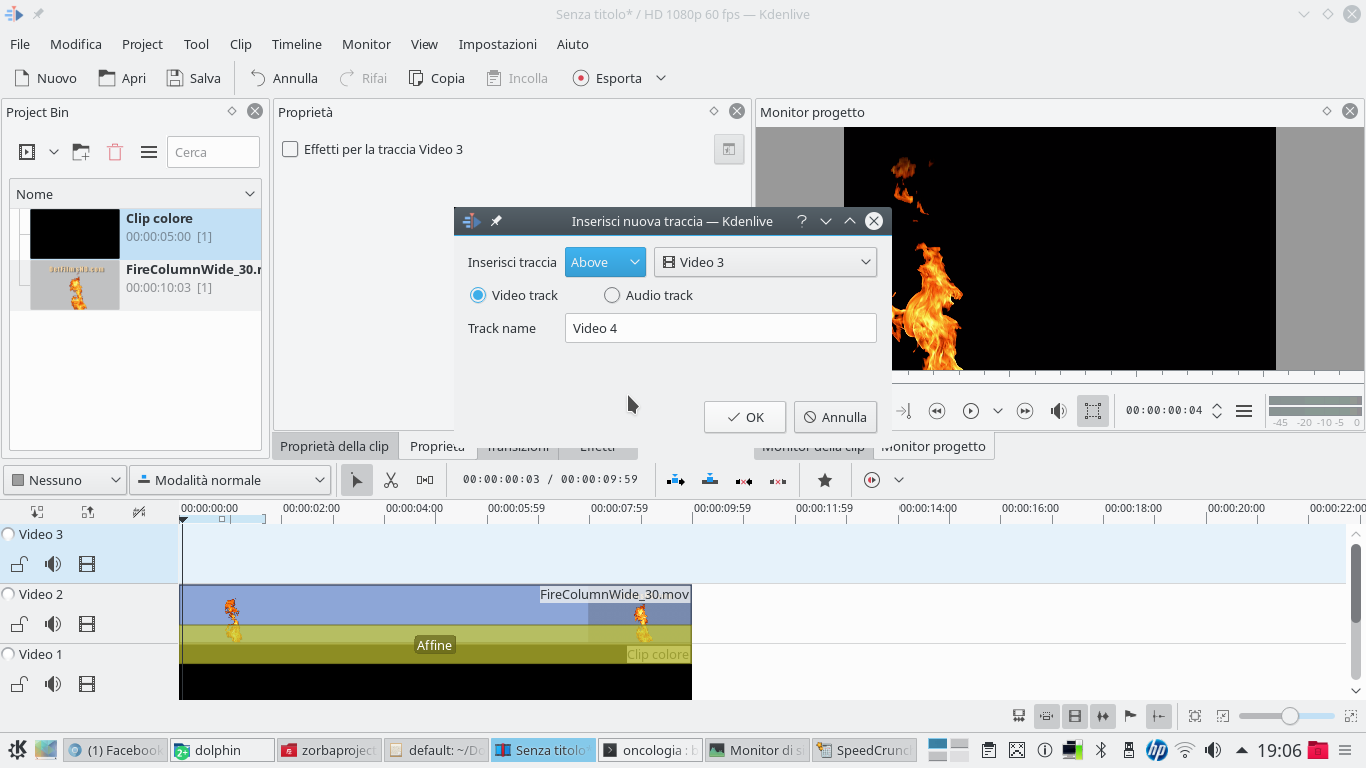 3 NEW TRACK – We will then have to add more clips from the same movie of the flame in the tracks above the Video2 . Since there is usually only one Movie3 , we will have to add more by right clicking on that track and choosing Add track .
 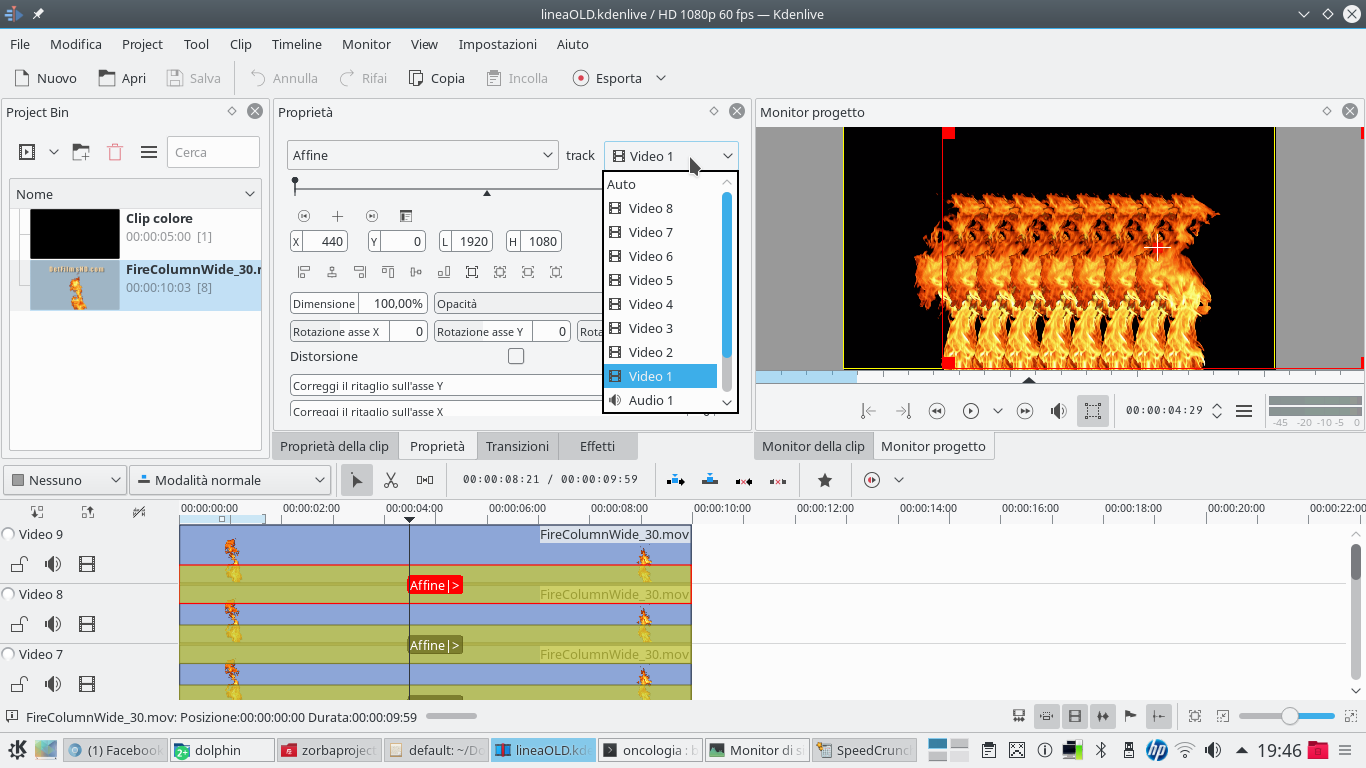 4 REPEAT ALL– The number of clips needed depends on what we want to achieve, but getting down to the track Video9 can be a good reference. In each track there will be a transition flame clip Affine referred to the track Video1 .
 Flames enter the real world
We insert the movie with the fire superimposed on the clip shot with the video camera
 1 MUST BE SIDE – All the images of the flames must be positioned side by side, to create a row of flames. The parameter Y of the various transitions Affine must always be 0 . Then we can export the movie by clicking on Export .
  2 NEW PROJECT – Now we are ready to open a new Kdenlive project, inserting inside it the clip just made containing the row of flames, and the video clip that we filmed with our actor.
  3 RIGHT TIME – The clip with the actor must be positioned in the track Video1 , while the one with the flames must be inserted in the track Video2 , making it start the moment we want the flames to appear.
  4 WITH ROTATION – A transition of type must be inserted between the two clips Composite and Transform . In addition, we will insert a type effect Rotate , to adjust the rotation of the line of flames so that it looks like a stretch of the letter we want to write.
 Draw the text with flames
Let’s add a line of flames for each segment of the text
 1 THE FIRST LETTER – We add all the necessary tracks: in each track we insert a row of flames, which we will use as part of a letter. So for the letter L we need two tracks, one for the horizontal section and one for the vertical one.
 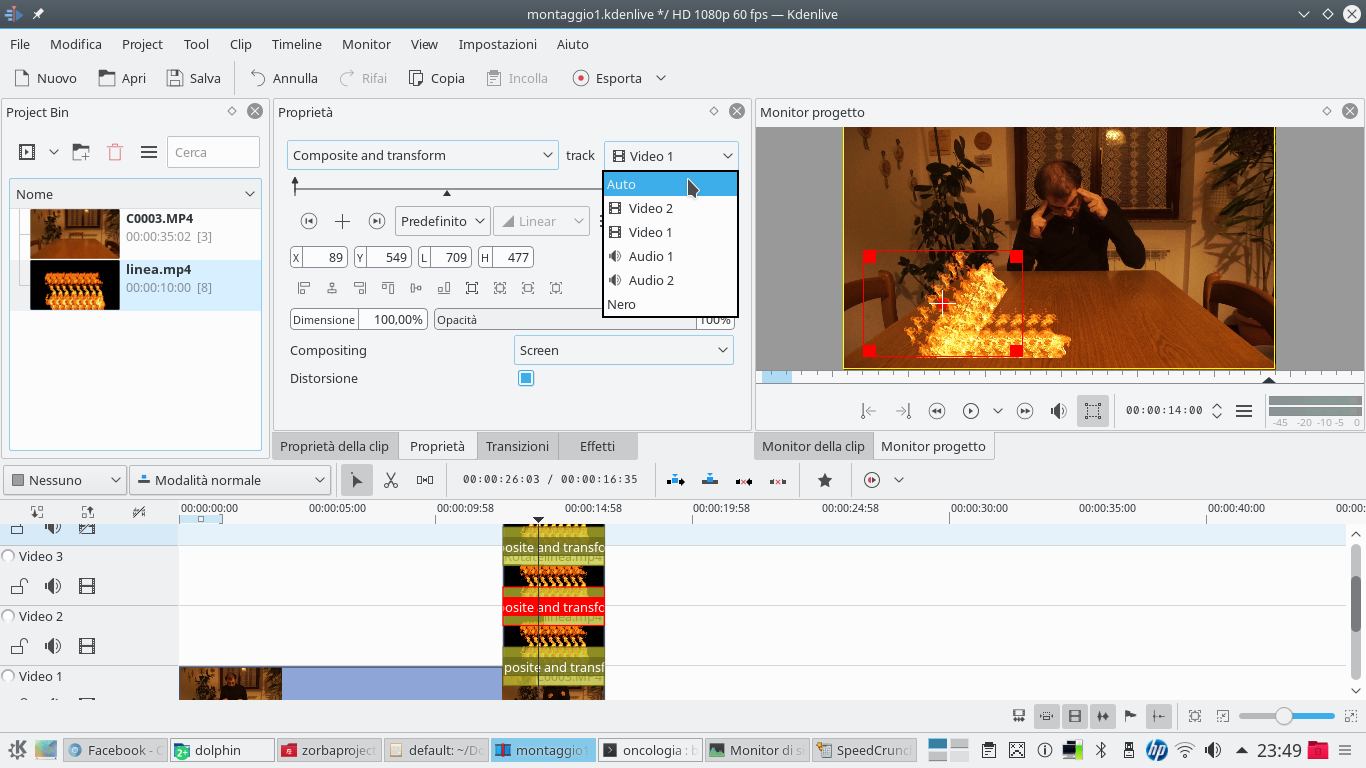 2 THE TRANSITION – All flame clips must have a type transition Composite and Transform , referred to the track Video1 , or that of the movie containing the actor. We recommend checking the box Distortion .
  3 SCREEN MODE – Thanks to the distortion, each clip with the flames can be freely resized, according to the need to draw the stroke we want. In addition, the compositing must be set to mode Screen .
 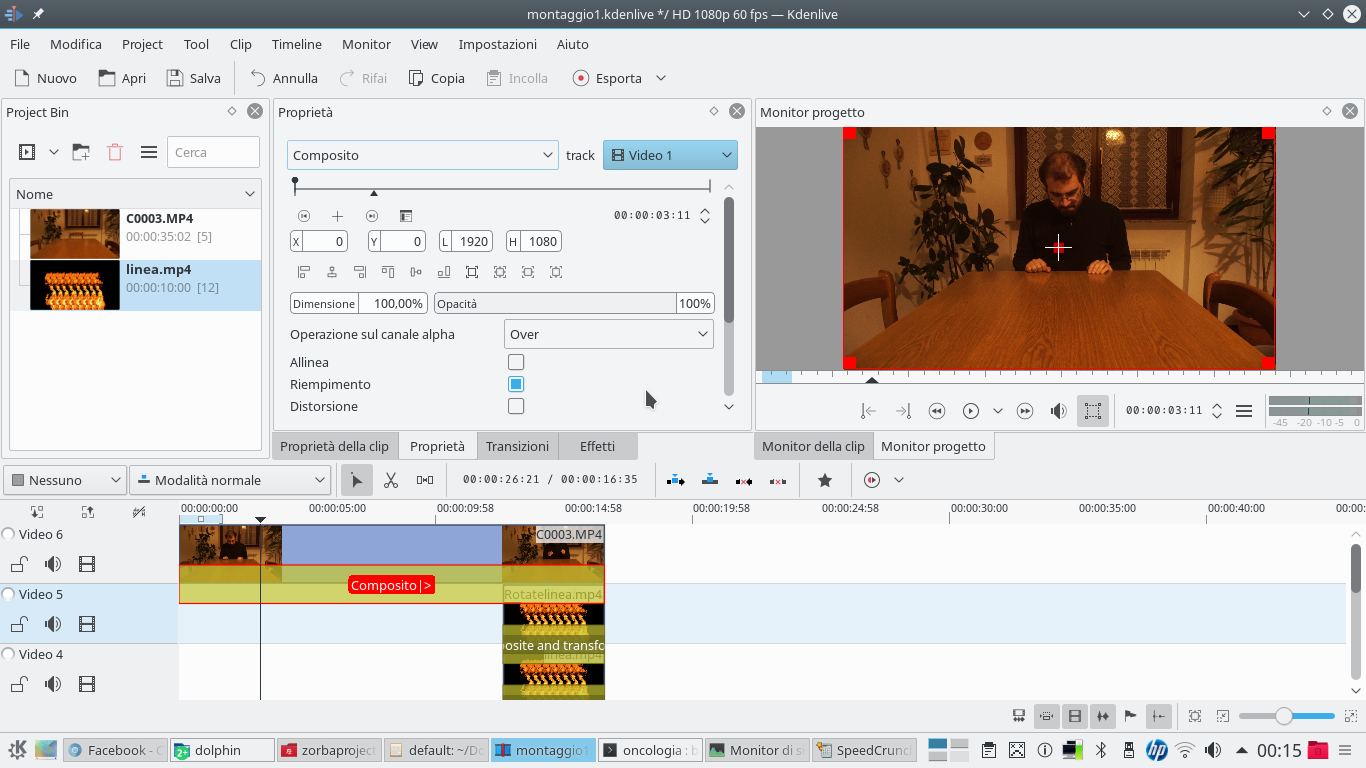 4 STILL THE ACTOR – After applying the mode Screen at all transitions, the flames will appear above the actor’s movie. Now let’s add a new track above all the others and insert the actor’s clip again, synchronized with the one present in Video1 .
  5 THE ROTOSCOPING – The new clip containing the actor must have a transition Composite throughout its extension, referring to the track Video1 . Then we insert an effect rotoscoping and add a keyframe by drawing an outline to cover the writing.
 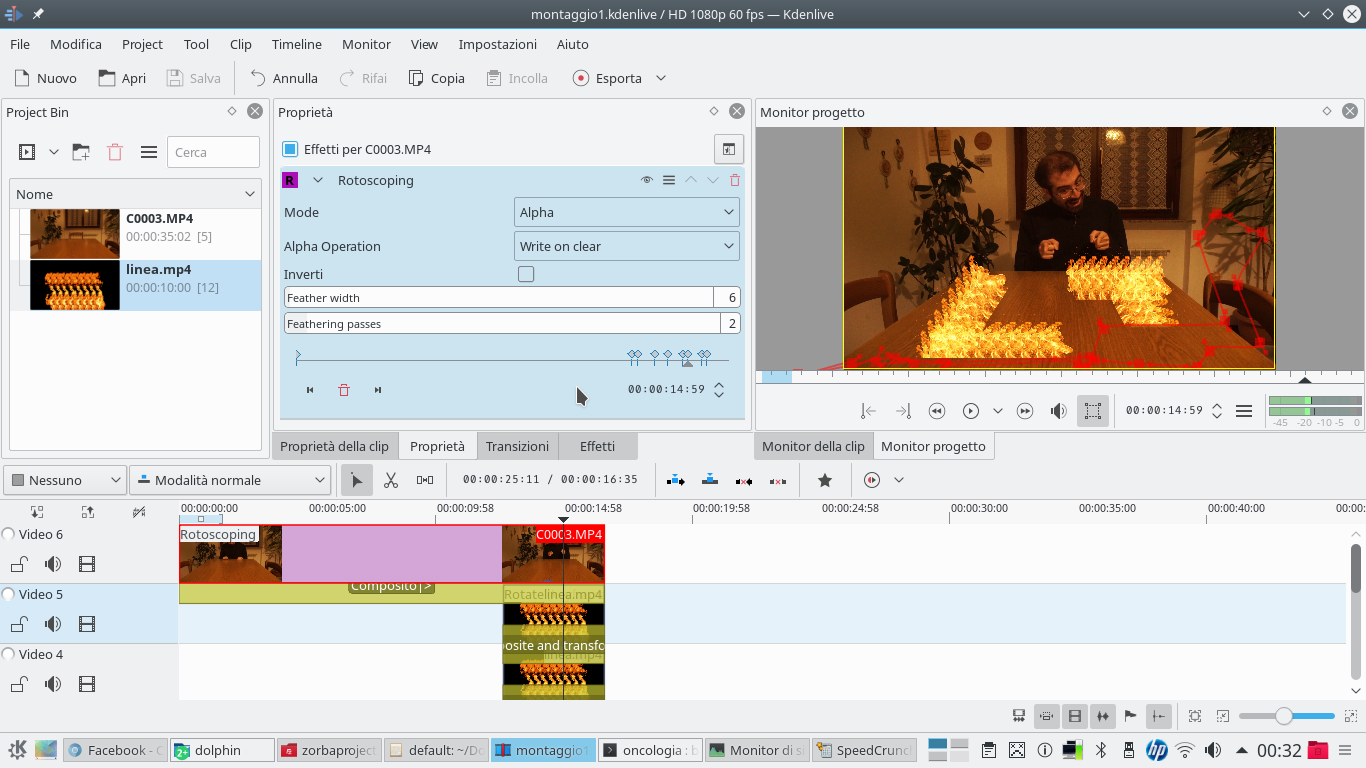 6 NEW KEYFRAMES– By adding other key frames, we move the drawn contour step by step so that within one or two seconds all the underlying image is discovered, gradually making the writing of fire visible. We set feather width to 6 .

