We can give realism to our action or horror scenes with fake blood… and thanks to Kdenlive it is possible to simulate the presence of blood in our scene without having to pour red paint on our film set.
Action films inevitably involve fights of various kinds. And, in the fighting, it is obvious that someone is injured. Simulating a shooting, a duel with swords, or a boxing match is not too difficult: it is enough that the actors have a certain coordination, so as not to really hit each other and be able to dodge the shots. It’s a bit like a dance choreography. It is also important that the actors manage to pretend to have been hit, and to experience pain, in a realistic way. But that may not be enough: anyone knows that when a person is injured the first reaction of the body is loss of blood. If the wounds on the body can be reproduced with discreet ease using makeup, it is much more difficult to reproduce the bloodstains that must necessarily appear on the objects of the room such as the floor, walls, and any furniture. One option is to buy a two-liter can of fake blood and spread it in the room where you are shooting your footage. But on most occasions, especially if you work on a fairly tight budget, it is not an option practically: fake blood can indelibly stain some types of ceramics and the plaster of the walls, as well as being still rather difficult to remove even on surfaces that are not porous. The simplest solution is to shoot the scenes without blood, and add it in post production using the magic of Kdenlive. Our trick works with fixed shots (ie with the video camera mounted on a tripod), but it can also possibly be applied to shots on the move using “camera tracking”, a mechanism we talked about in a previous issue of GNU / Linux Magazine. The idea is quite simple in itself: just get good bloodstained images and process them with GIMP in order to adapt them to the scene we shot. Then you can overlap the spots using the Kdenlive “multiply” transition. The beauty of this transition is that it superimposes the image while maintaining the lighting of the original scene. It means that, for example, if the stain is to appear half on a white wall and the other half on the brown jamb of a door, the correct lighting will be preserved. The same applies to the possible modification of the lights: for example, if in the shot an actor illuminates the area where the spot is located with a flashlight, the spot automatically assumes the right color. Of course, characters can be moved in front of the spots using rotoscoping. For example, we can suddenly make a stain of blood appear behind an actor’s back, who then falls to the floor: this gives the illusion that blood has spattered on the wall because the actor was hit. We can also make bloodstains in motion using the key frames of the Kdenlive Composite transition: we set a key frame at the beginning of the clip with the initial position of the bloodstain, and then one at the end with the position where we want it to be. spot arrivals, Kdenlive will draw all the other frames for us. This allows you to create a fake pool of blood that widens. As always, you can see the example video at the following address: https://www.youtube.com/watch?v=As3fVu91nvI
 An example of fake blood stains on the wall
  A fake pool of blood moving on the floor
 Fake blood as makeup
The effect we propose works well if the spots must appear on stationary objects. If you want blood spots to appear on the actors instead, it is convenient to use fake blood as makeup. Fake wounds can be easily made using liquid latex (found in costume and toy stores) and toilet paper. Practically, pieces of about 1×1 cm of paper are torn, to be glued on the actor’s skin with latex gradually building the shape you want for the scar. Finally, it is left to dry and covered with foundation. The advantage of latex is that it detaches very easily from the skin after being bathed in warm water. At the center of the fake scar, or even directly on the skin, fake blood can also be added for external use. You can buy it or produce it at home using water, corn syrup, food coloring (red, green, blue), and corn starch. The doses are estimated on the basis of the color and viscosity that are desired. The advantage of this preparation is that it is also edible, therefore it can be poured from the mouth.
Find the spots
A web search allows us to find realistic bloodstains
 1 A SEARCH – If we want to insert blood stains in our movie, we must first find them: then we open our favorite browser and search on Google Images for a phrase like “blood stains”, which means “blood stains”, by downloading the best photos.
  2 IN KDENLIVE – We load the clip of the movie in which the actor is hit in the Kdenlive program, scrolling until it reaches the instant when the blood must appear. We have to to extract this frame in a file using the gear button .
 Corrections with GIMP
The photographs of the spots must be correct in their position and perspective
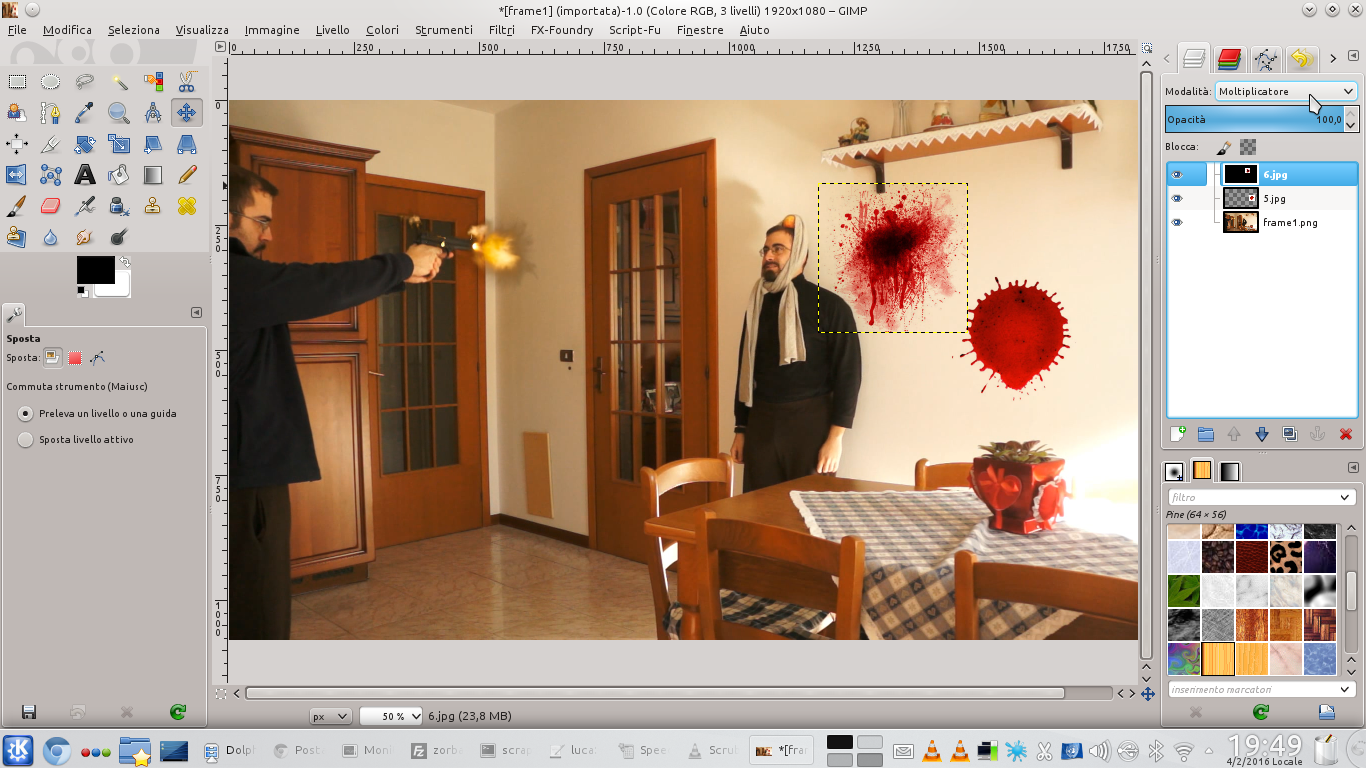 1 CHANGE IN GIMP – We open the frame just extracted in the GIMP program. Then, using the menu File / Open as Layers , we insert the images with bloodstains that we downloaded from the web. Stain levels must have mode Multiplier .
 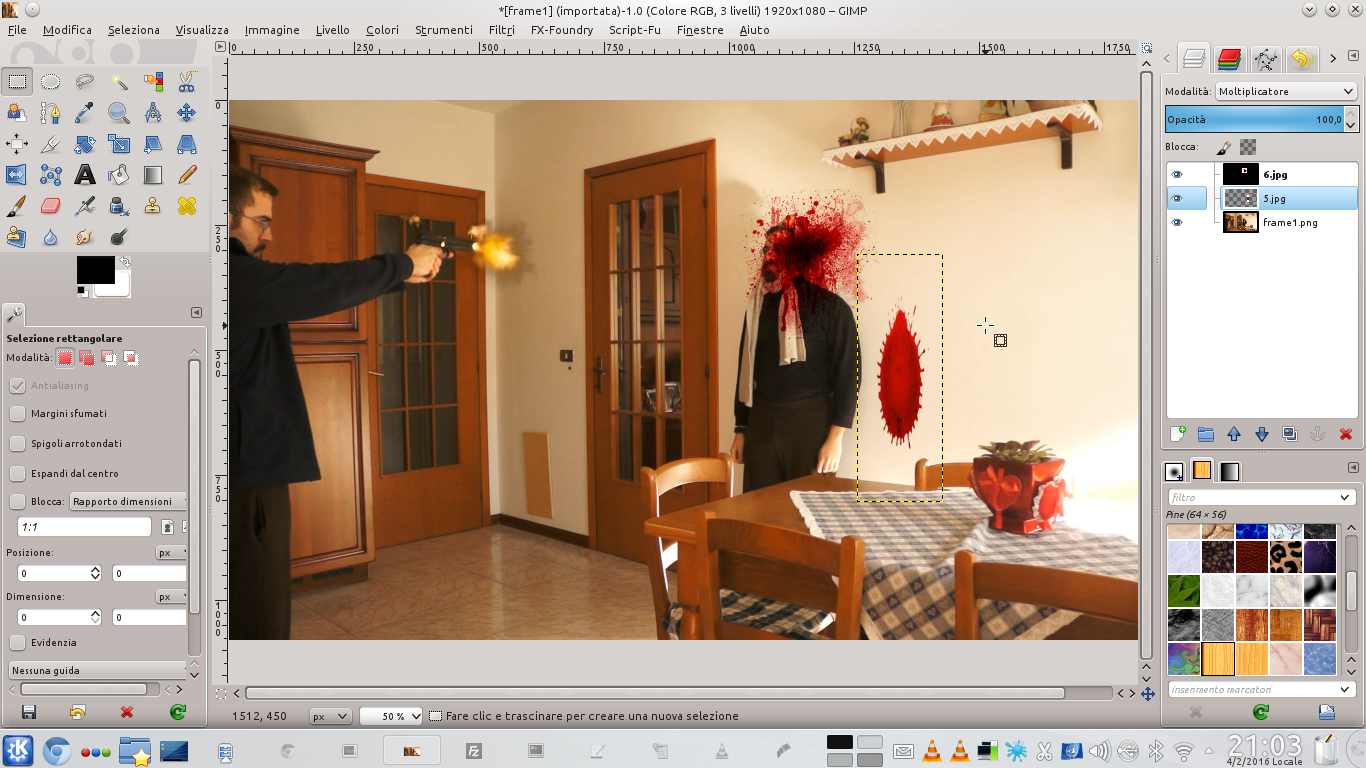 2 IN THE RIGHT POINT – Using the tool Move we place the spots in the place they should have (the wall behind the actor). We can also modify the spots using the tools Ladder is Perspective , so that they really look like part of the wall.
  3 NOT IN THE SPOTLIGHT – If the spots cover objects in the foreground, we can delete those portions with the Rubber . Now let’s hide the layer of the frame, inserting above it (but below the spots) a new level white color.
 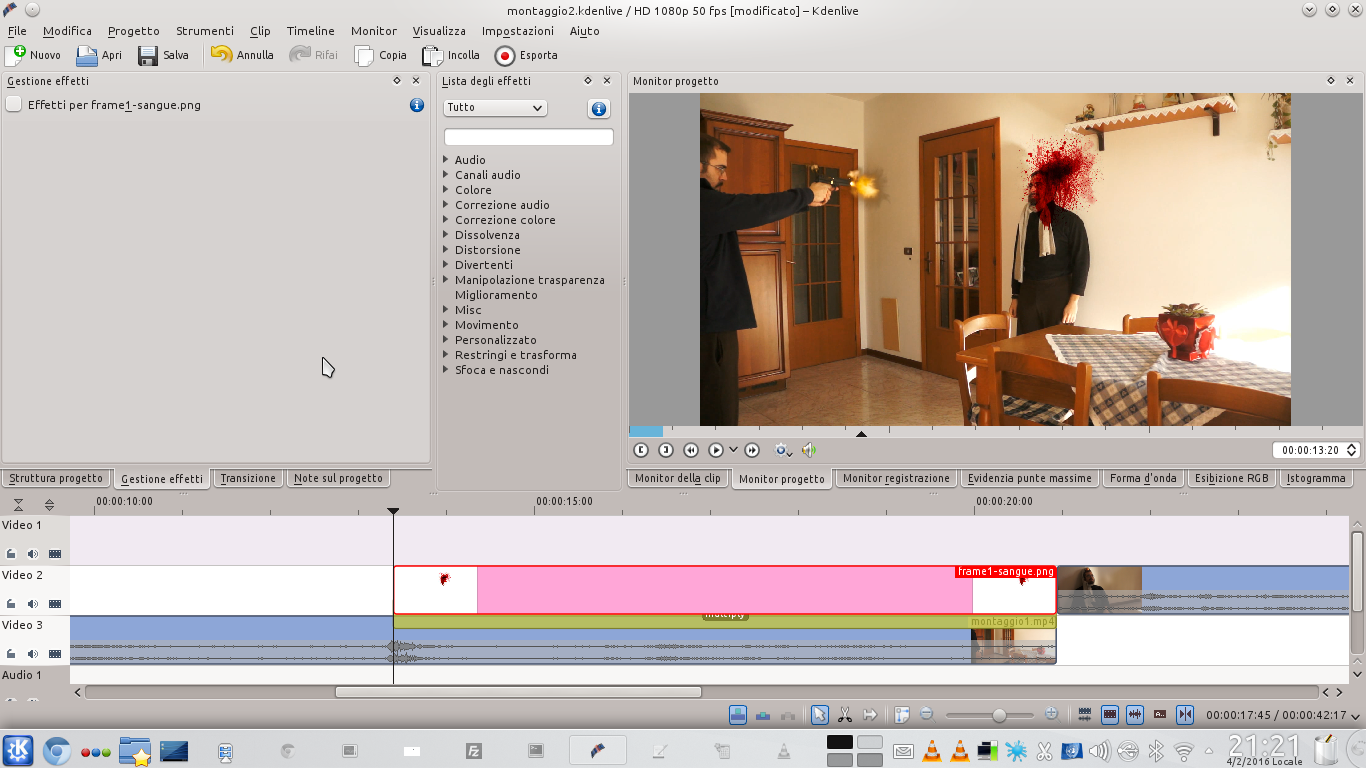 4 INSIDE KDENLIVE– We export the created image of GIMP. Let’s go back to Kdenlive, inserting the newly created image into the project, positioning it in the video track ( 2 ) immediately above that of the actor’s movie ( 3 ), with a transition multiply .
 The superimposed actor
We use rotoscoping to allow the actor to pass in front of the spots
 1 THE SAME CLIP – Now we have to put in the highest video track ( Video1 ) the same movie that we inserted in Movie3 , or that of the actor who is hit. It is necessary for the clips to Video1 is Movie3 are perfectly synchronized.
  2 THE ROTOSCOPING – The trace of Video1 must have a composite transition, relative to the track Movie3 . We must also insert in the clip Video1 the effect rotoscoping , drawing the outline of the actor when the blood appears.
 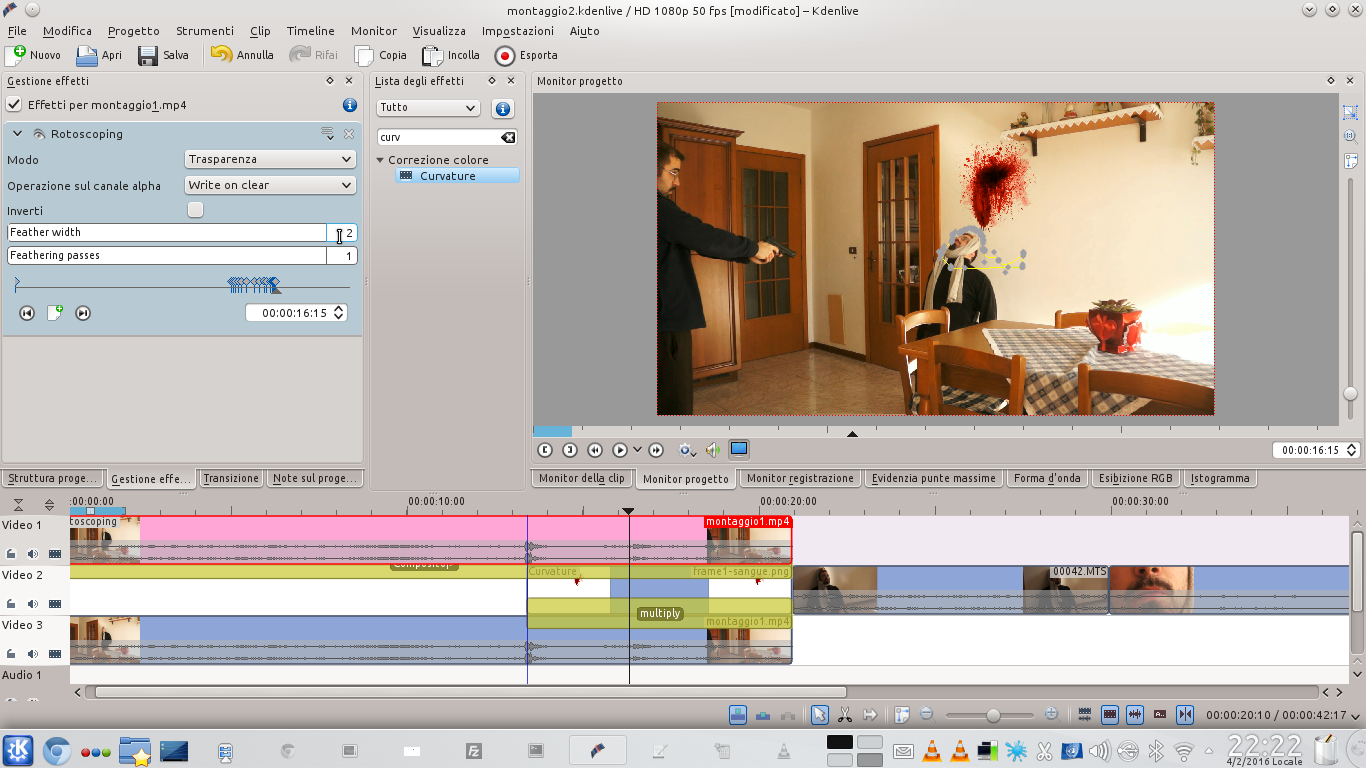 3 THE KEY FRAME – We continue to work on the Rotoscoping effect, moving forward a couple of frames at a time to correct the shape of the effect so that it can follow the figure of the actor, making the bloodstains appear behind the body in a realistic way.
  4 THE RED LIGHT – To conclude, we can insert an effect in the clip of the spots (in the track Video2) Bends . The effect should only affect the channel Red , since blood has this color. We can then draw a curve that adapts to the brightness of the scene.
 A moving spot
It is also possible to simulate the movement of a blood spot
 1 MULTIPLIER – If we want a moving blood spot, we still have to start with the same method: we extract the first frame of the scene and open it in GIMP, inserting in overlap Multiplier the blood stain.
 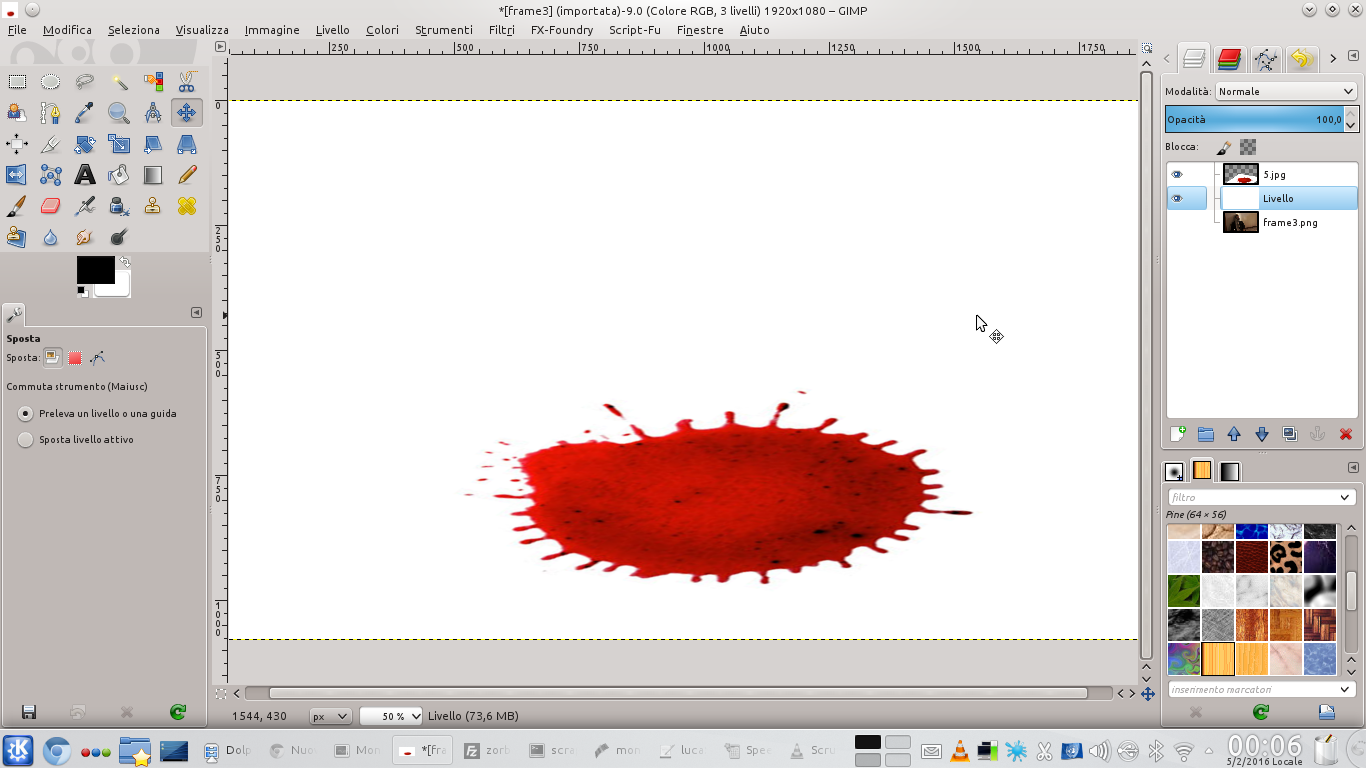 2 IN PERSPECTIVE – We must deform the layer containing the stain so that it appears in the correct position: for example, it will be necessary to use the tool Perspective . Then we can move the spot to the center of the image and replace the background with the white color.
  3 A WHITE CLIP – We export the image to a file and upload it to Kdenlive, positioning in the track Movie3 the clip with the actor, in the Video1 the image of the blood stain, and in the Video2 a white clip ( Project / Add color clip ).
  4 THE TRANSITIONS – The white clip must have a type transition Multiply , while the clip with the blood stain a type Composite . Thanks to the composite transition we can move the stain as we prefer: we just need to set one frame at the beginning and one at the end.
  5 NEW TRACK – Add a further track above Video1 (right click on the Video1 track), and insert the clip with the actor again. This clip must have a type transition Composite referred to the last available video track.
 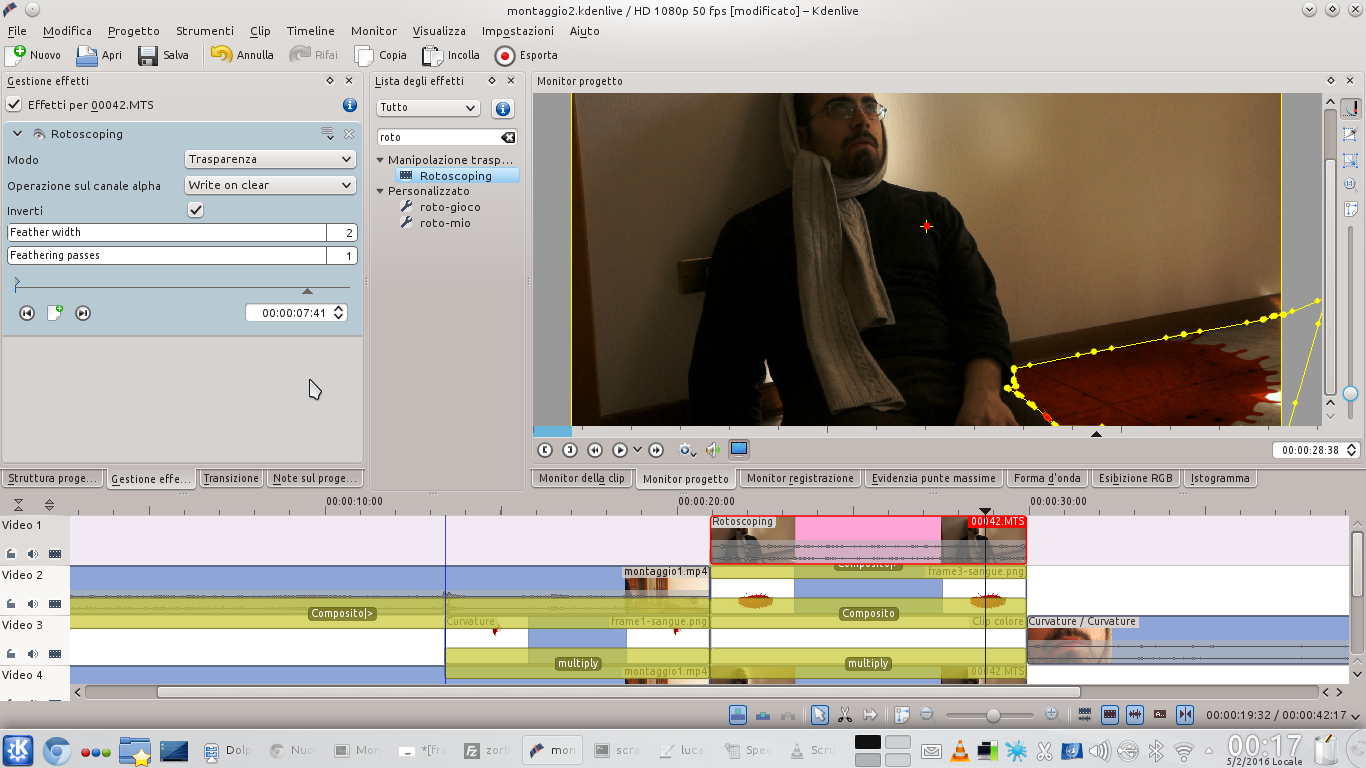 6 THE ROTOSCOPING– Finally, we add the effect to the clip of the track just inserted above the others rotoscoping , with the tick on the Invert box and drawing the outline of the area where the stain must appear, thus preventing it from appearing even on objects in the foreground.

